element14 Community
element14 Community
    Register Log In
  • Site
  • Search
  • Log In Register
  • Members
    Members
    • Achievement Levels
    • Benefits of Membership
    • Feedback and Support
    • Members Area
    • Personal Blogs
    • What's New on element14
  • Learn
    Learn
    • eBooks
    • Learning Center
    • Learning Groups
    • STEM Academy
    • Webinars, Training and Events
  • Technologies
    Technologies
    • 3D Printing
    • Experts & Guidance
    • FPGA
    • Industrial Automation
    • Internet of Things
    • Power & Energy
    • Sensors
    • Technology Groups
  • Challenges & Projects
    Challenges & Projects
    • Arduino Projects
    • Design Challenges
    • element14 presents
    • Project14
    • Project Groups
    • Raspberry Pi Projects
  • Products
    Products
    • Arduino
    • Avnet Boards Community
    • Dev Tools
    • Manufacturers
    • Product Groups
    • Raspberry Pi
    • RoadTests & Reviews
  • Store
    Store
    • Visit Your Store
    • Or choose another store...
      • Europe
      •  Austria (German)
      •  Belgium (Dutch, French)
      •  Bulgaria (Bulgarian)
      •  Czech Republic (Czech)
      •  Denmark (Danish)
      •  Estonia (Estonian)
      •  Finland (Finnish)
      •  France (French)
      •  Germany (German)
      •  Hungary (Hungarian)
      •  Ireland
      •  Israel
      •  Italy (Italian)
      •  Latvia (Latvian)
      •  
      •  Lithuania (Lithuanian)
      •  Netherlands (Dutch)
      •  Norway (Norwegian)
      •  Poland (Polish)
      •  Portugal (Portuguese)
      •  Romania (Romanian)
      •  Russia (Russian)
      •  Slovakia (Slovak)
      •  Slovenia (Slovenian)
      •  Spain (Spanish)
      •  Sweden (Swedish)
      •  Switzerland(German, French)
      •  Turkey (Turkish)
      •  United Kingdom
      • Asia Pacific
      •  Australia
      •  China
      •  Hong Kong
      •  India
      •  Korea (Korean)
      •  Malaysia
      •  New Zealand
      •  Philippines
      •  Singapore
      •  Taiwan
      •  Thailand (Thai)
      • Americas
      •  Brazil (Portuguese)
      •  Canada
      •  Mexico (Spanish)
      •  United States
      Can't find the country/region you're looking for? Visit our export site or find a local distributor.
  • Translate
  • Profile
Sub -1 GHz Band
  • Challenges & Projects
  • Project14
  • Sub -1 GHz Band
  • More
  • Cancel
Sub -1 GHz Band
Blog Sub-1GHz Band Challenge - STM32WL Nucleo board unboxing and kickstarting development
  • Blog
  • Forum
  • Documents
  • Files
  • Leaderboard
  • Mentions
  • Sub-Groups
  • Tags
  • More
  • Cancel
  • New
Sub -1 GHz Band requires membership for participation - click to join
Blog Post Actions
  • Subscribe by email
  • More
  • Cancel
  • Share
  • Subscribe by email
  • More
  • Cancel
Group Actions
  • Group RSS
  • More
  • Cancel
Engagement
  • Author Author: balajivan1995
  • Date Created: 13 Aug 2023 5:20 PM Date Created
  • Views 769 views
  • Likes 11 likes
  • Comments 3 comments
  • lorawan
  • NUCLEO-WL55JC1
  • Sub-1 GHz Band
  • sub1ghzbandch
  • lora
  • stmicroelectronics
  • st
Related
Recommended

Sub-1GHz Band Challenge - STM32WL Nucleo board unboxing and kickstarting development

balajivan1995
balajivan1995
13 Aug 2023

Introduction

Thanks to tariq.ahmad, I got two NUCLEO-WL55JC1 Nucleo boards delivered to me this week. In this intro blog post, we will see the specification of the board and how to run a simple “Hello world” program using MBED cloud.

Hardware Specifications

The following details are taken directly from ST and MBED OS official product webpage. I have included the ones that are important.

  1. Dual core 32bit ARM cortex controllers
    1. M4 is the one we use for peripheral programming and stuffs (Ex: LEDs on the Nucleo board)
    2. M0+ is the radio controller
  2. 256-Kbyte Flash memory and 64-Kbyte SRAM
  3. RF transceiver (150 MHz to 960 MHz frequency range) supporting LoRa, (G)FSK, (G)MSK, and BPSK modulations3 user LEDs
  4. 3 user buttons and 1 reset push-button
  5. SMA antenna.
  6. Mass storage, VCOM port and a debug port.
  7. Most importantly it supports LoRaWAN, Sigfox, wM-Bus, and many other proprietary protocols. Supporting libraries are already available with STM32Cubeide.
  8. Like the regular Nucleo/Disco boards this STM32 boards also includes a convenient inbuilt STLINK-V3 debugger.

   Note:

  1. On connecting to programmer, it asks you to upgrade the debugger firmware.
  2. When you connect the Nucleo port to your system, it will open up a storage drive. The storage has a single file on clicking it will redirect you to MBED official page for this particular model.
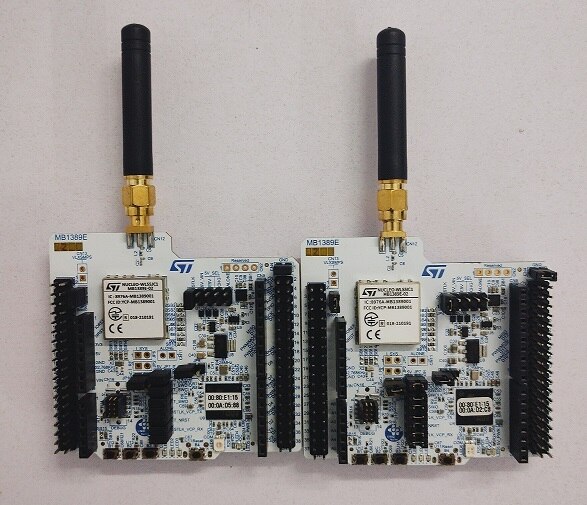
Unboxing

The board comes with a near Arduino UNO farm factor (excluding the Antenna of course). As usual, all the Nucleo Boards that supports Morpho headers allows users to make use of most of the controller’s I/O pins.

On plugging in, we will be greeting with a LED dancing sequence preprogrammed in the controller.

image

Programming the controller

For creating application, I selected MBED cloud studio as I wanted to test the basic working without installing the toolchains and all.

  1. Log into your ARM developer account and select Keil cloud studio. You will be greeted with a VS code like interface.image
  2. Select “New Project” from the left side pane. Select the default blinky example and give it a proper name. I have entered “hello_world” as mine. Click Add project.image
  3. Now the interface will be created with a blinky template without a hardware model specified. From the left side pane, select “Nucleo-WL55JC” as build target. image
  4. You will see the cloud IDE populated with LED blink template with our board as target. The example will turn On/Off the blue LED in the board at an interval of 500ms.image
  5. Now let's add serial port to see the LED GPIO’s current state. Enable the UART port connected to USB interface. Set the baud rate as 115200. Add the print statement.image
  6. One sweet advantage of using MBED cloud studio is you can directly flash the firmware on your board from your browser or you can download the compiled binary file. Click the build icon to compile the code, “Run” icon to compile and flash the binary, “Bug” icon to debug your application and “console” icon to enable serial monitor.image
  7. Plug in your board and add the device. Browser will list the debugger, select and click “connect”. You will see your device connected and available for direct flashing.image
  8. Click the run button on browser, you will be presented with two cortex processor, select “CM4” to run our application.image
  9. If controller does not automatically reset into boot mode, press reset button when “Asset hardware reset” line is printed on screen.image
  10. On successful flashing, you will see the blue LED flashing at 500ms, enable serial monitor and select baud rate as 115200.image
  11. On serial monitor console, we will the current status of LED printed at 500ms interval.image
  12. The first controller is loaded with test code and the second one is running with preprogrammed code.
    You don't have permission to edit metadata of this video.
    Edit media
    x
    image
    Upload Preview
    image

Debugging the controller

MBED cloud also allows us to debug our application directly from browser itself. For convenience I have moved the LED logic into a separate function and added that function to breakpoint.

image

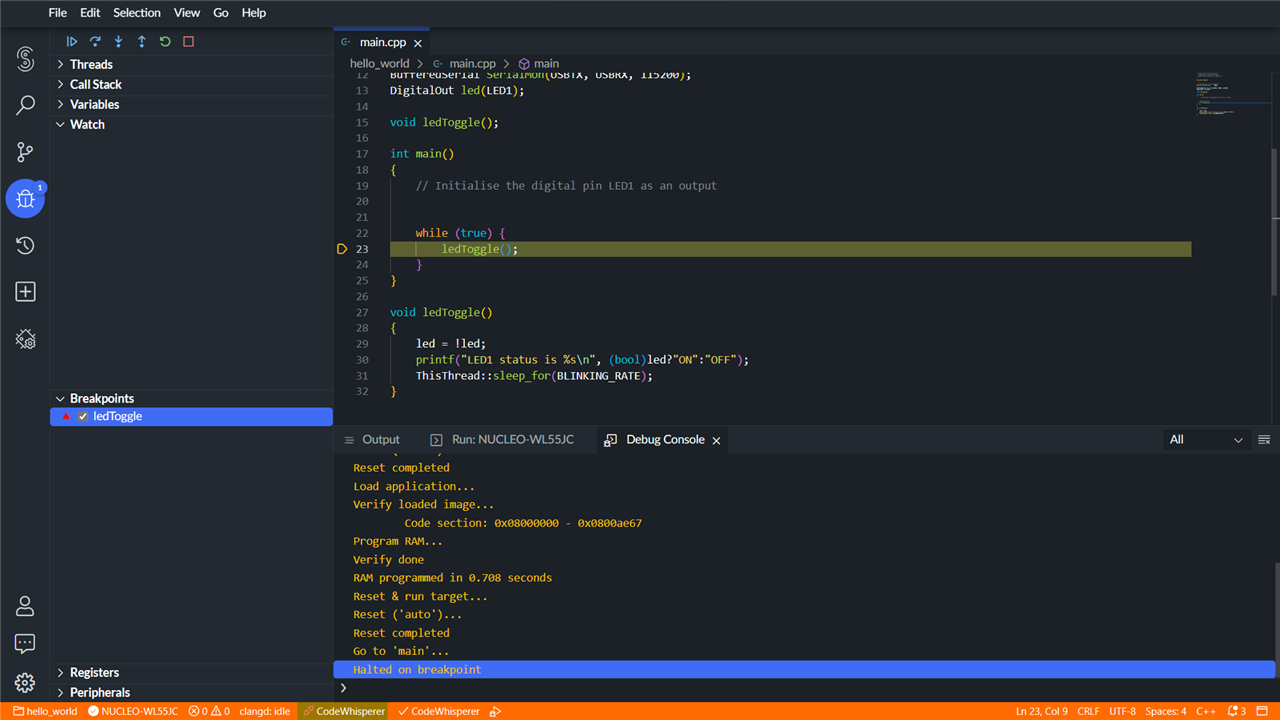
On entering the function, we can see the state the registers and etc.

image

Conclusion

Overall, I have tested the working of controller and the STLink over web with a basic LED example. In upcoming blog posts, we will see how to use this module to transmit messages wirelessly and build some applications.

  • Sign in to reply
  • Soura_123
    Soura_123 3 months ago

    Great...

    • Cancel
    • Vote Up 0 Vote Down
    • Sign in to reply
    • More
    • Cancel
  • DAB
    DAB 3 months ago

    Looks like you are up and running.

    I look forward to your blogs.

    • Cancel
    • Vote Up 0 Vote Down
    • Sign in to reply
    • More
    • Cancel
  • genebren
    genebren 3 months ago

    Great start! Congratulations on getting the cool boards to use in your project.

    • Cancel
    • Vote Up 0 Vote Down
    • Sign in to reply
    • More
    • Cancel
element14 Community

element14 is the first online community specifically for engineers. Connect with your peers and get expert answers to your questions.

  • Members
  • Learn
  • Technologies
  • Challenges & Projects
  • Products
  • Store
  • About Us
  • Feedback & Support
  • FAQs
  • Terms of Use
  • Privacy Policy
  • Legal and Copyright Notices
  • Sitemap
  • Cookies

An Avnet Company © 2023 Premier Farnell Limited. All Rights Reserved.

Premier Farnell Ltd, registered in England and Wales (no 00876412), registered office: Farnell House, Forge Lane, Leeds LS12 2NE.

ICP 备案号 10220084.

Follow element14

  • X
  • Facebook
  • linkedin
  • YouTube