element14 Community
element14 Community
    Register Log In
  • Site
  • Search
  • Log In Register
  • About Us
  • Community Hub
    Community Hub
    • What's New on element14
    • Feedback and Support
    • Benefits of Membership
    • Personal Blogs
    • Members Area
    • Achievement Levels
  • Learn
    Learn
    • Ask an Expert
    • eBooks
    • element14 presents
    • Learning Center
    • Tech Spotlight
    • STEM Academy
    • Webinars, Training and Events
    • Learning Groups
  • Technologies
    Technologies
    • 3D Printing
    • FPGA
    • Industrial Automation
    • Internet of Things
    • Power & Energy
    • Sensors
    • Technology Groups
  • Challenges & Projects
    Challenges & Projects
    • Design Challenges
    • element14 presents Projects
    • Project14
    • Arduino Projects
    • Raspberry Pi Projects
    • Project Groups
  • Products
    Products
    • Arduino
    • Avnet Boards Community
    • Dev Tools
    • Manufacturers
    • Multicomp Pro
    • Product Groups
    • Raspberry Pi
    • RoadTests & Reviews
  • Store
    Store
    • Visit Your Store
    • Choose another store...
      • Europe
      •  Austria (German)
      •  Belgium (Dutch, French)
      •  Bulgaria (Bulgarian)
      •  Czech Republic (Czech)
      •  Denmark (Danish)
      •  Estonia (Estonian)
      •  Finland (Finnish)
      •  France (French)
      •  Germany (German)
      •  Hungary (Hungarian)
      •  Ireland
      •  Israel
      •  Italy (Italian)
      •  Latvia (Latvian)
      •  
      •  Lithuania (Lithuanian)
      •  Netherlands (Dutch)
      •  Norway (Norwegian)
      •  Poland (Polish)
      •  Portugal (Portuguese)
      •  Romania (Romanian)
      •  Russia (Russian)
      •  Slovakia (Slovak)
      •  Slovenia (Slovenian)
      •  Spain (Spanish)
      •  Sweden (Swedish)
      •  Switzerland(German, French)
      •  Turkey (Turkish)
      •  United Kingdom
      • Asia Pacific
      •  Australia
      •  China
      •  Hong Kong
      •  India
      •  Korea (Korean)
      •  Malaysia
      •  New Zealand
      •  Philippines
      •  Singapore
      •  Taiwan
      •  Thailand (Thai)
      • Americas
      •  Brazil (Portuguese)
      •  Canada
      •  Mexico (Spanish)
      •  United States
      Can't find the country/region you're looking for? Visit our export site or find a local distributor.
  • Translate
  • Profile
  • Settings
Test Instrumentation
  • Challenges & Projects
  • Project14
  • Test Instrumentation
  • More
  • Cancel
Test Instrumentation
Blog TinyDVM#3 : Colour and Final Case
  • Blog
  • Forum
  • Documents
  • Events
  • Polls
  • Files
  • Members
  • Mentions
  • Sub-Groups
  • Tags
  • More
  • Cancel
  • New
Join Test Instrumentation to participate - click to join for free!
  • Share
  • More
  • Cancel
Group Actions
  • Group RSS
  • More
  • Cancel
Engagement
  • Author Author: dubbie
  • Date Created: 2 Nov 2018 12:25 PM Date Created
  • Views 1205 views
  • Likes 6 likes
  • Comments 2 comments
  • p14 mkr 1010
  • tinydvm
  • diytestinstruch
Related
Recommended

TinyDVM#3 : Colour and Final Case

dubbie
dubbie
2 Nov 2018
image

Test Instrumentation

Enter Your Electronics & Design Project for a chance to win a Grand Prize for Originality, a Tool Set, and a $100 Shopping Cart!

Back to The Project14 homepage image

Project14 Home
Monthly Themes
Monthly Theme Poll


Just for fun I thought I would consider various colours to spray the 3D printed case for the TinyDVM. The 3D printed colour of white is OK but I thought it might look better with some alternative colour. So I tried yellow and black sprayed onto the first version of the case. I decided the black would be better. (My apologises for the video which is a bit blurred towards the end. This is something to do with the camera, I dropped it once and now sometimes it gets blurry. Maybe a new camera is needed.)


You don't have permission to edit metadata of this video.
Edit media
x
image
Upload Preview
image


I could not get the 3D printed case completely smooth and the flat black paint didn't look as good as the trial, probably because there was no yellow undercoat. Still it looks OK. I left the bezel white for a better contrast with the display and then fitted everything inside, drilled a small hole in the end for the connecting wires, stuffed it all into the case and added the bottom. I also programmed in a simple program that just measures the voltage and displays it on the OLED display.


I'm still using the example OLED clock programme provided in the documentation for the OLED and just inserted a while loop near the beginning before it gets into any of the clock display statements. I might even leave the clock display part in and make it a combined DVM and clock (maybe not!). The while loop is listed below:


while (1)
  {
    oled.setCursor(0, 0); // points cursor to x=0 y=0
    oled.print("TinyDVM"); // Print a const string

    value = analogRead(0);
    oled.print(" "); // Print a const string
    TinyV = (3.30 * value)/1023;

    oled.print(TinyV,3);  // Print a float
    oled.print("V"); // Print a const string
    oled.display(); // Draw to the screen
    delay(300);
  } /* while */


It is all working nicely now and displaying voltages. I am currently using 3 decimal places for the display, just to see how well it works. With a 10 bit ADC this provides a resolution of (1/1023) * 3.30V = 0.00322V, so by displaying 3 decimal places the display changes in steps of approximately 0.003V. It might be better to just use two decimal places. The voltmeter used for comparison (DT-830B Digital Multimeter) is a cheap one and only uses two decimal places on the 0-20V range needed for measuring voltages in the range 0.00-3.30V. Also, the TinyDVM display fluctuates fairly rapidly on the third decimal place and hence sometimes on the second decimal place as well. This is most likely due to some sort of noise being collected by the wiring inside the case or the leads used for making connections. The multimeter probably uses a double integration filtering method running at 50 Hz to reduce this type of noise, which is why digital voltages change at such a relatively slow rate. I do not think I will get into that much filtering but I might try averaging over two or three readings which should help considerably. This variation also affected the refresh rate. When running at maximum speed the final digit or two even are just a blur, so I inserted a delay of 300 ms just to slow everything down. Once I start filtering I might reduce this delay.


The next step was to calibrate the TinyDVM which I did with the DT-830D multimeter. This multimeter is good enough for everything that I get involved with so is suitably accurate to calibrate the TinyDVM. Below is an Excel graph of DT-830B voltages measured against TinyDVM voltages. The controlled variable, which is the voltage measured by the DT-830B goes along the X-axis and the measured variable along the Y-axis.


image


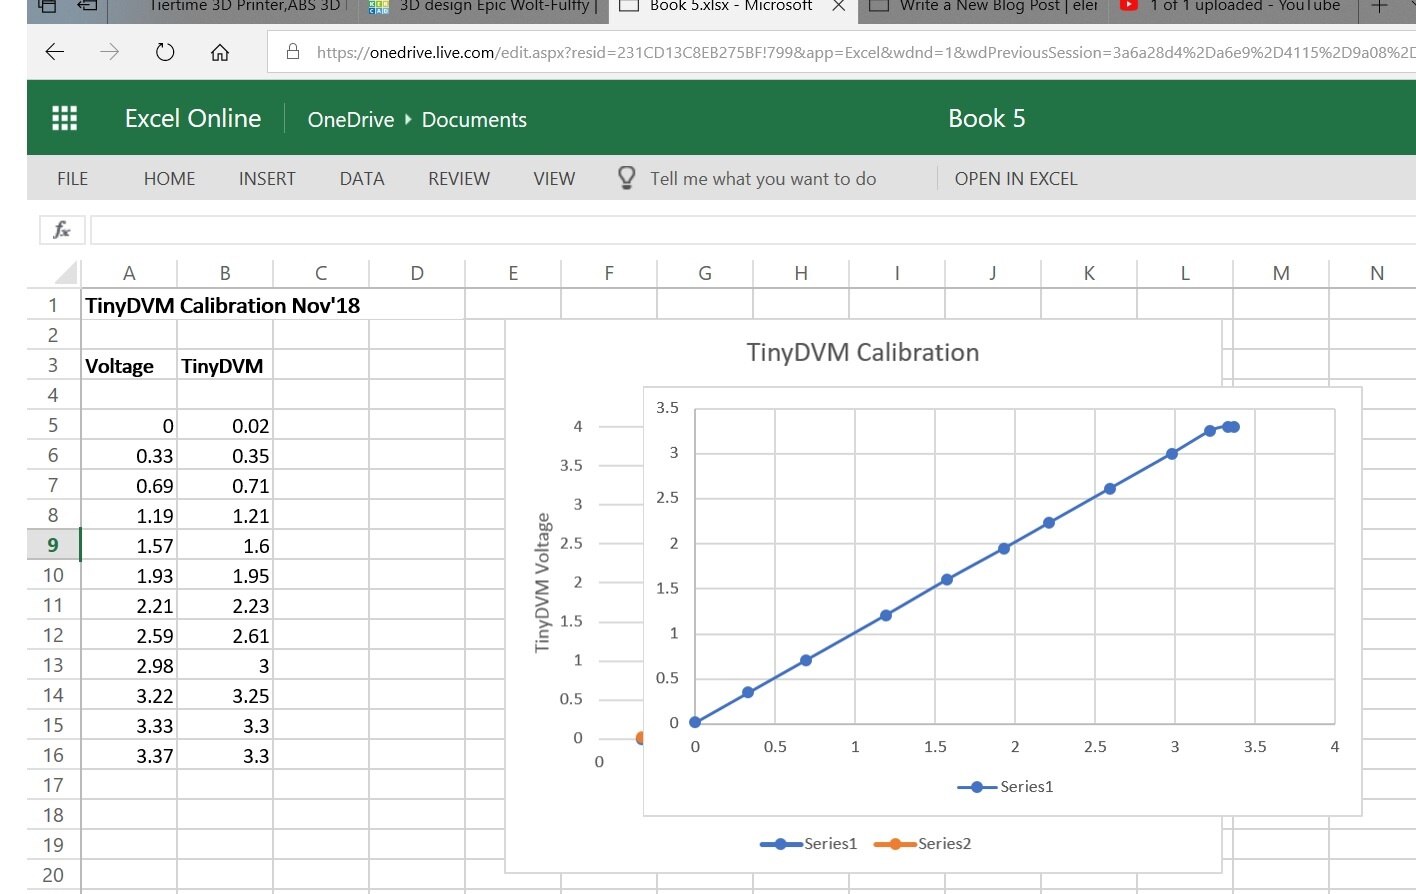
As this shows it is completely linear apart from at the maximum voltage. This is because the largest value the Arduino ADC can provide is 3.30V no matter what the input voltage. Also, although it cannot be seen on the graph there is a small positive offset of 0.02V. I'm not entirely sure what this is, possibly some small voltage offset in the wiring somewhere, or maybe just something to do with the Arduino ADC. However, it appears to be consistent and I could easily subtract this from the readings before displaying them.


The next step will be to improve the display. It is a graphical display so it might be fun to try and make use of the capability. Also, although I hadn't intended to, I could possibly make use of the WiFi capability of the Arduino MKR 1010 WiFi. I have not tried this out yet so I'll have to see how difficult this will be in the time remaining.

  • Sign in to reply

Top Comments

  • dubbie
    dubbie over 6 years ago in reply to genebren +1
    Gene, Thanks for the support. Sorry I'm a bit delayed in replying as I'm still working out how all this blogging and commenting works. It's funny how a project works out. Some bits work better than you…
  • dubbie
    dubbie over 6 years ago in reply to genebren

    Gene,


    Thanks for the support. Sorry I'm a bit delayed in replying as I'm still working out how all this blogging and commenting works.


    It's funny how a project works out. Some bits work better than you think and other bits you think must be good turn out not so good. The black paint looked good in the trial but not so good on the actual case, not quite as smooth.


    Dubbie

    • Cancel
    • Vote Up +1 Vote Down
    • Sign in to reply
    • More
    • Cancel
  • genebren
    genebren over 6 years ago

    Working and looking quite nice.

    Gene

    • Cancel
    • Vote Up 0 Vote Down
    • Sign in to reply
    • More
    • Cancel
element14 Community

element14 is the first online community specifically for engineers. Connect with your peers and get expert answers to your questions.

  • Members
  • Learn
  • Technologies
  • Challenges & Projects
  • Products
  • Store
  • About Us
  • Feedback & Support
  • FAQs
  • Terms of Use
  • Privacy Policy
  • Legal and Copyright Notices
  • Sitemap
  • Cookies

An Avnet Company © 2025 Premier Farnell Limited. All Rights Reserved.

Premier Farnell Ltd, registered in England and Wales (no 00876412), registered office: Farnell House, Forge Lane, Leeds LS12 2NE.

ICP 备案号 10220084.

Follow element14

  • X
  • Facebook
  • linkedin
  • YouTube