


So yeah - I'm a bit of a nutcase when it comes to SBC clusters.
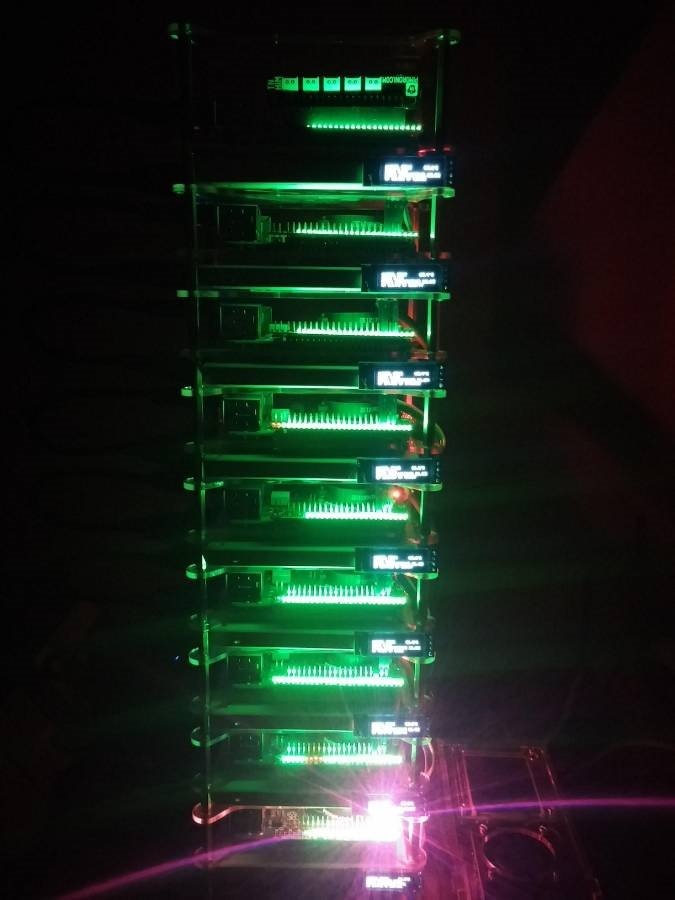
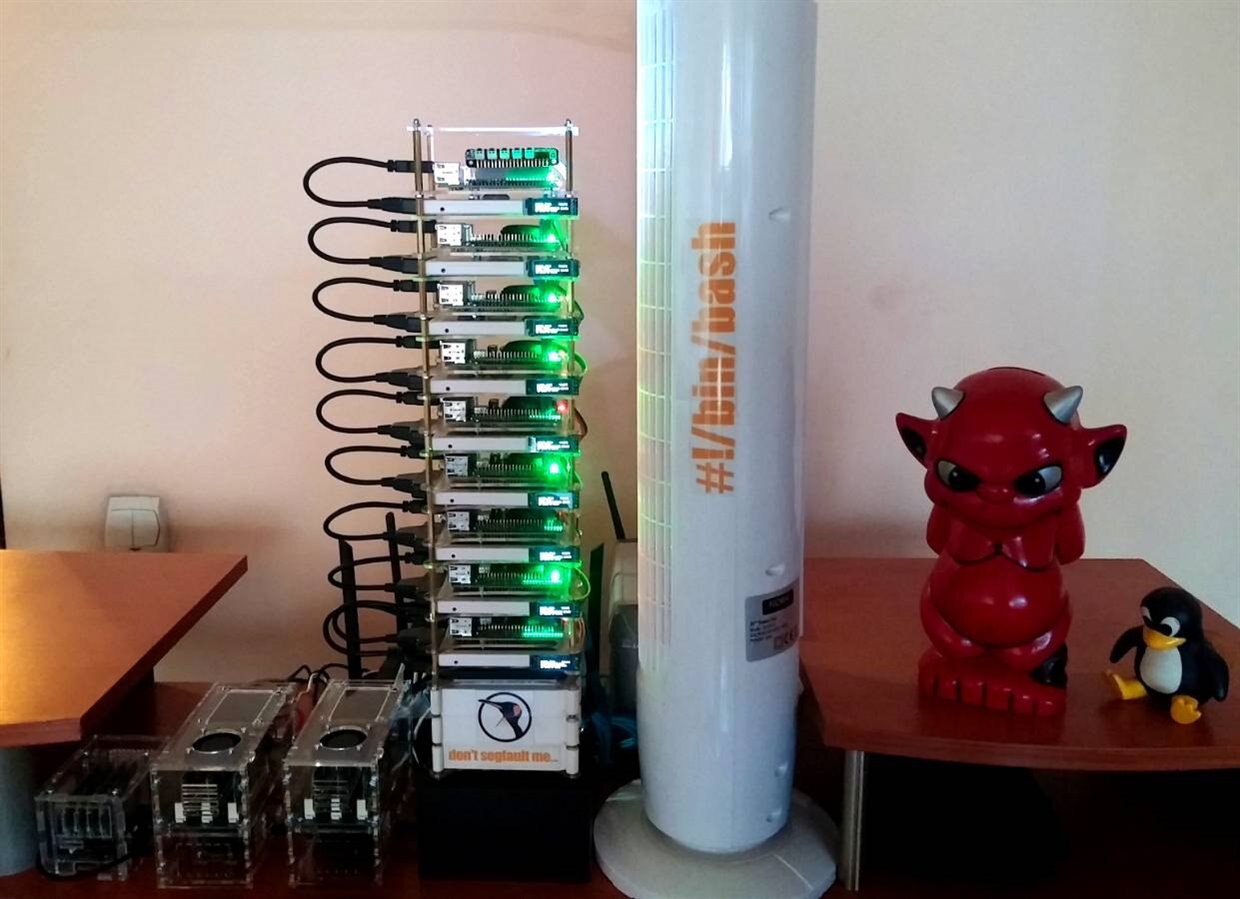
The Tower
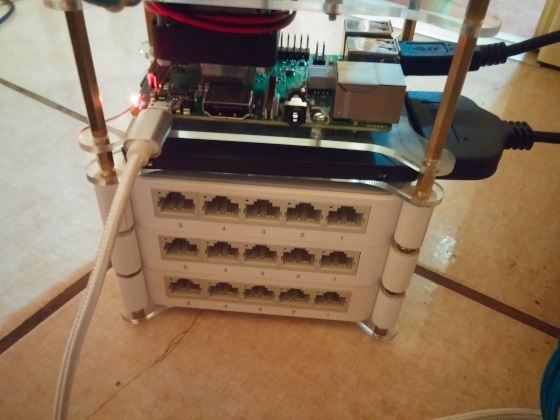
The first one I've build had 4 nodes and I've rapidly expanded it to 9 nodes: 1 Raspberry Pi 3 B+ master node (rpi0) and 8 Raspberry Pi 3 B+ slave nodes (rpi1-8). The SBCs reside in a cluster skeleton with three stacked TP-LINK switches at the base. Each switch is 10/100 and has five ports. Having plans to upgrade to gigabit switches as soon as I have the cash for it. For now I use wlan0 to keep the cluster mobile (tomorrow I have a presentation at Oradea University on clusters and AI scripts on the NVidia Jetson Nano in relation to Sociological research. I'm in my final year as a bachelor in Sociology and in my final year as a PhD in Sociology. I use the cluster to gater data using various social network APIs (Facebook, Twitter, LinkedIn, YouTube, VKontakte) regarding online protest initiation. That's the subject of my PhD thesis. I also help out teachers and colleagues with running resource-intensive R scripts (ANOVA, MANCOVA and the like) when they need me to.

Each cluster node had an 16GB MicroSD card but they were gathering bad sectors every two weeks so I've replaced them with 16GB SSDs. Ech Pi boots off off an SSD and at the base there's another SSD (500GB) for data storage, mounted as a NFS share.

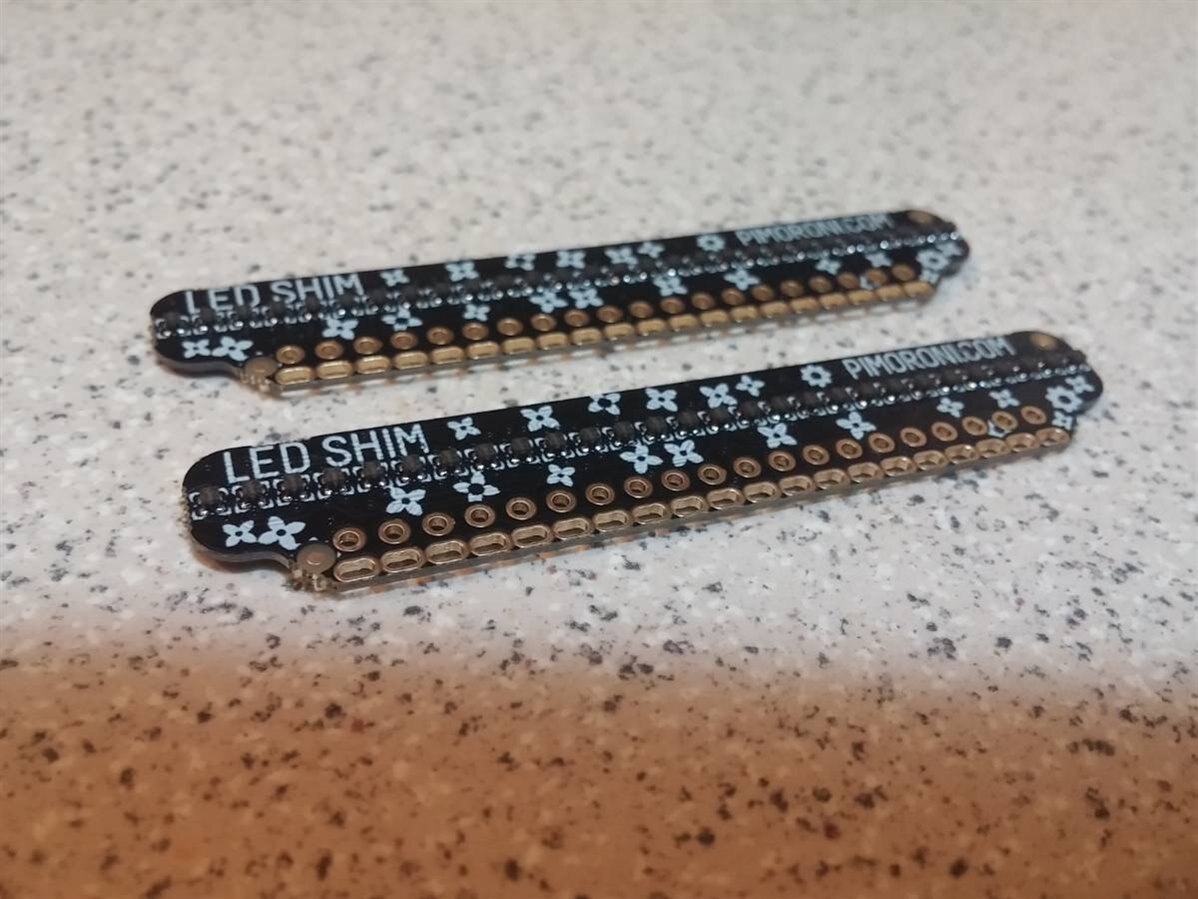
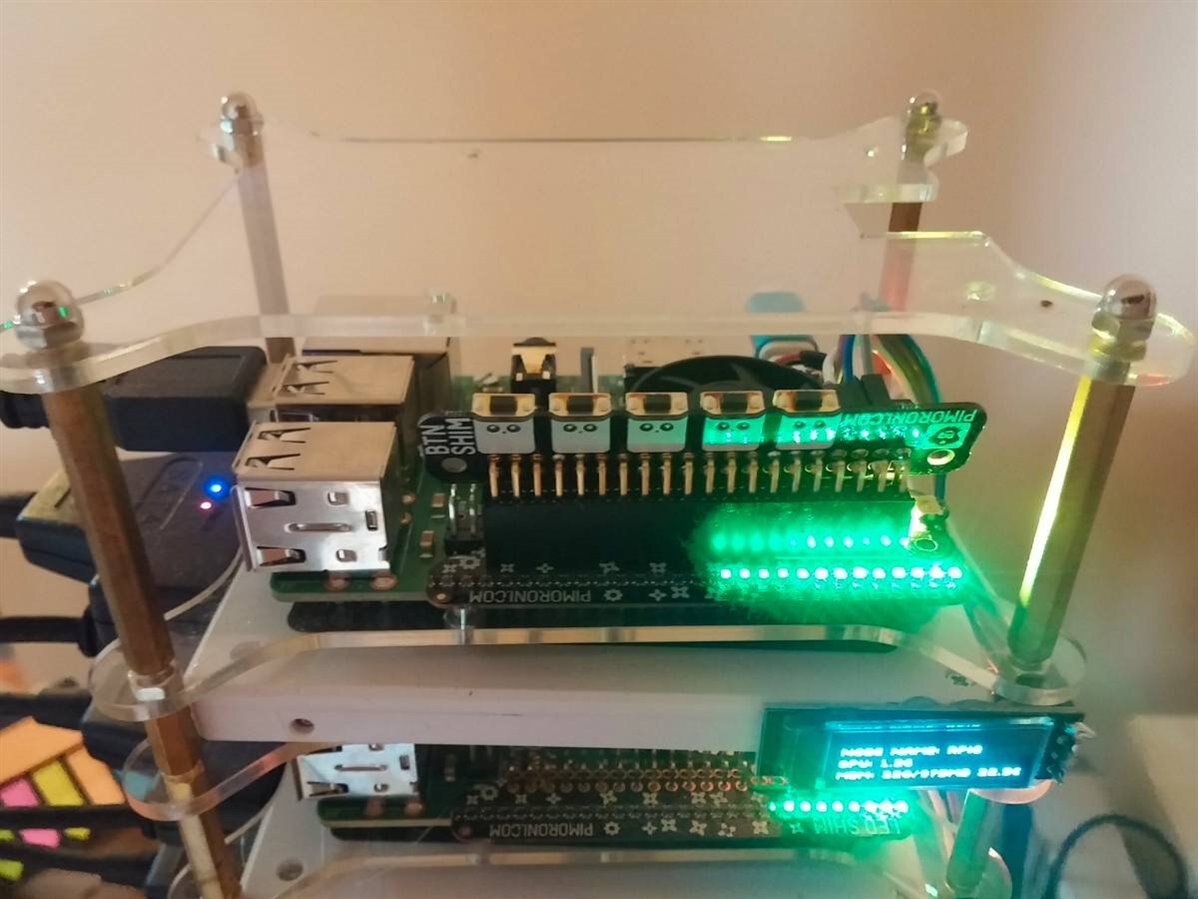
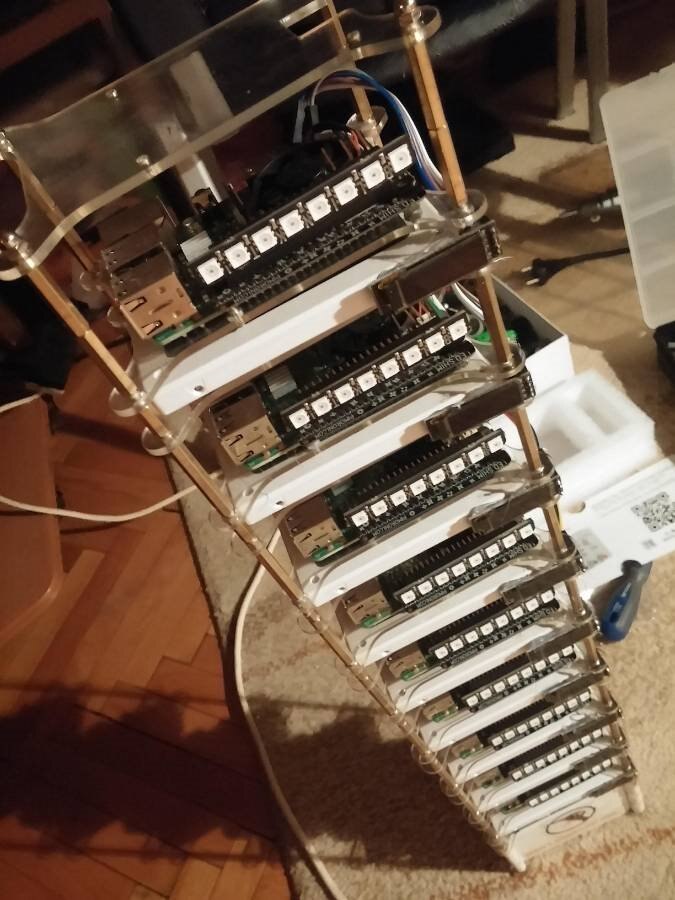
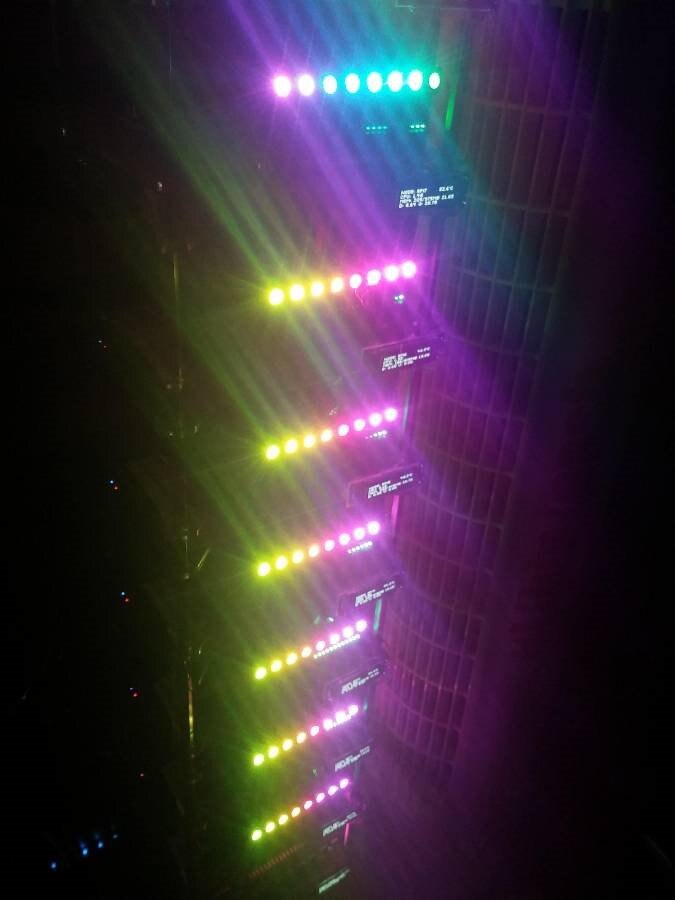
The flickering lights are Pimoroni LED SHIMS. They display CPU usage for now but I'm working on a Python script to make them display scheduler activity or Docker container status.
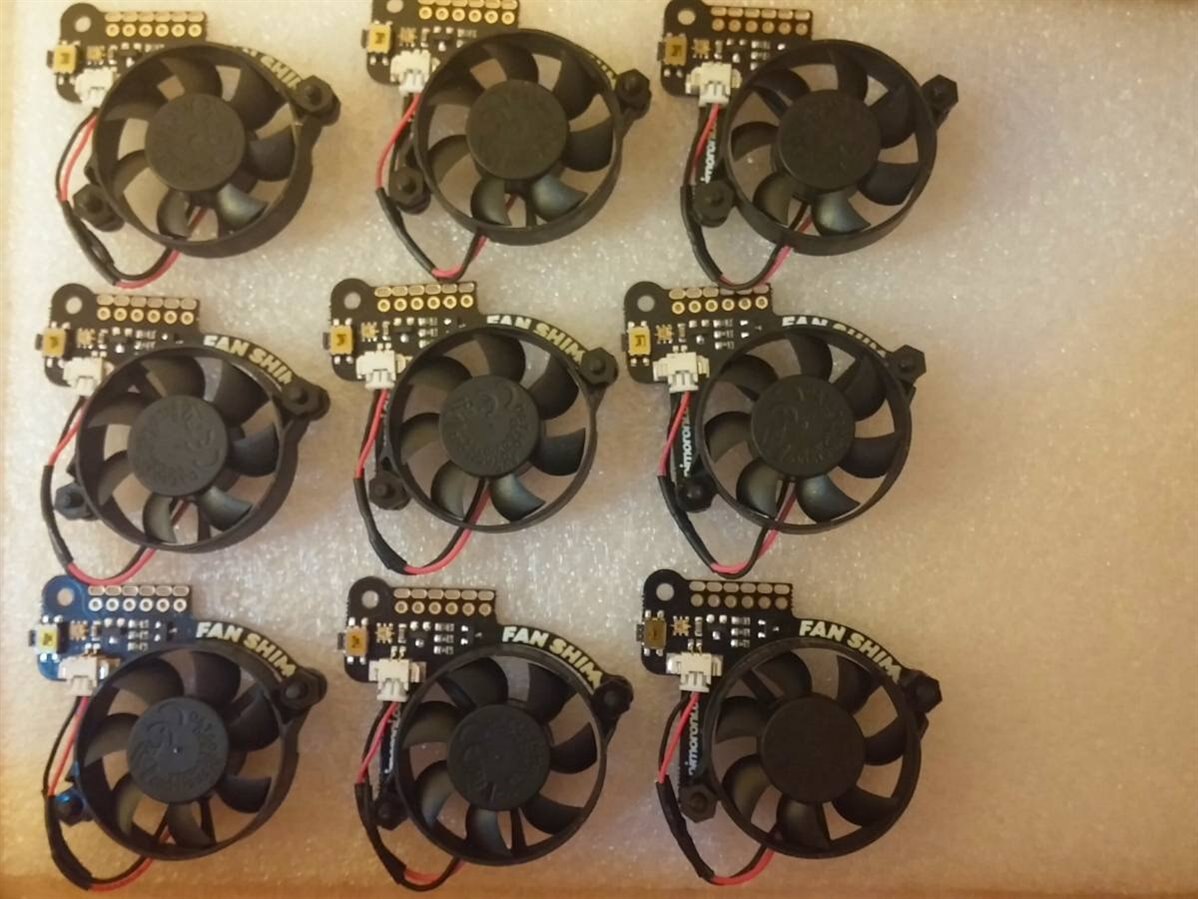
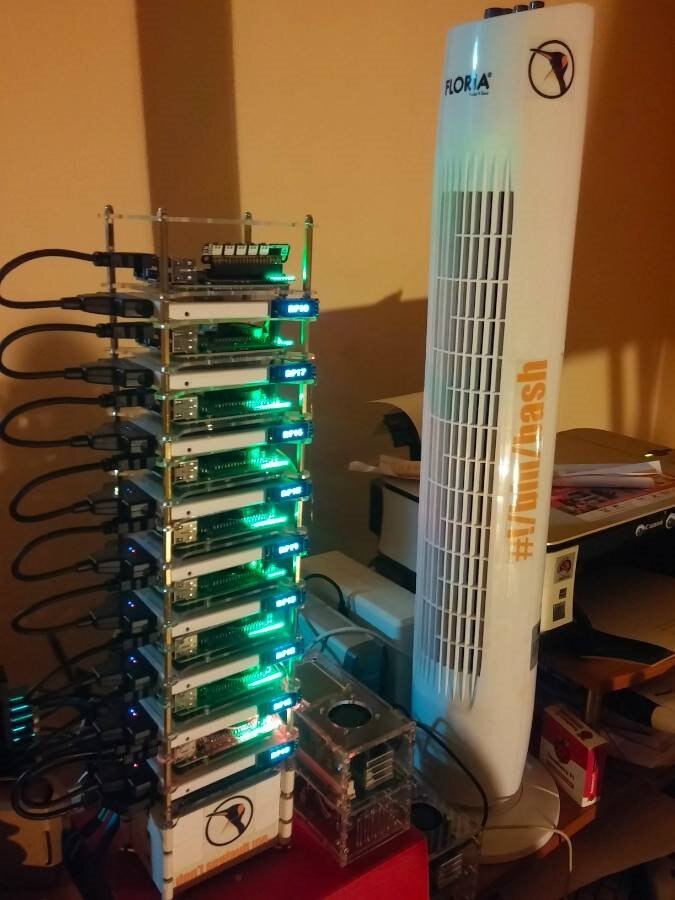
Each Pi has a Pimoroni FAN SHIM for cooling. At room temperature, with all the Python script running, the CPU temperature gets up to 63-64 degrees. That's why I've had an idea and bought a room cooling vertical fan for about $30. It's the perfect height and it has three speeds. On the fastest speed it cools all the CPUs 25 degrees in about a minute so by the time three minutes have passed each CPU has reached about 26-28 degrees Celsius. Which comes in very handy when doing resouce-intensive computations.
Each node also has an 128x32px monochrome OLED screen. It fits four rows of text and they display the hostname and CPU temperature for each node, memory usage, free aviable space on the SSD and download/upload status The bottom OLED displays the NFS share's free HDD space.
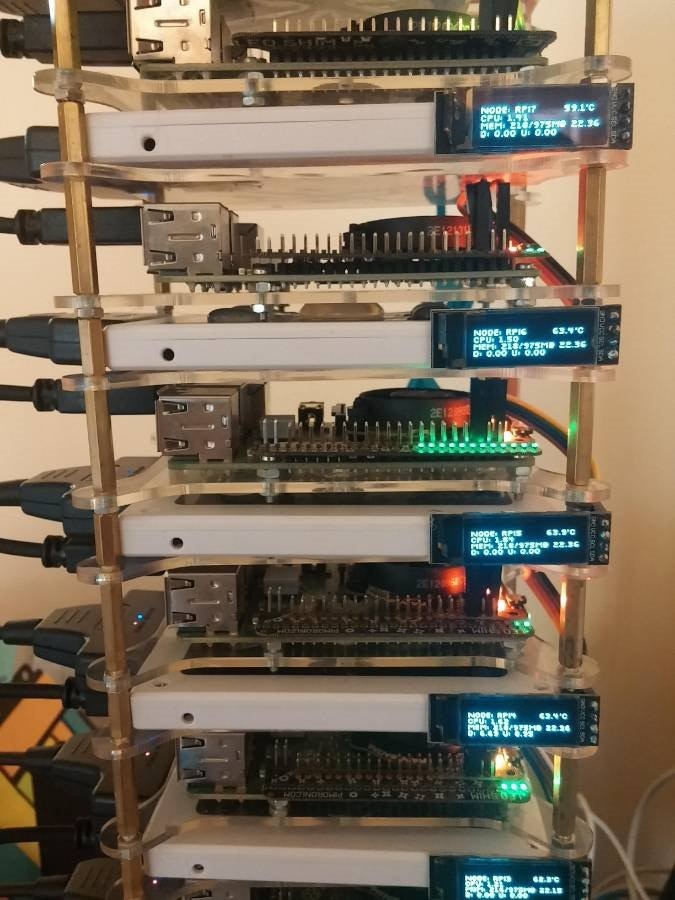


Each Raspberry Pi 3 Model B Plus Rev 1.3 has an 1.4GHz ARM CPU with 4 cores and 1GB of RAM, an HDMI port, four USB ports and an Ethernet port (plus WiFi b/g/n and Bluetooth).
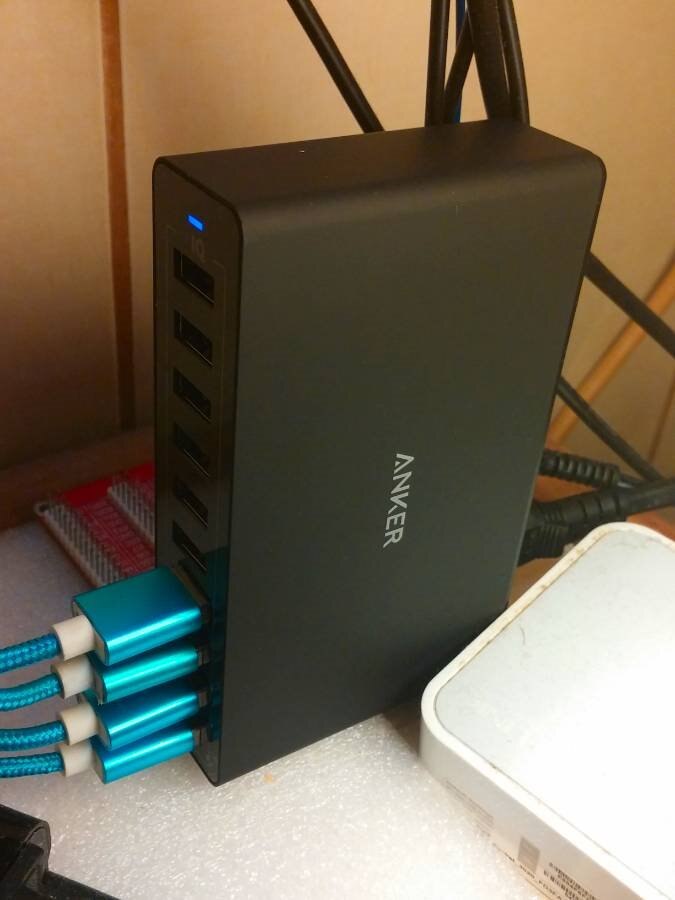
The cluster is powered by a 10-port 60W Anker power hub and I'vefound it to be extremely reliable. One of the best investments I've ever made. I've bought another two off eBay since I've got the first one. The 9 USB power cables are braided and of good quality. The last port has an USB multiplier that can fit and power all three TP-LINK switches at the bottom.
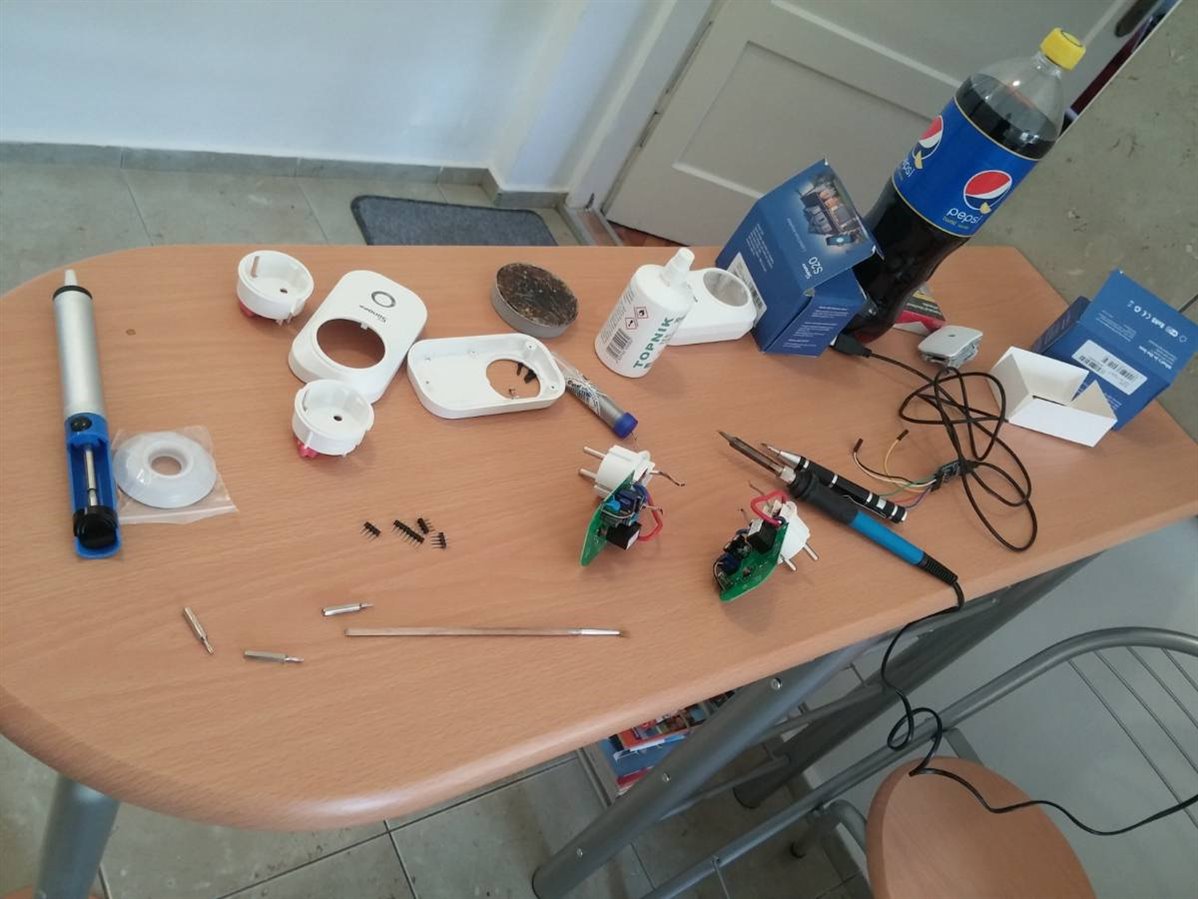
The Anker is plugged into a Sonoff S20 smart plug I've flashed Linux unto. I made a script to power up the cluster by activating the smart plug via curl (192.168.1.22), another for cleanly rebooting all nodes and a third one for a clean shutdown (sudo halt, wait a bit then power off the WiFi plug).
The scripts are as follows:
#!/bin/bash
# /usr/bin/clusterstart
echo -e "\n \e[7;93m[ Powering up WiFi plug ]\n"
curl http://192.168.1.22/control?cmd=event,start
echo -e "\n \e[7;93m[ Cluster powering up ]\n"
sleep 70
echo -e "\n \e[7;93m[ All done - you can now SSH in ]\n"

#!/bin/bash
# /usr/bin/clusterreboot
echo -e "\n"
#for i in {232..247} {247..232} ; do echo -en "\e[48;5;${i}m \e[0m" ; done ; echo
echo -e "\n \e[7;93m[ Rebooting cluster ]\n"
#for i in {232..247} {247..232} ; do echo -en "\e[48;5;${i}m \e[0m" ; done ; echo
echo -e "\n"
for I in 0 1 2 3 4 5 6 7 8; do echo -e "\e[40;38;5;82m Cluster node \e[30;48;5;82m $I \e[0m \e[38;5;4m Rebooting";ssh pi@192.168.1.18$I sudo reboot;done
echo -e "\n \e[7;93m[ Rebooting cluster ]\n"
#sleep 17
#echo -e "\n \e[7;93m[ Done. ]\n"
#!/bin/bash
# /usr/bin/clusterhalt
echo -e "\n"
#for i in {232..247} {247..232} ; do echo -en "\e[48;5;${i}m \e[0m" ; done ; echo
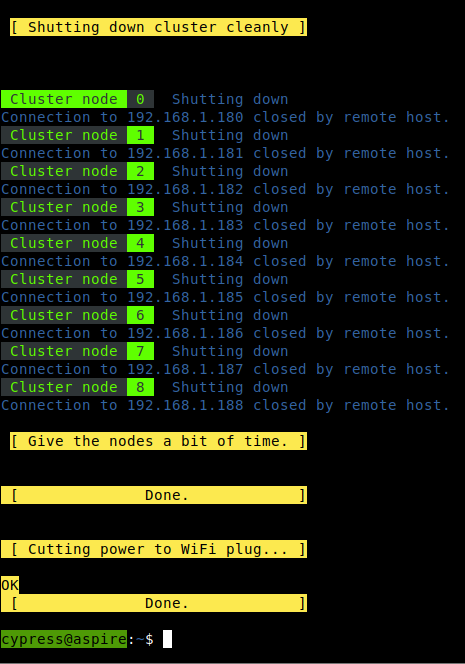
echo -e "\n \e[7;93m[ Shutting down cluster cleanly ]\n"
#for i in {232..247} {247..232} ; do echo -en "\e[48;5;${i}m \e[0m" ; done ; echo
echo -e "\n"
for I in 0 1 2 3 4 5 6 7 8; do echo -e "\e[40;38;5;82m Cluster node \e[30;48;5;82m $I \e[0m \e[38;5;4m Shutting down";ssh pi@192.168.1.18$I sudo halt;done
echo -e "\n \e[7;93m[ Give the nodes a bit of time. ]\n"
sleep 20
echo -e "\n \e[7;93m[ Done. ]\n"
echo -e "\n \e[7;93m[ Cutting power to WiFi plug... ]\n"
curl http://192.168.1.22/control?cmd=event,stop
echo -e "\n \e[7;93m[ Done. ]\n"
I made it so that I can SSH into each node without needing a password by linking the ssh rsa of each node to my laptop.
The cluster runs OpenMPI, Kubernetes, Docker (with portainer), Slurm, Munge, Ansible and Hadoop.
There's a pimoroni Button SHIM on top of the 9th node to be able to change what the small OLED screens display. i have yet to perfect the scripts it launches via the five physical buttons. Theres an 8x4 LED HAT at the base that I've just installed today and I want to make it display four LED per column for each slave node: one LED for OpenMPI activity, one for Docker, one for Kubernetes and one for a scheduler. I do rsync backups regularly on the NFS share.

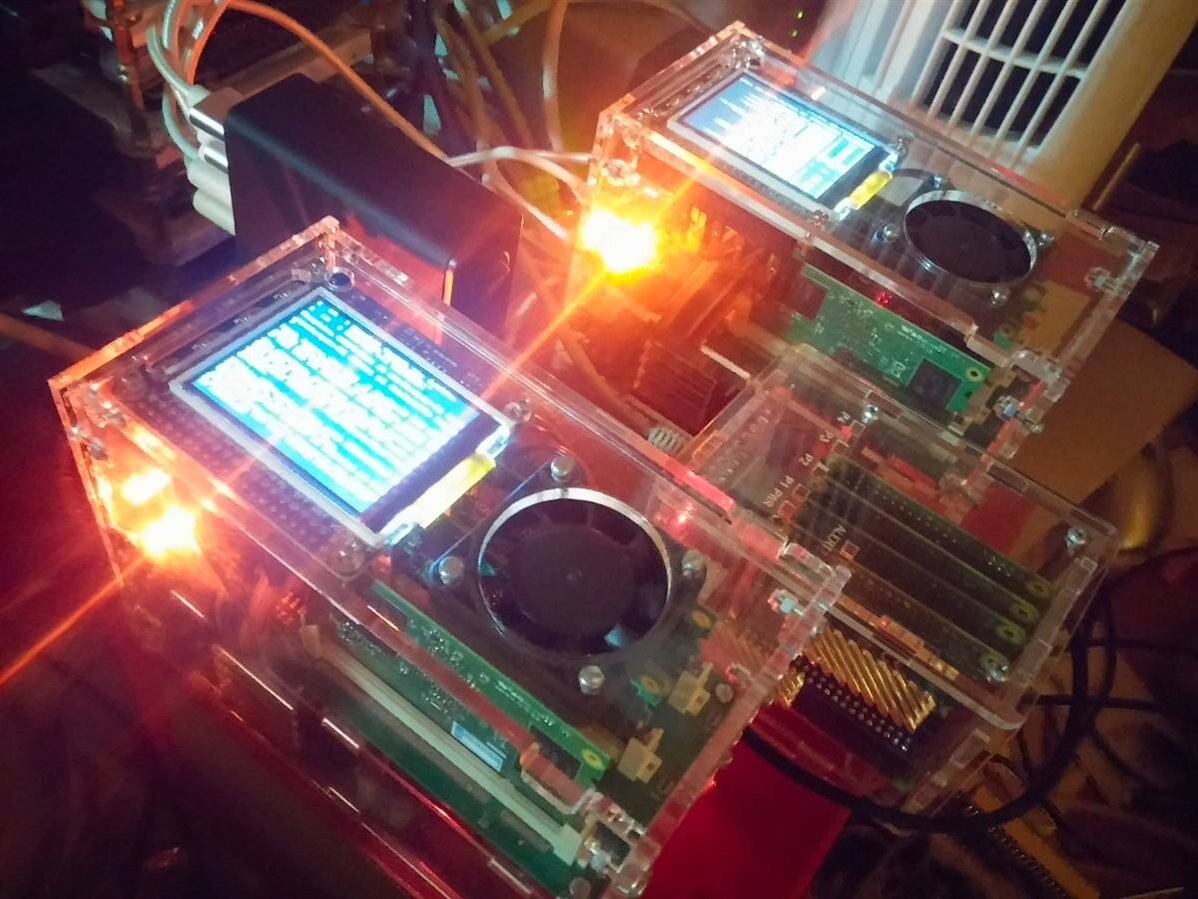
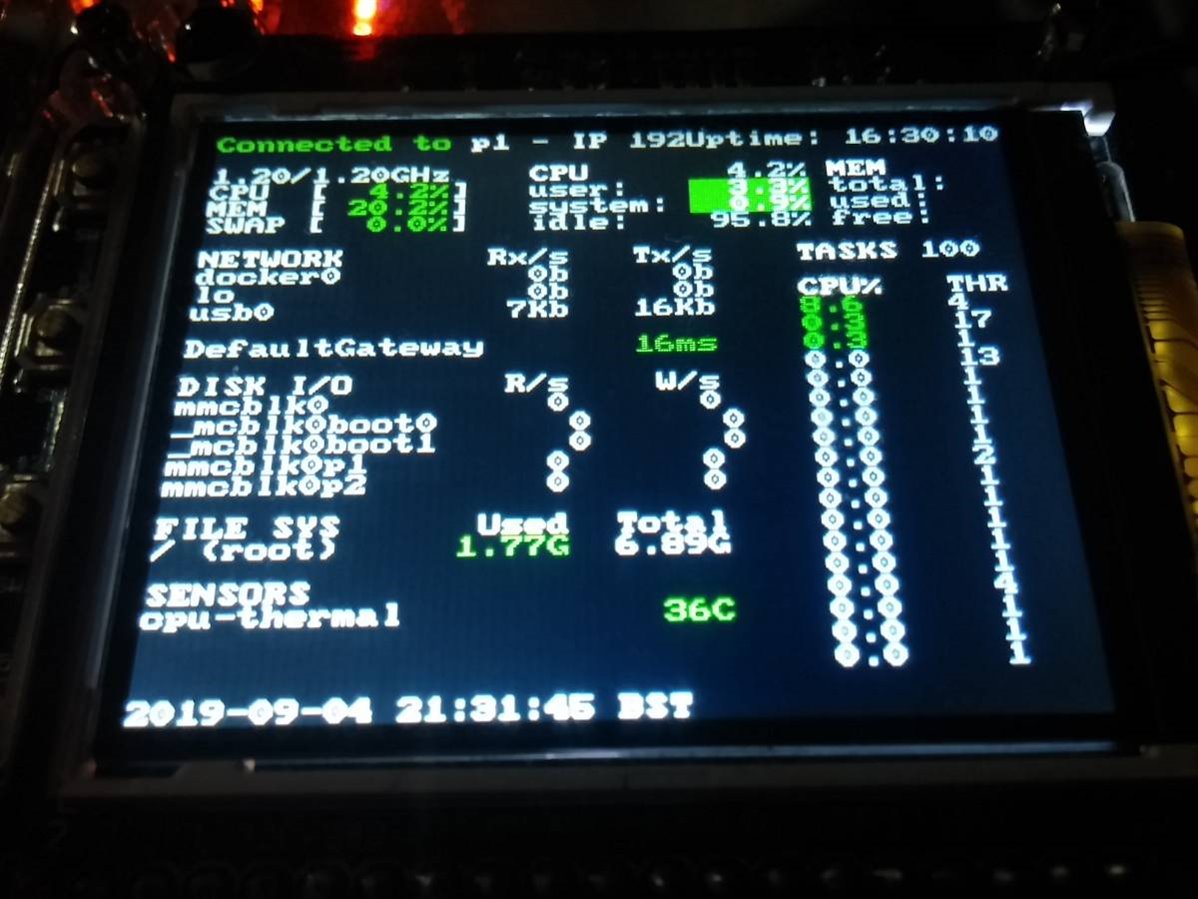
At one time I had a 3,5” screen on top of the tower cluster showing Glances stats. Maybe I'll put it back these days.
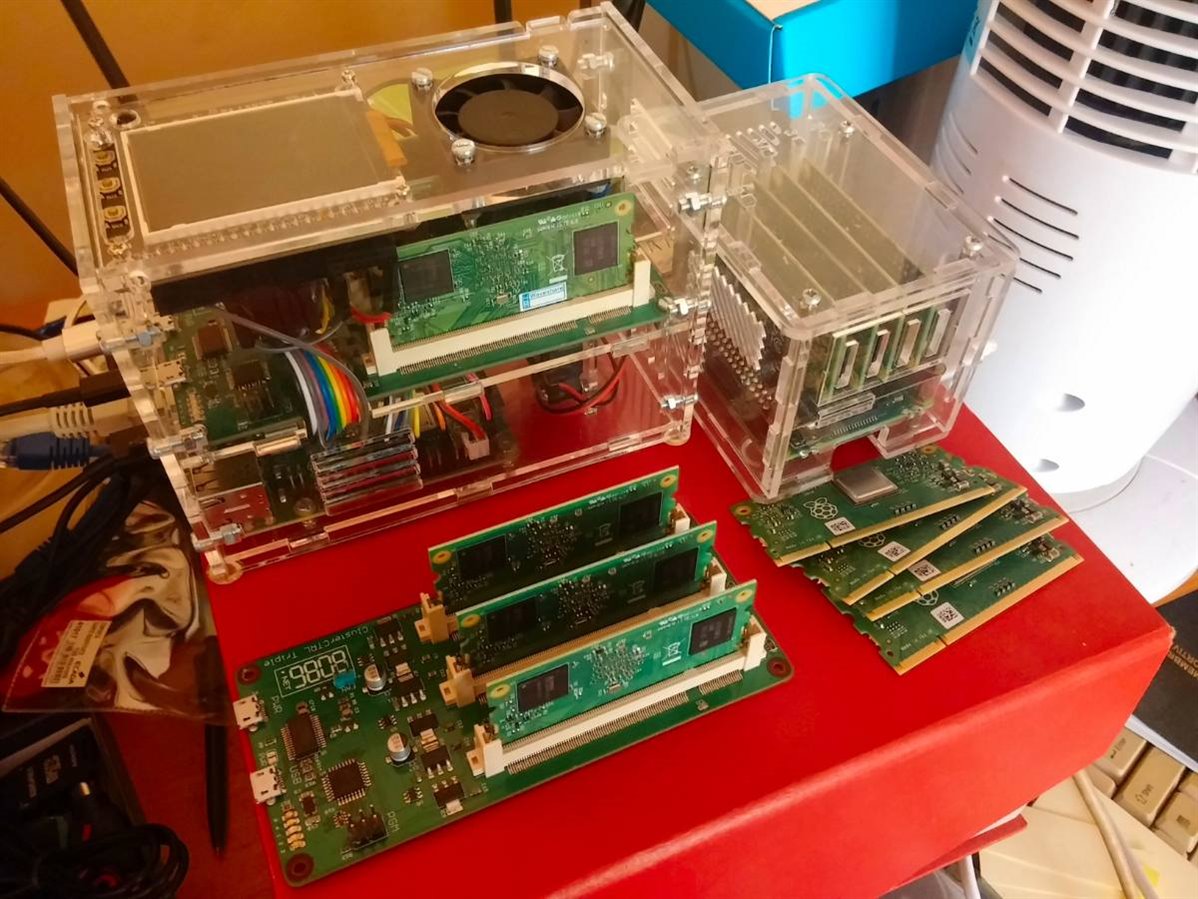
The Triples
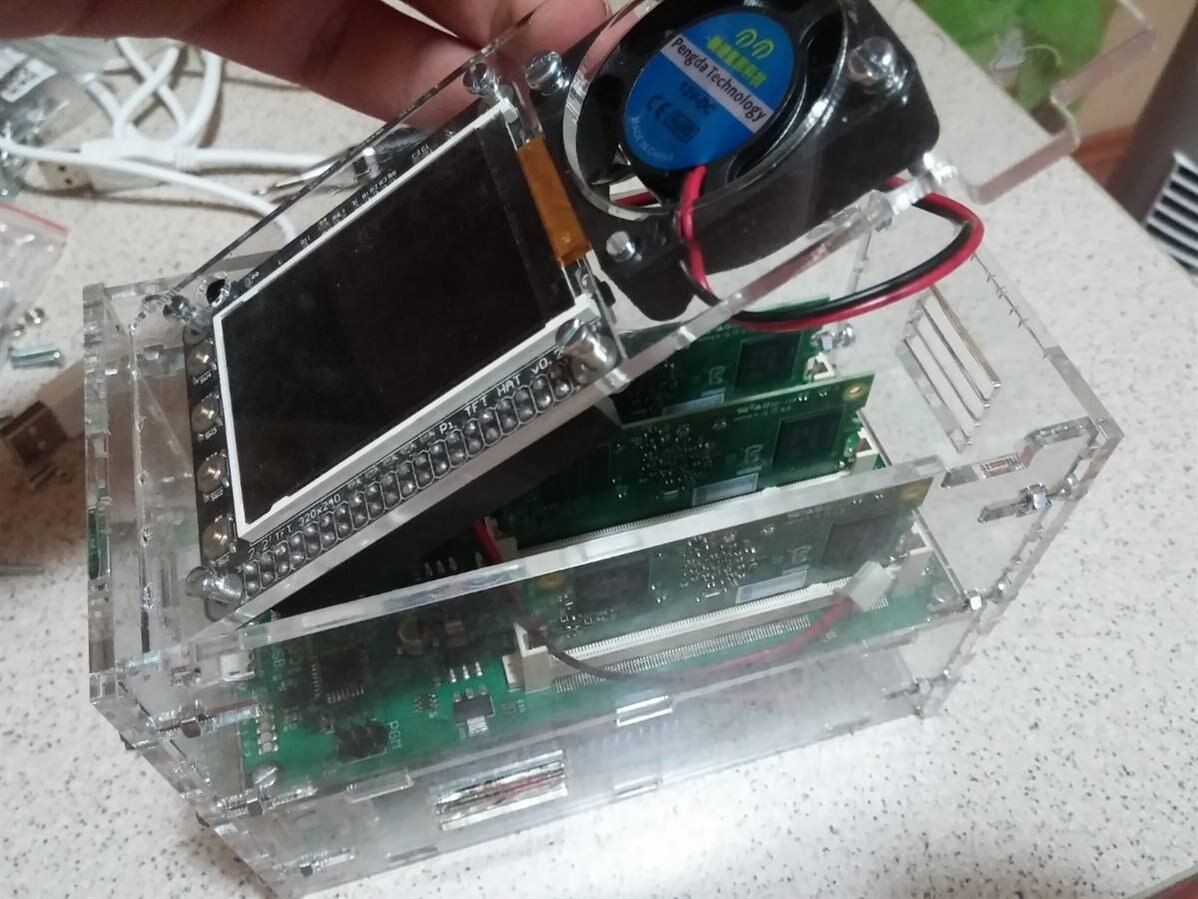
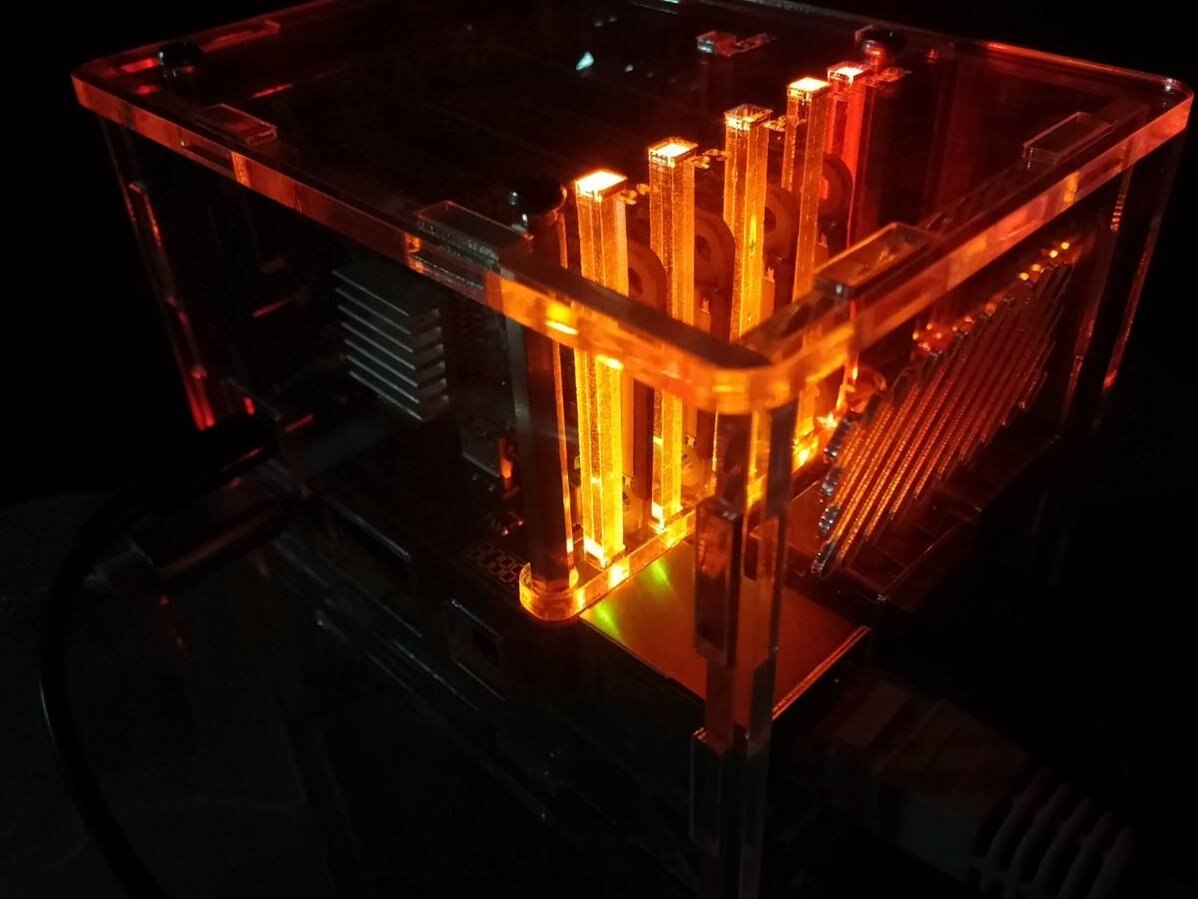
8086.net has a nifty little board called the ClusterCTRL Triple. It's a carrier board for up to three CM/CM+ Raspberry Pi modules. The board is powered separately from the controller (which is a Raspberry Pi 3 B+ in my case). I have two of these running firmware v.1.2.

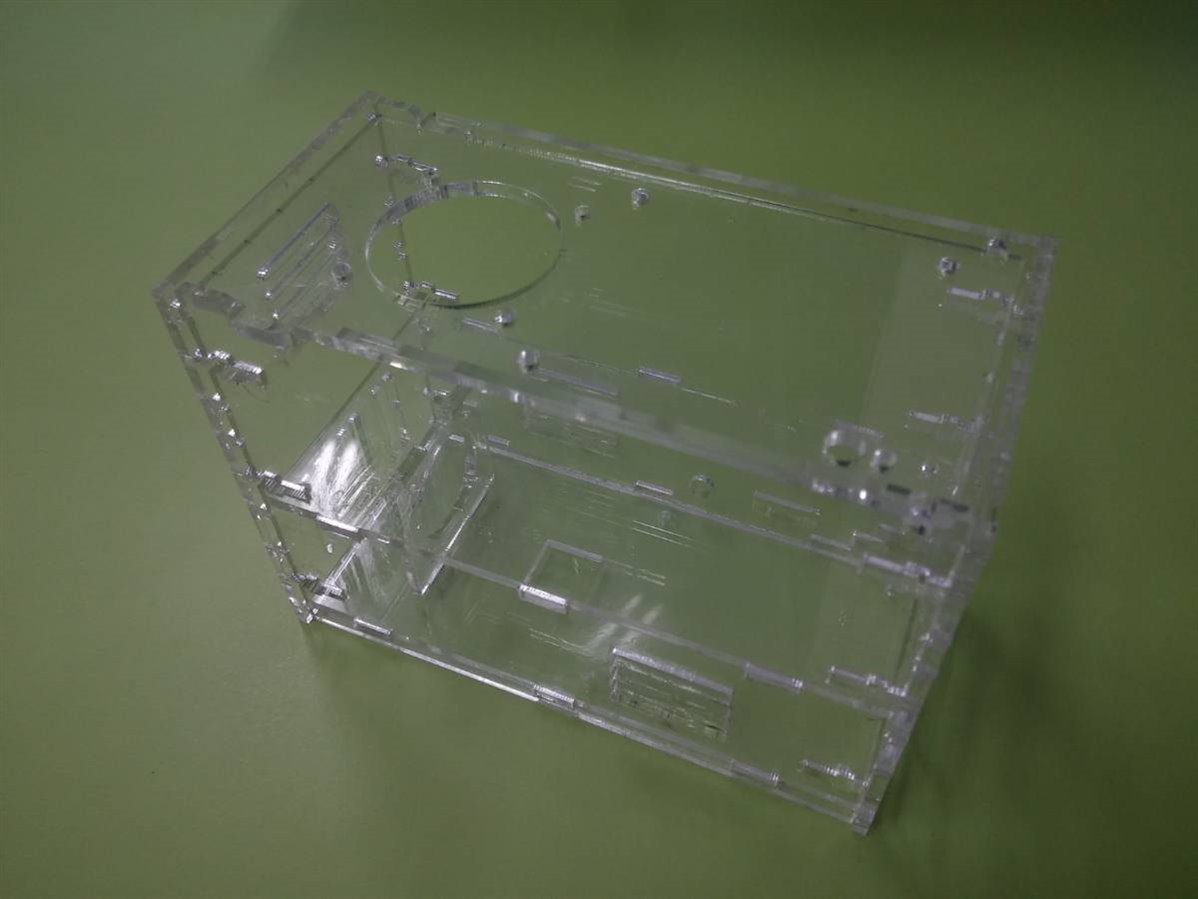
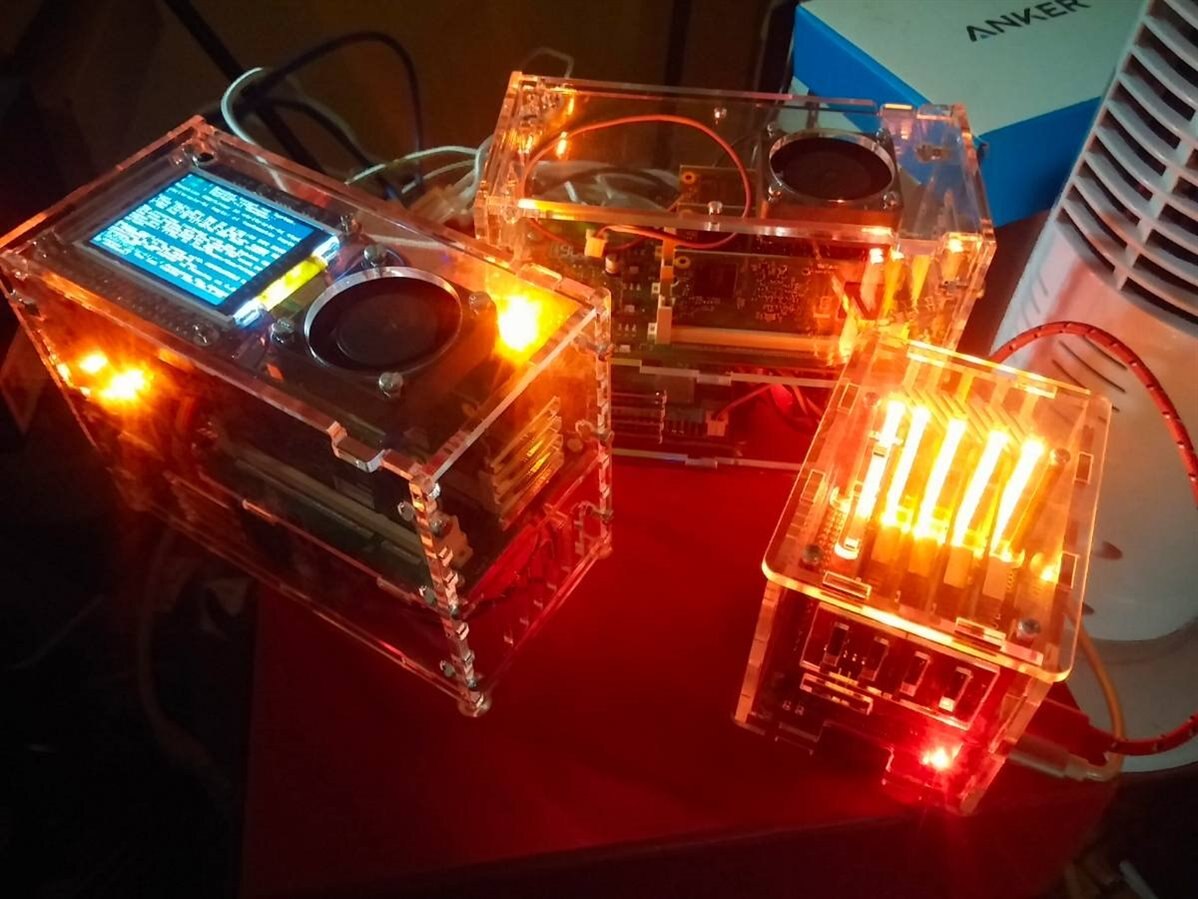
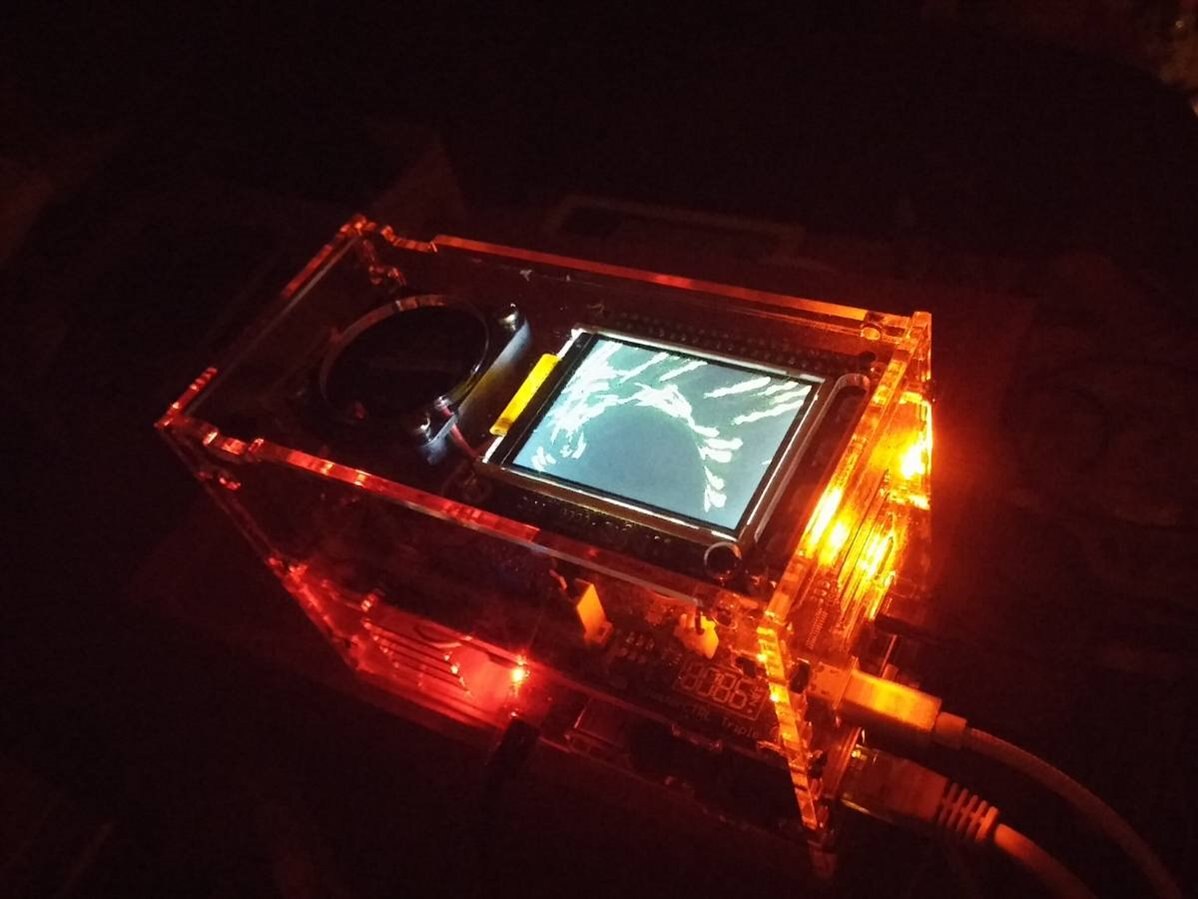
I've designed and built a custom case for them. The design files for laser cutting can be found here. The case should be lasercut out of a 3mm thick plate. It is made to host a Raspberry Pi 3B+ controller at the bottom and the ClusterCTRL Triple on top. It has a 40mm fan slot on top and a 3mm fan slot at the bottom for cooling. It also houses a 2,2” TFT with four buttons and an IR LED but there are versions in the ZIP file that offer a simple lid.
Feel free to modify the design to fit your needs.
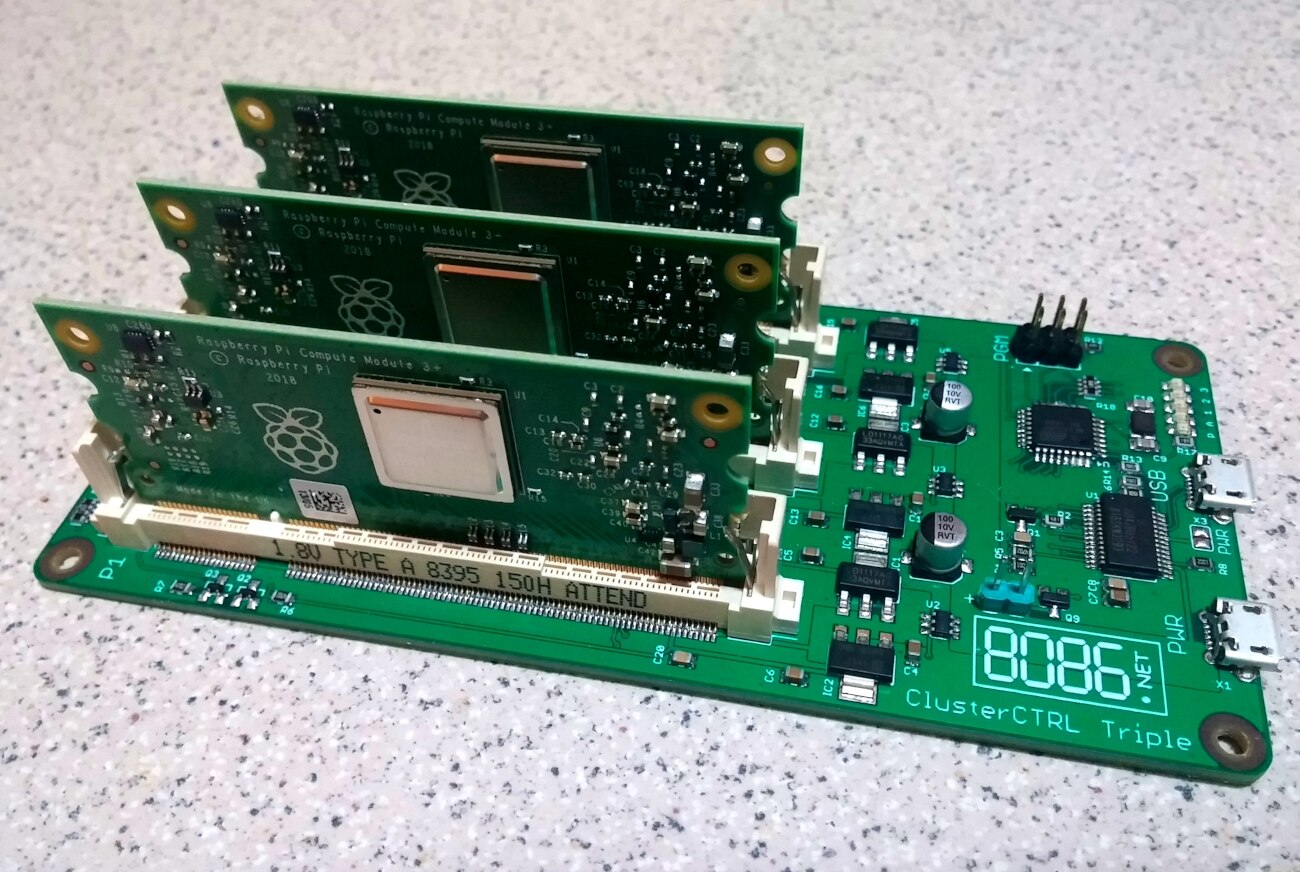
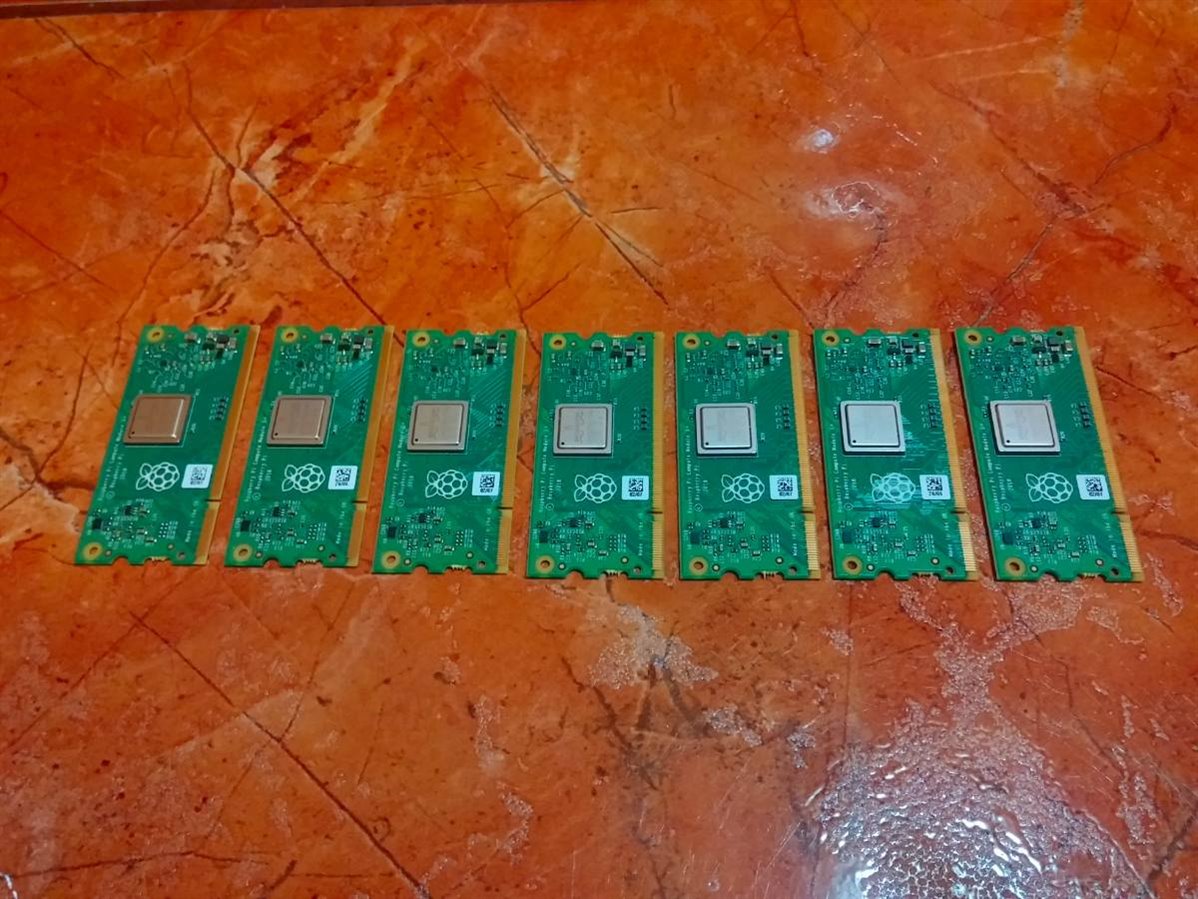
When powered on the clear case lights up nicely. These two clusters also run Raspbian Buster and I can make them join the Docker swarm on the main cluster. The CM+ modules each have an 8GB eMMC because I don't trust MicroSD cards with my data. In terms of computing power they are each equal to a Raspberry Pi 3 B+. The fans I've installed keep the case cool and the 2,2" TFT screens each have 4 physical buttons to configure what system info is displayed.
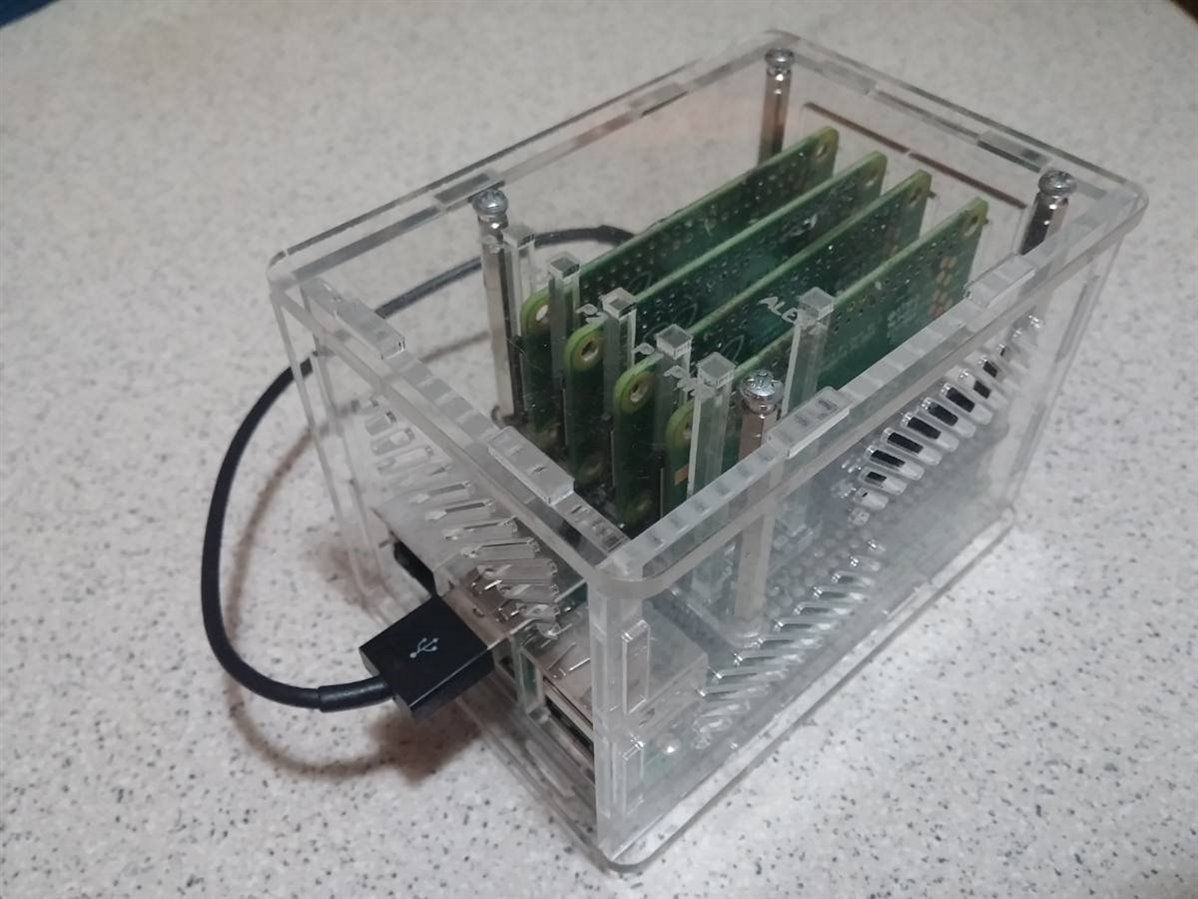
The ClusterHAT
This is a Raspberry Pi HAT that can be mounted on a Raspberry Pi 3 B/B+ or Raspberry Pi 4. It holds up to 4 Raspberry Pi Zero/Zero W boards. In terms of computing power this cluster is neglijable but I do my testing on it before moving settings to the main clusters. I has a nice clear acrylic case that protects it. Another 10 port Anker power hub gives electricity to these last three clusters.


I've also made a special CSS for the Glances webserver mode so it would fit stats in one webpage:
Future plans
- I've bought 7 more 8GB eMMC CM+ modules waiting for the TuringPi clusterboard to be finally shipped, so I can build a fifth cluster.
- One of the smaller fans in one of the CTRL Triples is making noise so I will have to replace it.
- Instead of displaying CPU usage I want to make the Pimoroni LED SHIMs on the tower display Ansible activity. I also have two 3,5" and two 7" LCD screens to use for the tower. One 3,5" touchscreen will go on top and display in a webpage all service web interfaces: Hadoop, Portainer, Kubernetes controls. For now I use a 7" ancient ASUS EeePC as a kind of "dumb terminal" to display glances information about the clusters.

- The 8x4 WS2813 LED HAT at the bottom will display status information about running services (one 4 LED colum for each node, one in 4 LEDs covering one service like Kubernetes or Docker).

- I've ordered 20 male and 20 female MicroUSB jacks and I plan to make my own L-shaped PCB so that the power cords don't come out horizontally out of the tower but rather vertically.

- Need to program the Button SHIM on top so that some BASH commands are parsed via SSH to each node's OLED screen and then I can display various system information pertaining each node.
- I want to subsitute the NFS SSD at the base with a bigger one (maybe a 2 or 3TB SSD).
- Need to change the three switches with Gigabit ones.
- I have another Sonoff S20 smart plug that I will have to flash Linux unto and make the giant cooling system controllable via SSH.
/Edit (6th of February):
So my Pimoroni Blinkt LED modules arrived some days ago and I've spent the better part of last day's evening dismantling the cluster, installing the Blinkt modules and reassembling everything back together.
I now have 9 Blinkt modules and 9 L-shaped GPIO headers.

I've bent four of the last 5 pins on the inner row of the headers to be able to tick in the four cables of the OLED screens so that the screens get access to 3.3v, SDA, SCL and GND. Since the Blinkt modules and the OLED screens used the same GND pin I've chosen one of the other free GND pins of the headers to connect the 128x32 OLED screens to.
It took me 4 hours in total to put everything back together. Had to raise the cluster by 1.5cm per node so that the L-shaped headers would fit. Sawed off some screws that were the same size as the 3M hexagonal standoffs and changed the old 2.4cm standoffs with 4cm ones. Since they were old and corroded a bit I left them in vinegar for about 5 minutes until they were shiny, then washed them with cold water.

The screw ends I filed down a bit.

After everything was put back together and the Blinkt modules were pointing outwards I connected the four OLED wires to their respective pins and tested everything.
Next I installed the libraries for the Pimoroni Blinkt on each node and checked if the work.
I then made the Blinkt modules display Docker activity:
Launched the Docker swarm on the master node
docker swarm init --advertise-addr 192.168.1.180 --listen-addr 192.168.1.180:2377
and made the slave nodes join that swarm
docker swarm join --token SWMTKN-1-5kkcv084djxrudi8xb8ia09c686r9qlzu8942eg8d6p1g0q6tc-2ip73pwgcl9y1dronyvg8m0ih 192.168.1.180:2377
Now all the nodes were active:
All was well so I installed the Pimoroni Blinkt docker monitor with
docker service create --name monitor --mode global --restart-condition any --mount type=bind,src=/sys,dst=/sys --mount type=bind,src=/var/run/docker.sock,dst=/var/run/docker.sock stefanscherer/monitor:1.1.0
and
docker service create --name whoami stefanscherer/whoami:1.1.0
Display 8 tasks and scale up to 32 tasks:
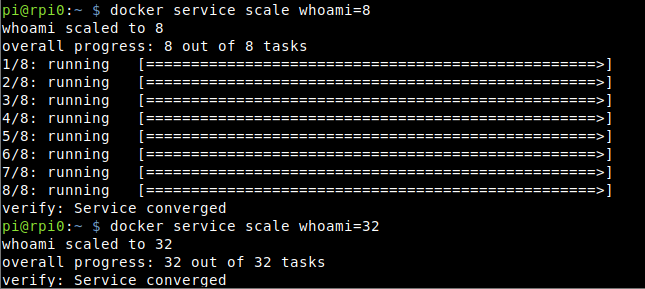
The result was this:
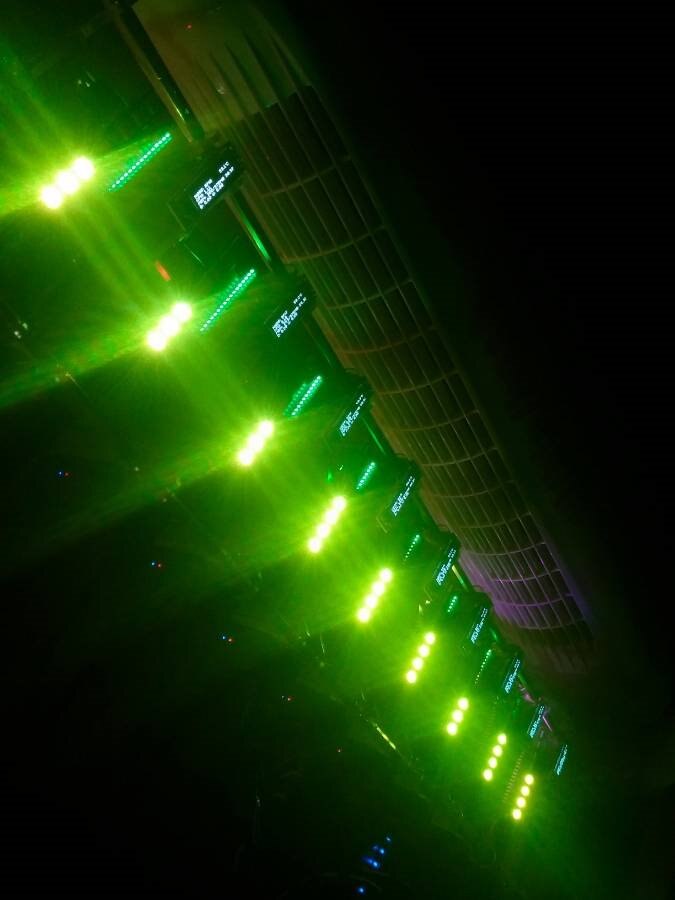
Here's a video of the rig running at night:
And here it is during daytime:
Top Comments
-

clem57
-
Cancel
-
Vote Up
+1
Vote Down
-
-
Sign in to reply
-
More
-
Cancel
Comment-

clem57
-
Cancel
-
Vote Up
+1
Vote Down
-
-
Sign in to reply
-
More
-
Cancel
Children