


This Blog will Cover How to build a cheap EC meter for your aquaponics/Hydroponics or water quality related projects. We are not going to get into what the ideal value of PPM or EC is, Just cover how to measure and quantify a fluid.
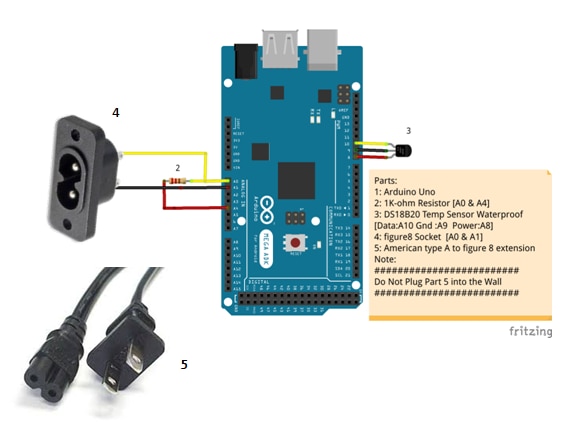
Parts:
-MCU of your choice with ADC
-DS18B20 waterproof temperature sensor
-500 ohm [or 1kohm resistor]
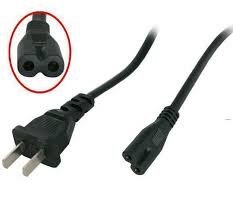
-Type A Two Prong american plug to Figure 8
-Female Socket for Figure 8 connector
So why are we using a plug:
-Cheap
-Available worldwide
-Standard size [makes calibration easy]
Use the solid prong one like below and not the one with holes:
Wiring it up:
Note: You want the Solid Prong type plug
Do not Plug the pronged plug into the mains
Operating Principal
PPM is calculated from the EC of a fluid, EC is the inverse of the electrical resistance of the fluid. We are estimating the EC or PPM of a fluid by measuring the resistance between two probes [The plug pins] when the plug is submerged in the liquid of interest.
Ec measurement needs to be done using AC or the liquid of interest is polarised and will give bad readings. This has got to be a great example of asking why instead of just accepting a statement as fact, it turns out we can take a very fast DC reading without suffering polarisation. meaning we can make a really cheap EC sensor.
Want to use it and dont care how it works? Skip to the main EC code and using the wiring diagram it will work.
Temperature Compensation
Temperature has an effect on the conductivity of fluids so it is essential that we compensate for this.
It is common to use a liner approximation for small temperature changes[1] to convert them to their equivelant EC at 25*C:
EC25 = EC /( 1 + a (T - 25) )
EC25- Equivelant EC at 25'C
EC - Measured EC
T- Temperature [Decgrees C] of Measurment
a = 0.019 °C [Commonly used for nutrient solutions]
Deciding on Value of R1
//##################################################################################
//----------- Do not Replace R1 with a resistor lower than 300 ohms ------------
//##################################################################################
We can change the Value of R1 in the voltage divider to change the range of EC we want to measure. Below is the Equivalent Voltage divider circuit.
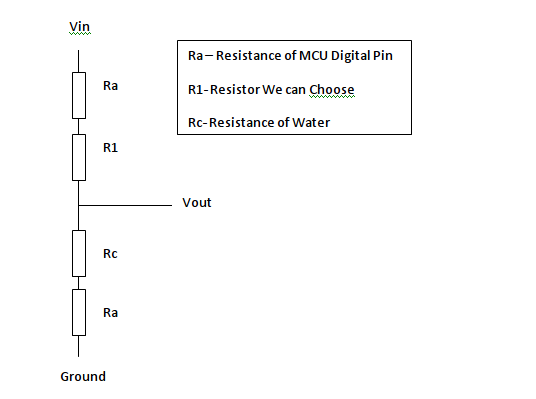
Ra
Ra the resistance of the digital pins is not stated in the data sheet instead we need to pull it out from a graph.
Going off the graph on page [387] of the atmel 2560 Data Sheet “Figure 32-25. I/O Pin Output Voltage vs. Source Current (VCC = 5V)”
V=IR
Ra= V/I [From Figure] V=0.4 I=1.5e-4 R=25 ohms estimated
Rc
Rc will change with EC [PPM] of the measured fluid. we will calculate the maximum and minimum values we expect to see for the range of fluids we wish to measure taking into account temperature changes and the cell constant K. [We will estimate K to be 3 for the plug probe, estimate from previous tests]
EC = EC25*( 1 + a (T - 25))
R=(1000/(EC*K)) +Ra
Min temp=0 [we arnt going to care about EC if the pond is frozen]
Max Temp = 40 *C [I doubt a pond should be above this]
Minimum EC 25=0.3 EC= 0.3*(1+0.019*(0-25) Min EC= 0.16 S/sm
Maximum EC 25= 3 EC= 0.3*(1+0.019*(40-25) Max EC = 3.9 S/cm
Min Resistance = 1000/(MaxEC*K)+25 = 1000(3.9*2.88) =114 ohms
Max Resitance = 1000/(MinEC*K)+25 = 1000/(0.16*2.88) = 2195 ohms
R1
Now we have enough information to calculate a good value for R1 to get the best resolution over our intended measuring range. We could sum it all up mathematically and differentiate to find the peak, but that hurts my head so I just did a quick excel spreadsheet for the Voltage divider for the EC I expect to see:
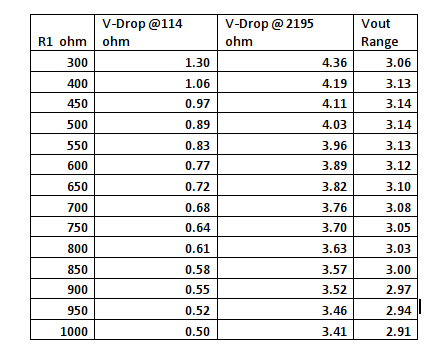
As we can see we get the largest difference using a value for R1 of 500 ohm, I only had 1Kohm to hand so I will have to live with a little less range.
So we chose a 500 ohm resistor
EC – Range /Voltage Range * (5/ADC steps)
(3.9-0.16)/3.14 * 5/1024 = 5.8e-3 resolution so that is a resolution of 0.0058
To put this is PPM [Tranchen [Australia] PPMconversion: 0.7] this is a resolution of 4ppm.
Much more than we need for aquaponics or hydroponics.
If you want to measure the quality of drinking water you will need to calculate the expected Ec values and increase R1 accordingly.
Calibration Code
If you want the best readings from your system it is advisable to calibrate your sensor with some known fluid.
>Add your EC in S/cm into the definitions
>Plug your K value from the terminal window into the main EC code
you will need to use the modified one wire and Dallas library [download from https://wp.josh.com/2014/06/23/no-external-pull-up-needed-for-ds18b20-temp-sensor/ ] or add a pull up for the temperature probe data line [google it]
| Calibration Code |
|---|
/* ElCheapo Arduino EC-PPM measurments Calibration
This Script is used for calibration of the sensor and fine tuning of the Cell Constant K Submerge the sensor and temperature probe in the calibration solution and leave for a while so the temperature probe can settle Change the value of the calibration solution to suit the solutiton strength Stir the probe to make sure the solution is well mixed and upload the code to the arduino Open the terminal for an update of the estimated Cell Constant K [should be around 3] and use this new value in the main EC code.
28/8/2015 Michael Ratcliffe Mike@MichaelRatcliffe.com
This program is free software: you can redistribute it and/or modify it under the terms of the GNU General Public License as published by the Free Software Foundation, either version 3 of the License, or (at your option) any later version.
This program is distributed in the hope that it will be useful, but WITHOUT ANY WARRANTY; without even the implied warranty of MERCHANTABILITY or FITNESS FOR A PARTICULAR PURPOSE. See the GNU General Public License for more details.
You should have received a copy of the GNU General Public License along with this program. If not, see <http://www.gnu.org/licenses/>.
Parts: -Arduino - Uno/Mega -Standard American two prong plug -1 kohm resistor -DS18B20 Waterproof Temperature Sensor
See www.MichaelRatcliffe.com/Projects for a Pinout and user guide or consult the Zip you got this code from
*/
//************************** Libraries Needed To Compile The Script [See Read me In Download] ***************// // Both below Library are custom ones [ SEE READ ME In Downloaded Zip If You Dont Know how To install Use them or add a pull up resistor to the temp probe
#include <OneWire.h> #include <DallasTemperature.h>
//************************* User Defined Variables ********************************************************//
float CalibrationEC=1.38; //EC value of Calibration solution is s/cm
//################################################################################## //----------- Do not Replace R1 with a resistor lower than 300 ohms ------------ //##################################################################################
int R1= 1000; int Ra=25; //Resistance of powering Pins int ECPin= A0; int ECGround=A1; int ECPower =A4;
//*************Compensating for temperature ************************************// //The value below will change depending on what chemical solution we are measuring //0.019 is generaly considered the standard for plant nutrients [google "Temperature compensation EC" for more info float TemperatureCoef = 0.019; //this changes depending on what chemical we are measuring
//************ Temp Probe Related *********************************************// #define ONE_WIRE_BUS 10 // Data wire For Temp Probe is plugged into pin 10 on the Arduino const int TempProbePossitive =8; //Temp Probe power connected to pin 9 const int TempProbeNegative=9; //Temp Probe Negative connected to pin 8
//***************************** END Of Recomended User Inputs *****************************************************************//
OneWire oneWire(ONE_WIRE_BUS);// Setup a oneWire instance to communicate with any OneWire devices DallasTemperature sensors(&oneWire);// Pass our oneWire reference to Dallas Temperature.
float TemperatureFinish=0; float TemperatureStart=0; float EC=0; int ppm =0;
float raw= 0; float Vin= 5; float Vdrop= 0; float Rc= 0; float K=0;
int i=0; float buffer=0;
//*********************************Setup - runs Once and sets pins etc ******************************************************// void setup() { Serial.begin(9600); pinMode(TempProbeNegative , OUTPUT ); //seting ground pin as output for tmp probe digitalWrite(TempProbeNegative , LOW );//Seting it to ground so it can sink current pinMode(TempProbePossitive , OUTPUT );//ditto but for positive digitalWrite(TempProbePossitive , HIGH ); pinMode(ECPin,INPUT); pinMode(ECPower,OUTPUT);//Setting pin for sourcing current pinMode(ECGround,OUTPUT);//setting pin for sinking current digitalWrite(ECGround,LOW);//We can leave the ground connected permanantly
delay(100);// gives sensor time to settle sensors.begin(); delay(100); //** Adding Digital Pin Resistance to [25 ohm] to the static Resistor *********// // Consule Read-Me for Why, or just accept it as true R1=(R1+Ra);
Serial.println("ElCheapo Arduino EC-PPM measurments Calibration"); Serial.println("By: Michael Ratcliffe Mike@MichaelRatcliffe.com"); Serial.println("Free software: you can redistribute it and/or modify it under GNU "); Serial.println(""); Serial.println("Make sure Probe and Temp Sensor are in Solution and solution is well mixed"); Serial.println(""); Serial.println("Starting Calibration: Estimated Time 60 Seconds:");
}; //******************************************* End of Setup **********************************************************************//
//************************************* Main Loop - Runs Forever ***************************************************************// //Moved Heavy Work To subroutines so you can call them from main loop without cluttering the main loop void loop() {
i=1; buffer=0; sensors.requestTemperatures();// Send the command to get temperatures TemperatureStart=sensors.getTempCByIndex(0); //Stores Value in Variable
//************Estimates Resistance of Liquid ****************// while(i<=10){
digitalWrite(ECPower,HIGH); raw= analogRead(ECPin);
digitalWrite(ECPower,LOW); buffer=buffer+raw; i++; delay(5000); }; raw=(buffer/10);
sensors.requestTemperatures();// Send the command to get temperatures TemperatureFinish=sensors.getTempCByIndex(0); //Stores Value in Variable
//*************Compensating For Temperaure********************// EC =CalibrationEC*(1+(TemperatureCoef*(TemperatureFinish-25.0))) ;
//***************** Calculates R relating to Calibration fluid **************************// Vdrop= (((Vin)*(raw))/1024.0); Rc=(Vdrop*R1)/(Vin-Vdrop); Rc=Rc-Ra; K= 1000/(Rc*EC);
Serial.print("Calibration Fluid EC: "); Serial.print(CalibrationEC); Serial.print(" S "); //add units here Serial.print("Cell Constant K"); Serial.print(K);
if (TemperatureStart==TemperatureFinish){ Serial.println(" Results are Trustworthy"); Serial.println(" Safe To Use Above Cell Constant in Main EC code");
} else{ Serial.println(" Error -Wait For Temperature To settle");
}
} //************************************** End Of Main Loop **********************************************************************// |
EC PPM Measurement Code
>If you are using PPM and not EC make sure you note what conversion factor you are using [it isnt universal]
>Dont call the read function more than once every 5 seconds or you will get bad readings and a damaged probe
I tested this code in a solution for 48 hours reading at 5 second intervals without any polarisation or probe damage, the longer you leave between readings the longer your probe will last. 5 seconds is the minimum wait between readings not the maximum.
you will need to use the modified one wire and Dallas library [download from www.michaelratcliffe.com] or add a pull up for the temperature probe data line [google it]
| EC PPM Measurement Code |
|---|
/* ElCheapo Arduino EC-PPM measurments
This scrip uses a common USA two prong plug and a 47Kohm Resistor to measure the EC/PPM of a Aquaponics/Hydroponics Sytem. You could modift this code to Measure other liquids if you change the resitor and values at the top of the code.
This Program will give you a temperature based feed controller. See Read me in download file for more info.
28/8/2015 Michael Ratcliffe Mike@MichaelRatcliffe.com
This program is free software: you can redistribute it and/or modify it under the terms of the GNU General Public License as published by the Free Software Foundation, either version 3 of the License, or (at your option) any later version.
This program is distributed in the hope that it will be useful, but WITHOUT ANY WARRANTY; without even the implied warranty of MERCHANTABILITY or FITNESS FOR A PARTICULAR PURPOSE. See the GNU General Public License for more details.
You should have received a copy of the GNU General Public License along with this program. If not, see <http://www.gnu.org/licenses/>.
Parts: -Arduino - Uno/Mega -Standard American two prong plug -1 kohm resistor -DS18B20 Waterproof Temperature Sensor
Limitations: - -
See www.MichaelRatcliffe.com/Projects for a Pinout and user guide or consult the Zip you got this code from
*/
//************************** Libraries Needed To Compile The Script [See Read me In Download] ***************// // Both below Library are custom ones [ SEE READ ME In Downloaded Zip If You Dont Know how To install] Use them or add a pull up resistor to the temp probe
#include <OneWire.h> #include <DallasTemperature.h>
//************************* User Defined Variables ********************************************************//
//################################################################################## //----------- Do not Replace R1 with a resistor lower than 300 ohms ------------ //##################################################################################
int R1= 1000; int Ra=25; //Resistance of powering Pins int ECPin= A0; int ECGround=A1; int ECPower =A4;
//*********** Converting to ppm [Learn to use EC it is much better**************// // Hana [USA] PPMconverion: 0.5 // Eutech [EU] PPMconversion: 0.64 //Tranchen [Australia] PPMconversion: 0.7 // Why didnt anyone standardise this?
float PPMconversion=0.7;
//*************Compensating for temperature ************************************// //The value below will change depending on what chemical solution we are measuring //0.019 is generaly considered the standard for plant nutrients [google "Temperature compensation EC" for more info float TemperatureCoef = 0.019; //this changes depending on what chemical we are measuring
//********************** Cell Constant For Ec Measurements *********************// //Mine was around 2.9 with plugs being a standard size they should all be around the same //But If you get bad readings you can use the calibration script and fluid to get a better estimate for K float K=2.88;
//************ Temp Probe Related *********************************************// #define ONE_WIRE_BUS 10 // Data wire For Temp Probe is plugged into pin 10 on the Arduino const int TempProbePossitive =8; //Temp Probe power connected to pin 9 const int TempProbeNegative=9; //Temp Probe Negative connected to pin 8
//***************************** END Of Recomended User Inputs *****************************************************************//
OneWire oneWire(ONE_WIRE_BUS);// Setup a oneWire instance to communicate with any OneWire devices DallasTemperature sensors(&oneWire);// Pass our oneWire reference to Dallas Temperature.
float Temperature=10; float EC=0; float EC25 =0; int ppm =0;
float raw= 0; float Vin= 5; float Vdrop= 0; float Rc= 0; float buffer=0;
//*********************************Setup - runs Once and sets pins etc ******************************************************// void setup() { Serial.begin(9600); pinMode(TempProbeNegative , OUTPUT ); //seting ground pin as output for tmp probe digitalWrite(TempProbeNegative , LOW );//Seting it to ground so it can sink current pinMode(TempProbePossitive , OUTPUT );//ditto but for positive digitalWrite(TempProbePossitive , HIGH ); pinMode(ECPin,INPUT); pinMode(ECPower,OUTPUT);//Setting pin for sourcing current pinMode(ECGround,OUTPUT);//setting pin for sinking current digitalWrite(ECGround,LOW);//We can leave the ground connected permanantly
delay(100);// gives sensor time to settle sensors.begin(); delay(100); //** Adding Digital Pin Resistance to [25 ohm] to the static Resistor *********// // Consule Read-Me for Why, or just accept it as true R1=(R1+Ra);// Taking into acount Powering Pin Resitance
Serial.println("ElCheapo Arduino EC-PPM measurments"); Serial.println("By: Michael Ratcliffe Mike@MichaelRatcliffe.com"); Serial.println("Free software: you can redistribute it and/or modify it under GNU "); Serial.println(""); Serial.println("Make sure Probe and Temp Sensor are in Solution and solution is well mixed"); Serial.println(""); Serial.println("Measurments at 5's Second intervals [Dont read Ec morre than once every 5 seconds]:");
}; //******************************************* End of Setup **********************************************************************//
//************************************* Main Loop - Runs Forever ***************************************************************// //Moved Heavy Work To subroutines so you can call them from main loop without cluttering the main loop void loop() {
GetEC(); //Calls Code to Go into GetEC() Loop [Below Main Loop] dont call this more that 1/5 hhz [once every five seconds] or you will polarise the water PrintReadings(); // Cals Print routine [below main loop]
delay(5000);
} //************************************** End Of Main Loop **********************************************************************//
//************ This Loop Is called From Main Loop************************// void GetEC(){
//*********Reading Temperature Of Solution *******************// sensors.requestTemperatures();// Send the command to get temperatures Temperature=sensors.getTempCByIndex(0); //Stores Value in Variable
//************Estimates Resistance of Liquid ****************// digitalWrite(ECPower,HIGH); raw= analogRead(ECPin);
digitalWrite(ECPower,LOW);
//***************** Converts to EC **************************// Vdrop= (Vin*raw)/1024.0; Rc=(Vdrop*R1)/(Vin-Vdrop); Rc=Rc-Ra; //acounting for Digital Pin Resitance EC = 1000/(Rc*K);
//*************Compensating For Temperaure********************// EC25 = EC/ (1+ TemperatureCoef*(Temperature-25.0)); ppm=(EC25)*(PPMconversion*1000);
;} //************************** End OF EC Function ***************************//
//***This Loop Is called From Main Loop- Prints to serial usefull info ***// void PrintReadings(){ Serial.print("Rc: "); Serial.print(Rc); Serial.print(" EC: "); Serial.print(EC25); Serial.print(" Simens "); Serial.print(ppm); Serial.print(" ppm "); Serial.print(Temperature); Serial.println(" *C ");
/* //********** Usued for Debugging ************ Serial.print("Vdrop: "); Serial.println(Vdrop); Serial.print("Rc: "); Serial.println(Rc); Serial.print(EC); Serial.println("Siemens"); //********** end of Debugging Prints ********* */ }; |
Got any questions let me know.
The next tutorial will be on coding a self learning nutrient doser.
References:
[1]
John J. Barron & Colin Ashton "The Effect of Temperature on Conductivity Measurement" Technical Services Department, Reagecon Diagnostics Ltd
http://www.reagecon.com/pdf/technicalpapers/Effect_of_Temperature_TSP-07_Issue3.pdf
Side Note: I haven't got the Figure 8 Junction Block to test, but if it has a decent resistance we will have to add it to the Ra variable to get good readings, I will update this once I know more.
Top Comments