


For People running a headless set-up like myself it can be very useful to turn the arduino and ethernet shield into a basic web server.
This is a very basic blog heavily based on the work of other people [see the top of the code for credits]
What you will need:
>Arduino [uno or mega]
>Ethernet Shield
>A router near your grow
The last one might be a problem for a lot of you, I've got a router in the greenhouse repeating the Wifi around the farm Hopefully you will have something close by. [if not , consider a ESP8266 these deserve a whole blog series of their own, epic little MCU's ]
Code
The code will turn your ethernet shield into a webserver, simply type in your arduino's IP address into your browser when on the local network. Ive added the two things any code should not be without, a RAM watchdog [you will not regret this as your project grows] and a basic uptime counter, both of these help with debugging your operation.
Once the code is uploaded you should be able to see your data by browsing to your arduino's IP adress in a browser when on your local network [you may have to give it a static IP in your router]
The Ip for this code is : http://192.168.9.10/ [Yours wil almost certianly not be the same subnet, more likley 192.168.1.X]
| Header 1 |
|---|
/* Web Server
A simple web server that shows the value of the analog input pins. A uptime counter and a ram checker. using an Arduino Wiznet Ethernet shield.
Michael Ratcliffe Mike@MichaelRatcliffe.com
This program is free software: you can redistribute it and/or modify it under the terms of the GNU General Public License as published by the Free Software Foundation, either version 3 of the License, or (at your option) any later version.
This program is distributed in the hope that it will be useful, but WITHOUT ANY WARRANTY; without even the implied warranty of MERCHANTABILITY or FITNESS FOR A PARTICULAR PURPOSE. See the GNU General Public License for more details.
You should have received a copy of the GNU General Public License along with this program. If not, see <http://www.gnu.org/licenses/>.
heavily based ont he work of David A. Mellis and the later work by Tom Igoe
*/
//**************** All Defualt Libraries ************************************// #include <SPI.h> #include <Ethernet.h>
//****************** User Defined Variables *********************************// // Enter a MAC address and IP address for your controller below. // The IP address will be dependent on your local network: byte mac[] = { 0xDE, 0xAD, 0xBE, 0xEF, 0xFE, 0xED }; IPAddress ip(192, 168, 9, 10);
// Initialize the Ethernet server library EthernetServer server(80);
//************ Ram Checker Variable ***********************// /* ATMega168 ATMega328P ATmega1280 ATmega2560 SRAM 1024 bytes 2048 bytes 8192 Bytes 8192 Bytes */ const int Total_Ram = 2048; //change this value for the correct one from above data
//********************************************* End OF Recomended Changes ********************//
//*************Seting up the Ram check********************// int freeRam () { extern int __heap_start, *__brkval; int v; return (int) &v - (__brkval == 0 ? (int) &__heap_start : (int) __brkval); };
//********Just Some variables we use to convert to % ************// float Ram=3; float Ram_Ussage=0; int Ram_error=0;
//************************** Just Some basic Definitions used for the Up Time LOgger ************// long Day=0; int Hour =0; int Minute=0; int Second=0; int HighMillis=0; int Rollover=0;
//************************** Setutp ********************************************************// void setup() { // Open serial communications and wait for port to open: Serial.begin(9600); while (!Serial) { ; // wait for serial port to connect. Needed for Leonardo only }
// start the Ethernet connection and the server: Ethernet.begin(mac, ip); server.begin(); Serial.print("server is at "); Serial.println(Ethernet.localIP()); }
//********************* End Of Setup ************************************************//
//******************************* Main Loop ****************************************//
void loop() {
uptime(); //Runs the uptime script located below the main loop and reenters the main loop print_Uptime(); // prints to serial Max_Ram(); // updates ram ussage
//**** This is the bit that hosts your "webpage" EthernetClient client = server.available(); if (client) { Serial.println("new client"); // an http request ends with a blank line boolean currentLineIsBlank = true; while (client.connected()) { if (client.available()) { char c = client.read(); Serial.write(c); // if you've gotten to the end of the line (received a newline // character) and the line is blank, the http request has ended, // so you can send a reply if (c == '\n' && currentLineIsBlank) { // send a standard http response header client.println("HTTP/1.1 200 OK"); client.println("Content-Type: text/html"); client.println("Connection: close"); // the connection will be closed after completion of the response client.println("Refresh: 5"); // refresh the page automatically every 5 sec client.println(); client.println("<!DOCTYPE HTML>"); client.println("<html>"); //********** Printing the uptime at the top client.print("Uptime Counter: "); client.print(Day); client.print(" Days "); client.print(Hour); client.print(" Hours "); client.print(Minute); client.print(" mins "); client.print(Second); client.print(" seconds "); client.println("<br />"); //********** Printing how much ram we used client.print("Max_Ram: "); client.println(Ram_Ussage); //Creating a new line client.println("<br />");
// output the value of each analog input pin for (int analogChannel = 0; analogChannel < 6; analogChannel++) { int sensorReading = analogRead(analogChannel); client.print("analog input "); client.print(analogChannel); client.print(" is "); client.print(sensorReading); client.println("<br />"); } client.println("</html>"); break; } if (c == '\n') { // you're starting a new line currentLineIsBlank = true; } else if (c != '\r') { // you've gotten a character on the current line currentLineIsBlank = false; } } } // give the web browser time to receive the data delay(1); // close the connection: client.stop(); Serial.println("client disconnected"); } }
//************************ Uptime Code - Makes a count of the total up time since last start ****************//
void uptime(){ //** Making Note of an expected rollover *****// if(millis()>=3000000000){ HighMillis=1;
} //** Making note of actual rollover **// if(millis()<=100000&&HighMillis==1){ Rollover++; HighMillis=0; }
long secsUp = millis()/1000;
Second = secsUp%60;
Minute = (secsUp/60)%60;
Hour = (secsUp/(60*60))%24;
Day = (Rollover*50)+(secsUp/(60*60*24)); //First portion takes care of a rollover [around 50 days]
};
//******************* Prints the uptime to serial window **********************// void print_Uptime(){
Serial.print(F("Uptime: ")); // The "F" Portion saves your SRam Space Serial.print(Day); Serial.print(F(" Days ")); Serial.print(Hour); Serial.print(F(" Hours ")); Serial.print(Minute); Serial.print(F(" Minutes ")); Serial.print(Second); Serial.println(F(" Seconds")); Serial.print(Ram_Ussage); Serial.println(F("% Ram Used "));
}; //************* Loop for calculating Ram Ussage, called from main loop***//
void Max_Ram(){
if(freeRam()>=Ram){ Ram=(freeRam()); Ram_Ussage=(((Total_Ram-Ram)/Total_Ram)*100); };
if(Ram_Ussage>=70){ Ram_error=1; // Use this set flag to warn the user of a potential Ram ussage problem, or reset the arduino if it becomes true };
}; |
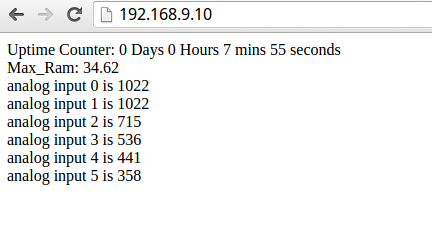
Printout:
Everything is working as we expected, here is a printout I got from chrome.
In a following Blog we will be trying to achieve a few things simultaneously with this Ethernet shield, on-line data logging to the cloud, a local webserver and a SD logger. I dont quite have this figured out yet, but I hope to find time to work on it soon.
Dont forget to keep an eye out on the main page: