element14 Community
element14 Community
    Register Log In
  • Site
  • Search
  • Log In Register
  • About Us
  • Community Hub
    Community Hub
    • What's New on element14
    • Feedback and Support
    • Benefits of Membership
    • Personal Blogs
    • Members Area
    • Achievement Levels
  • Learn
    Learn
    • Ask an Expert
    • eBooks
    • element14 presents
    • Learning Center
    • Tech Spotlight
    • STEM Academy
    • Webinars, Training and Events
    • Learning Groups
  • Technologies
    Technologies
    • 3D Printing
    • FPGA
    • Industrial Automation
    • Internet of Things
    • Power & Energy
    • Sensors
    • Technology Groups
  • Challenges & Projects
    Challenges & Projects
    • Design Challenges
    • element14 presents Projects
    • Project14
    • Arduino Projects
    • Raspberry Pi Projects
    • Project Groups
  • Products
    Products
    • Arduino
    • Avnet Boards Community
    • Dev Tools
    • Manufacturers
    • Multicomp Pro
    • Product Groups
    • Raspberry Pi
    • RoadTests & Reviews
  • Store
    Store
    • Visit Your Store
    • Choose another store...
      • Europe
      •  Austria (German)
      •  Belgium (Dutch, French)
      •  Bulgaria (Bulgarian)
      •  Czech Republic (Czech)
      •  Denmark (Danish)
      •  Estonia (Estonian)
      •  Finland (Finnish)
      •  France (French)
      •  Germany (German)
      •  Hungary (Hungarian)
      •  Ireland
      •  Israel
      •  Italy (Italian)
      •  Latvia (Latvian)
      •  
      •  Lithuania (Lithuanian)
      •  Netherlands (Dutch)
      •  Norway (Norwegian)
      •  Poland (Polish)
      •  Portugal (Portuguese)
      •  Romania (Romanian)
      •  Russia (Russian)
      •  Slovakia (Slovak)
      •  Slovenia (Slovenian)
      •  Spain (Spanish)
      •  Sweden (Swedish)
      •  Switzerland(German, French)
      •  Turkey (Turkish)
      •  United Kingdom
      • Asia Pacific
      •  Australia
      •  China
      •  Hong Kong
      •  India
      •  Korea (Korean)
      •  Malaysia
      •  New Zealand
      •  Philippines
      •  Singapore
      •  Taiwan
      •  Thailand (Thai)
      • Americas
      •  Brazil (Portuguese)
      •  Canada
      •  Mexico (Spanish)
      •  United States
      Can't find the country/region you're looking for? Visit our export site or find a local distributor.
  • Translate
  • Profile
  • Settings
CodeBug
  • Learn
  • Learning Center
  • STEM Academy
  • CodeBug
  • More
  • Cancel
CodeBug
Blog 10 CodeBug Projects in 10 Days: Many Faced Bug
  • Blog
  • Forum
  • Documents
  • Events
  • Polls
  • Files
  • Members
  • Mentions
  • Sub-Groups
  • Tags
  • More
  • Cancel
  • New
Join CodeBug to participate - click to join for free!
  • Share
  • More
  • Cancel
Group Actions
  • Group RSS
  • More
  • Cancel
Engagement
  • Author Author: element14Dave
  • Date Created: 23 Sep 2015 8:14 PM Date Created
  • Views 3000 views
  • Likes 20 likes
  • Comments 14 comments
  • codebug_intermediate
Related
Recommended

10 CodeBug Projects in 10 Days: Many Faced Bug

element14Dave
element14Dave
23 Sep 2015
imageIntroducing CodeBug!

image  What is CodeBug

image  10 CodeBug Projects in 10 Days

image  Are You a STEM Educator?


Getting Started:

image

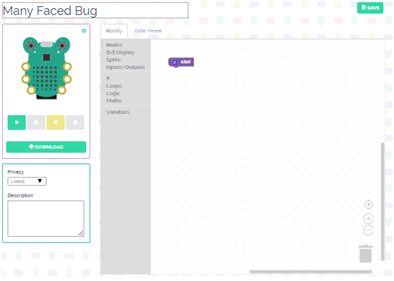
We start the project by visiting the CodeBug website http://www.codebug.co.uk and creating an account. It only takes a few minutes. While logged in, clock on Create to start a new project. Don't forget to save your work!


The interface for CodeBug contains an area to the right of the screen with is the primary programming interface. There are a series of menus that are used to store the blocks with can be dragged from the menus into the coding area. Good blocks are made to connect together, and that is what we intend to do!


Now that you have familiarized yourself with the interface, let's get started on an intermediate project Thomas Macpherson-Pope pulled together from CodeBug.org.


What you need:

CodeBug

Micro USB Cable

CR2032 Battery

Computer


The Project:


Expression has always been an important variable in human communications. From the smile on someone's face to a frustrated emoticon via text or the "mischief" emoticon found in the majority of our @Top Members conversations image.  The visual representation of ones feelings can also be communicated to the outside world via the CodeBug. In this project we will walk through how to show off the many faces of CodeBug!


Before we get started, it's  best to plan out your faces so you know how many you will have. Print out the template attached and get a pencil to plan out which LEDs you are going to have on. Below are some example faces.

image


Now that you've plotted out the expressions to display let's get coding that bug!


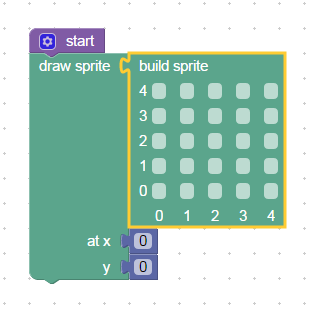
Let's begin at the Start block which is a pre-existing block in which the coding is ready to be built on! The Start block can be used to configure CodeBug when we run the emulation on the interface, for this project we will keep it as is.


For the first block of code we are going to need to use Sprites. Sprites are simple images created by the Build Sprite block and displayed using either the Draw Spite block or the Scroll Sprite block . To display a Sprite we need to drag a Draw Sprite block and a Build Sprite block into the coding area. Join the Build Sprite block into the Draw Sprite block and join that group of code into the Start block.

  image

Click on the different boxes of your Build Sprite block to design your sprite. A ticked box means that LED will be on. Run the code via the blockly emulator and see the "LEDs" light up!
    imageimage
Next we will need to program a different Sprite to be displayed when different buttons and legs are pressed. From the If menu drag an If block to an empty space on your workplace. Click on the cog icon on your If block and, in the window that appears, drag an Else If into the If on the right.
image

From the Inputs/Outputs menu drag in two Pressed blocks and snap them onto the If block. From the drop down selector tool on the Pressed block we will have the first block as "A" and the second block as "B"
image


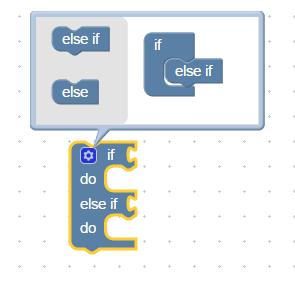
From the Sprite menu drag in another Draw and Build Sprite block and place it inside of the If block.


image


From the Loops menu, drag a Repeat While True loop and snap it onto your Start block. Drag your If Else If block into this While loop.


image


Let's add a few more Sprites into the code. Click on the Cog of the If block and drag four more of the Else If blocks into the If block. Next, from the Inputs/Outputs menu drag in four Leg Grounded block. Join these onto the Else If blocks and number them using the drop down selector tool 0-3.


image


To set the Legs of the CodeBug we will need to first configure the Emulator. To do this we will need to open the emulator configuration via the settings cog on the emulator. Tick the Show Leg Controls box. Click on the Configure Emulator button to complete the settings change. The Emulator will now show the status of the CodeBug's legs with blue arrows. The arrow pointing to the legs is the Input, away from the legs is the Output. When the background of the leg is red, the leg is at Power, when the leg is at black, it is Ground.

Now it's time to add in those extra Sprites. Drag four Draw Sprite blocks and four Build Sprite blocks into the coding area. Join the Build Sprite block into the Draw Sprite block and snap that group of code into the Else If blocks.

image


From there we can run the emulator with the code...


You don't have permission to edit metadata of this video.
Edit media
x
image
Upload Preview
image


With the code working, click on Download, it's just under the simulator controls. When the code downloads, plug in a USB to micro USB into your computer. While holding Button A of your CodeBug also insert the micro USB to the CodeBug. The top left LED in the matrix on the CodeBug will flash. Your computer should also recognize the CodeBug as a USB drive on your computer. Copy the code downloaded from the CodeBug website to the USB drive and run the program by pressing Button B.


Wear your emotions on your sleeve by inserting a  CR2032 battery into the holder on the back of the CodeBug and attaching to wherever you see fit


REMIX THIS PROJECT


See more CodeBug projects and learn how you can get one of your own by visiting: 10 CodeBug Projects in 10 Days

image
Attachments:
imagesprite-template.pdf
  • Sign in to reply

Top Comments

  • jkutzsch
    jkutzsch over 9 years ago +4
    Quick update! My son and I followed the instructions and everything went perfectly of course! My son has been playing with the CodeBug for a bit now and really enjoying it. Barnes and Noble has a Maker…
  • gregoryfenton
    gregoryfenton over 9 years ago +2
    Great course, following avidly It may be an idea to give people links to the code on CodeBug so they can remix your work. Keep them coming Greg
  • element14Dave
    element14Dave over 9 years ago in reply to gregoryfenton +2
    great idea!
Parents
  • Former Member
    Former Member over 9 years ago

    Brilliant little bug

    • Cancel
    • Vote Up 0 Vote Down
    • Sign in to reply
    • More
    • Cancel
Comment
  • Former Member
    Former Member over 9 years ago

    Brilliant little bug

    • Cancel
    • Vote Up 0 Vote Down
    • Sign in to reply
    • More
    • Cancel
Children
No Data
element14 Community

element14 is the first online community specifically for engineers. Connect with your peers and get expert answers to your questions.

  • Members
  • Learn
  • Technologies
  • Challenges & Projects
  • Products
  • Store
  • About Us
  • Feedback & Support
  • FAQs
  • Terms of Use
  • Privacy Policy
  • Legal and Copyright Notices
  • Sitemap
  • Cookies

An Avnet Company © 2025 Premier Farnell Limited. All Rights Reserved.

Premier Farnell Ltd, registered in England and Wales (no 00876412), registered office: Farnell House, Forge Lane, Leeds LS12 2NE.

ICP 备案号 10220084.

Follow element14

  • X
  • Facebook
  • linkedin
  • YouTube