element14 Community
element14 Community
    Register Log In
  • Site
  • Search
  • Log In Register
  • About Us
  • Community Hub
    Community Hub
    • What's New on element14
    • Feedback and Support
    • Benefits of Membership
    • Personal Blogs
    • Members Area
    • Achievement Levels
  • Learn
    Learn
    • Ask an Expert
    • eBooks
    • element14 presents
    • Learning Center
    • Tech Spotlight
    • STEM Academy
    • Webinars, Training and Events
    • Learning Groups
  • Technologies
    Technologies
    • 3D Printing
    • FPGA
    • Industrial Automation
    • Internet of Things
    • Power & Energy
    • Sensors
    • Technology Groups
  • Challenges & Projects
    Challenges & Projects
    • Design Challenges
    • element14 presents Projects
    • Project14
    • Arduino Projects
    • Raspberry Pi Projects
    • Project Groups
  • Products
    Products
    • Arduino
    • Avnet Boards Community
    • Dev Tools
    • Manufacturers
    • Multicomp Pro
    • Product Groups
    • Raspberry Pi
    • RoadTests & Reviews
  • Store
    Store
    • Visit Your Store
    • Choose another store...
      • Europe
      •  Austria (German)
      •  Belgium (Dutch, French)
      •  Bulgaria (Bulgarian)
      •  Czech Republic (Czech)
      •  Denmark (Danish)
      •  Estonia (Estonian)
      •  Finland (Finnish)
      •  France (French)
      •  Germany (German)
      •  Hungary (Hungarian)
      •  Ireland
      •  Israel
      •  Italy (Italian)
      •  Latvia (Latvian)
      •  
      •  Lithuania (Lithuanian)
      •  Netherlands (Dutch)
      •  Norway (Norwegian)
      •  Poland (Polish)
      •  Portugal (Portuguese)
      •  Romania (Romanian)
      •  Russia (Russian)
      •  Slovakia (Slovak)
      •  Slovenia (Slovenian)
      •  Spain (Spanish)
      •  Sweden (Swedish)
      •  Switzerland(German, French)
      •  Turkey (Turkish)
      •  United Kingdom
      • Asia Pacific
      •  Australia
      •  China
      •  Hong Kong
      •  India
      •  Korea (Korean)
      •  Malaysia
      •  New Zealand
      •  Philippines
      •  Singapore
      •  Taiwan
      •  Thailand (Thai)
      • Americas
      •  Brazil (Portuguese)
      •  Canada
      •  Mexico (Spanish)
      •  United States
      Can't find the country/region you're looking for? Visit our export site or find a local distributor.
  • Translate
  • Profile
  • Settings
CodeBug
  • Learn
  • Learning Center
  • STEM Academy
  • CodeBug
  • More
  • Cancel
CodeBug
Blog My experience making a fruit keyboard.
  • Blog
  • Forum
  • Documents
  • Events
  • Polls
  • Files
  • Members
  • Mentions
  • Sub-Groups
  • Tags
  • More
  • Cancel
  • New
Join CodeBug to participate - click to join for free!
  • Share
  • More
  • Cancel
Group Actions
  • Group RSS
  • More
  • Cancel
Engagement
  • Author Author: notdodgy
  • Date Created: 9 Oct 2015 10:51 PM Date Created
  • Views 1092 views
  • Likes 4 likes
  • Comments 2 comments
  • code_bug
  • ten_projects_in_ten
  • days
Related
Recommended

My experience making a fruit keyboard.

notdodgy
notdodgy
9 Oct 2015

I followed the tutorial which found by clicking on Learn, then tutorial and scrolling down...  direct link here: http://www.codebug.org.uk/learn/activity/54/fruit-keyboard/


The tutorial leads you through the main steps, with descriptions and explanations.


It will take you to the create page in tutorial mode - the steps to take are described in the box at the left.

As you step through this pop up instructions appear showing you exactly what to click on in order to create the code.


Following the steps to create one input was straightforward and it was easy enough to repeat the steps to extend it from one to four inputs.

Took me around 10 minutes.


I saved my code and it can be viewed here: http://www.codebug.org.uk/explore/codebug/1322/ (You can use REMIX to edit a copy).


I downloaded the code file and followed the instructions to load it.

(Removed the battery from the bug, Plug in the USB while holding button 1, then right clicked the file and selected send to codebug).


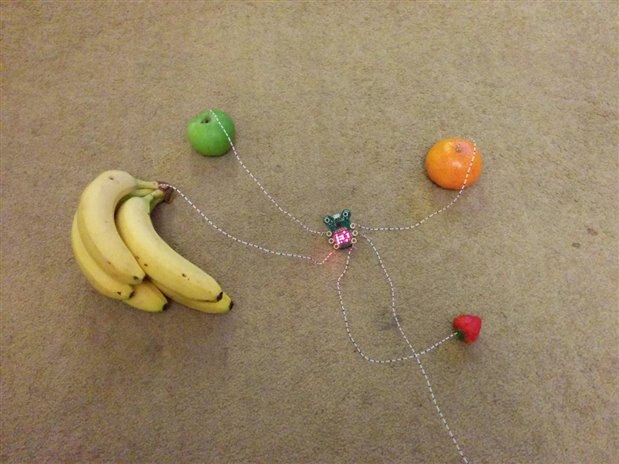
I did not have any crocodile clips, so simply twisted wires to the codebug and pushed the other ends into the fruit.

Re-inserted the battery and it worked.


I found I did not need to touch the ground wire, just the fruit.  I suspect this is down to background mains being picked up.

In fact, touching the ground wire caused it to detect the bananas!

I had used a bunch of 5 bananas, so I came up with the theory that size mattered.

I swapped the wires between the strawberry and the bunch of bananas and touching the earth wire now triggered the input connected to the bananas. (It displayed strawberry).


My daughter also tried touching the fruit and it did not trigger, but if I touched her, while she was touching the fruit, then it did!


This suggests some experiments could be made to see under which circumstances a connection to ground is needed and whether the environment affects triggering.

image

Doing this project I found out some of the features / rules for using the codebug, e.g. that inputs that you intend to use need to be declared in the start block.
(Something you have to do with most micro-controllers).


Working through the tutorials is good way to learn about programming the codebug.

  • Sign in to reply

Top Comments

  • Former Member
    Former Member over 9 years ago +1
    It looks a fantastic idea and I was impressed by the concept. I went through your code, it seems out of my understanding.
  • notdodgy
    notdodgy over 9 years ago in reply to Former Member +1
    I recommend working through some of the tutorials. They help you pick up how it works. This code had 5 components, which were duplicated for each input. Tell it to use the contacts as inputs A loop that…
Parents
  • Former Member
    Former Member over 9 years ago

    It looks a fantastic idea and I was impressed by the concept. I went through your code, it seems out of my understanding.

    • Cancel
    • Vote Up +1 Vote Down
    • Sign in to reply
    • More
    • Cancel
Comment
  • Former Member
    Former Member over 9 years ago

    It looks a fantastic idea and I was impressed by the concept. I went through your code, it seems out of my understanding.

    • Cancel
    • Vote Up +1 Vote Down
    • Sign in to reply
    • More
    • Cancel
Children
  • notdodgy
    notdodgy over 9 years ago in reply to Former Member

    I recommend working through some of the tutorials.

    They help you pick up how it works.


    This code had 5 components, which were duplicated for each input.


    1. Tell it to use the contacts as inputs
    2. A loop that runs forever which contains 4 if statements
    3. If statements that check if an input pin has gone low
    4. If action definition that tells it to scroll a sprite, (image on the display)
    5. Sprite definition - the word to be displayed.


    The best way to learn is to just have a go.

    • Cancel
    • Vote Up +1 Vote Down
    • Sign in to reply
    • More
    • Cancel
element14 Community

element14 is the first online community specifically for engineers. Connect with your peers and get expert answers to your questions.

  • Members
  • Learn
  • Technologies
  • Challenges & Projects
  • Products
  • Store
  • About Us
  • Feedback & Support
  • FAQs
  • Terms of Use
  • Privacy Policy
  • Legal and Copyright Notices
  • Sitemap
  • Cookies

An Avnet Company © 2025 Premier Farnell Limited. All Rights Reserved.

Premier Farnell Ltd, registered in England and Wales (no 00876412), registered office: Farnell House, Forge Lane, Leeds LS12 2NE.

ICP 备案号 10220084.

Follow element14

  • X
  • Facebook
  • linkedin
  • YouTube