element14 Community
element14 Community
    Register Log In
  • Site
  • Search
  • Log In Register
  • Community Hub
    Community Hub
    • What's New on element14
    • Feedback and Support
    • Benefits of Membership
    • Personal Blogs
    • Members Area
    • Achievement Levels
  • Learn
    Learn
    • Ask an Expert
    • eBooks
    • element14 presents
    • Learning Center
    • Tech Spotlight
    • STEM Academy
    • Webinars, Training and Events
    • Learning Groups
  • Technologies
    Technologies
    • 3D Printing
    • FPGA
    • Industrial Automation
    • Internet of Things
    • Power & Energy
    • Sensors
    • Technology Groups
  • Challenges & Projects
    Challenges & Projects
    • Design Challenges
    • element14 presents Projects
    • Project14
    • Arduino Projects
    • Raspberry Pi Projects
    • Project Groups
  • Products
    Products
    • Arduino
    • Avnet & Tria Boards Community
    • Dev Tools
    • Manufacturers
    • Multicomp Pro
    • Product Groups
    • Raspberry Pi
    • RoadTests & Reviews
  • About Us
  • Store
    Store
    • Visit Your Store
    • Choose another store...
      • Europe
      •  Austria (German)
      •  Belgium (Dutch, French)
      •  Bulgaria (Bulgarian)
      •  Czech Republic (Czech)
      •  Denmark (Danish)
      •  Estonia (Estonian)
      •  Finland (Finnish)
      •  France (French)
      •  Germany (German)
      •  Hungary (Hungarian)
      •  Ireland
      •  Israel
      •  Italy (Italian)
      •  Latvia (Latvian)
      •  
      •  Lithuania (Lithuanian)
      •  Netherlands (Dutch)
      •  Norway (Norwegian)
      •  Poland (Polish)
      •  Portugal (Portuguese)
      •  Romania (Romanian)
      •  Russia (Russian)
      •  Slovakia (Slovak)
      •  Slovenia (Slovenian)
      •  Spain (Spanish)
      •  Sweden (Swedish)
      •  Switzerland(German, French)
      •  Turkey (Turkish)
      •  United Kingdom
      • Asia Pacific
      •  Australia
      •  China
      •  Hong Kong
      •  India
      •  Korea (Korean)
      •  Malaysia
      •  New Zealand
      •  Philippines
      •  Singapore
      •  Taiwan
      •  Thailand (Thai)
      • Americas
      •  Brazil (Portuguese)
      •  Canada
      •  Mexico (Spanish)
      •  United States
      Can't find the country/region you're looking for? Visit our export site or find a local distributor.
  • Translate
  • Profile
  • Settings
STEM Projects
  • Learn
  • Learning Center
  • STEM Academy
  • STEM Projects
  • More
  • Cancel
STEM Projects
Blog Ideas for sensors with students
  • Blog
  • Forum
  • Documents
  • Events
  • Polls
  • Files
  • Members
  • Mentions
  • Sub-Groups
  • Tags
  • More
  • Cancel
  • New
Join STEM Projects to participate - click to join for free!
  • Share
  • More
  • Cancel
Group Actions
  • Group RSS
  • More
  • Cancel
Engagement
  • Author Author: fisher0251
  • Date Created: 17 Jan 2015 3:09 AM Date Created
  • Views 687 views
  • Likes 4 likes
  • Comments 4 comments
  • raspberry pi educators design challenge
  • raspberry_pi_educator
  • pi educators sub space
  • raspberrypi_education
Related
Recommended

Ideas for sensors with students

fisher0251
fisher0251
17 Jan 2015

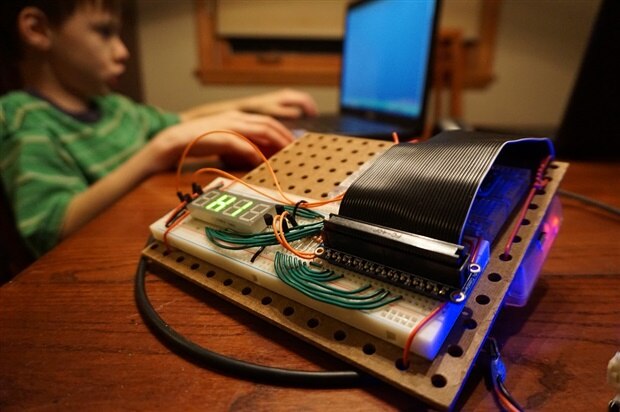
In my first Roadtest post, I gave my overall impression of the Raspberry Pi B+ Camera Kit out of the box. My long term idea is to have my Earth and Space Science high school students use a RPi-based high altitude balloon. This would require integrating a camera, sensors, GPS and radio communication into one package. Not a simple task! I was going to start with the camera module, but my 3rd grade son's science fair project intervened. He wanted to program something on the Pi and measure something with a sensor, so I went about breadboarding him a pressure sensor and 4-digit 7-segment display device for measuring atmospheric pressure. Since he'd need to be mobile (we're going to drive around in the car to collect data) we'd need battery power. Along the way, I reflected on what it takes to get students working up to a project like a RPi high altitude balloon.


The Hardware

Although my son is into electronics, this build was beyond his 3rd grade skills. I put it together, with the idea that he'd have to develop a plan for collecting data, and write a Python script to save and display it. Components:

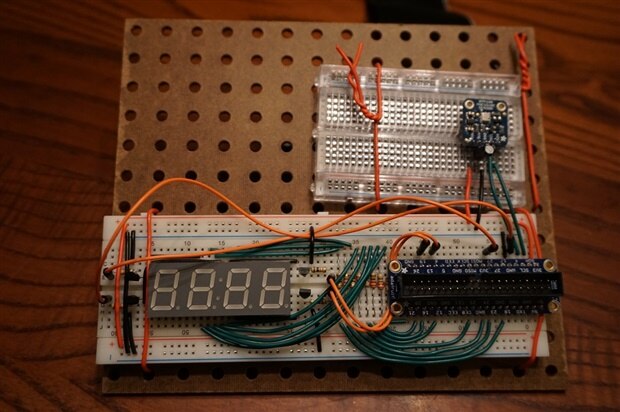
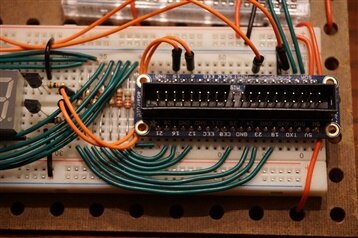
  • Adafruit Pi Cobbler for the B+ with included ribbon cable for easy connection to the RPi GPIO pins
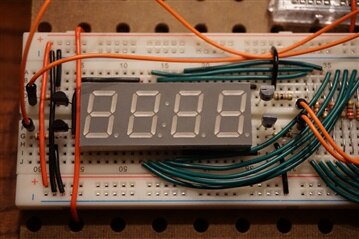
  • 4-digit 7-segment LED display (wiring and programming the multiplexing for this was fun and all, but next time I'll spend just a few more bucks and get one with more on-board help)
  • BMP180 pressure sensor breakout board (I've used this before in my Pi weather station)
  • 8 220-ohm resistors (for current limiting the LED segments)
  • 4 NPN transistors, one for each LED digit's common cathode (I used 2N3904 since I had them in my box, but any will do)
  • 4 1k resistors (to drive the transistor bases)
  • 1 10-uF electrolytic capacitor to help hold up the board voltage for the sensor (for good measure)
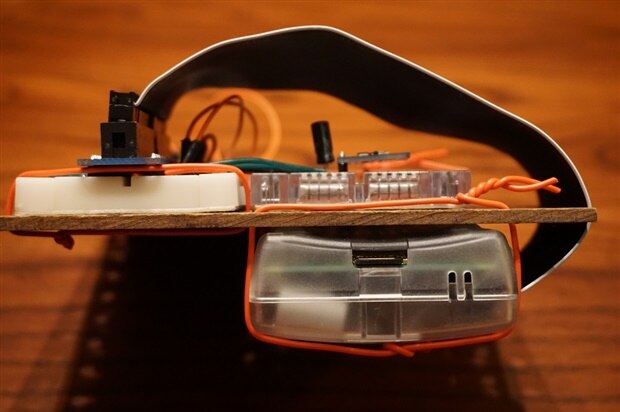
  • Adafruit PowerBoost 500 Charger and 2500-mAh lipo battery (if you want to go mobile)
  • Sufficient breadboard space and wire
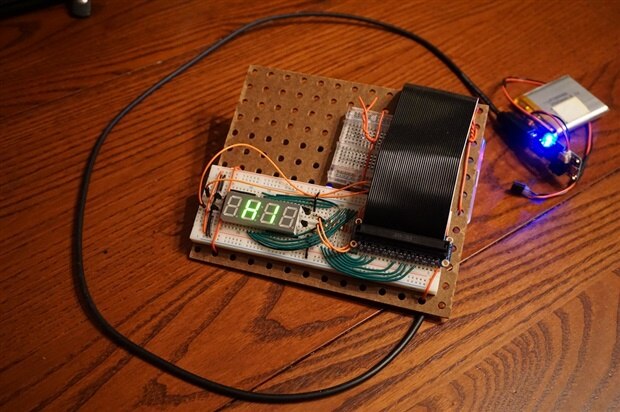
  • Approx. 6 in. x 6 in pegboard for temporarily mounting everything

I twist-tied the breadboard and the RPi to the pegboard with lengths of wire. This package is crude, but it should be adequate to protect the electronics for their journey. Images:

image

imageimageimage

image

The Code

The thing I've found after teaching science for 10 years, is that students need just the right amount of challenge when learning something new. Too much difficulty, and they throw their hands up in despair. So, for this project intended for my 3rd grader, I needed to provide him an easy way to interact with the hardware. But I would recommend this for students of any age.


(ledmulti library on Github)


I set about to create a Python function library for multiplexing the LED digits. The segmented display is common cathode for each digit: you have 8 GPIO pins set HIGH or LOW to provide power for each segment's anode (including the decimal point), then switch on the transistor to provide a path to ground for the single cathode and light up a single digit. This keeps the current draw from the RPi at a level that won't damage it. Note that you also don't want to use another GPIO pin for the cathode since sinking that much current to the Pi is bad. This means that in order to display more than one digit, you need to cycle through each digit one at a time fast enough that the human eye doesn't notice. This is what my ledmulti library does. Note: The library doesn't define a Python class, just usable functions. I don't know much about classes yet!


The function displayChar(character,digit,decimal) displays just one character in the specified digit (1 through 4) with or without a decimal. I included a "font" for the 7-segment display with numbers 0-9 and any uppercase letters I thought would look ok.


The function I intend for my son to use for displaying numbers is display(number,decimals,display_time). It accepts any number, and then displays it with the given decimal places for the given number of seconds. Since the RPi runs an OS that is not real time, you can notice very slight flickers when the system has to do something else. But otherwise it works well.


Examples for Students

My son has learned the basics of coding with Python (both from Codecademy and from coding for Minecraft-Pi). I've found that the best way to learn or teach a new programming library/module is with examples. Here are the three simple ones I wrote for my son.


Thoughts About Project in the Classroom

I really enjoyed getting this project together, but I have reservations about using this in the classroom with students of mixed abilities. For breadboarding a circuit with sensors and a display, there is a decent about of background knowledge required. Also required is experience programming, not necessarily in Python but some understanding of the logic of coding is needed. These are skills that are learned at my school in engineering electives (electronics and Arduino programming) and are used by our FIRST Robotics team. If I were to tackle a high altitude balloon project, I think that it'd have to be an opt-in activity for a relatively small but capable group of students. This would include those who want to learn as we go. Then the product could be used for the experiment with the entire class. I know that there are classes that gear the entire curriculum toward a project of this magnitude, but my course isn't there yet. I think that a teacher desiring this kind of project would have to: 1) Do it him or herself first, or at least complete preliminary projects to become proficient with what is doable. 2) Try it with a small group the first time, as I explained. 3) After success on a small scale, then branch out in future years to make the project an integral part of the curriculum.


NEXT TIME: Creating a time lapse with the camera module!


Check out more of my projects at electronicfish.wordpress.com.

image

image

  • Sign in to reply
  • clem57
    clem57 over 10 years ago in reply to jw0752

    John,

    I have my own son and tried to guide him into programming at an early age. But after 10 years saying nothing, he has suddenly seen the light and getting a degree in computers. I can not figure why he changed. LOL! So maybe the same could happen to yours.

    Just enjoy them,

    Clem

    • Cancel
    • Vote Up 0 Vote Down
    • Sign in to reply
    • More
    • Cancel
  • jw0752
    jw0752 over 10 years ago

    Hi Dan, This is a very nice project and it is impressive that your son can do so well at his age. I have been trying for years to get one of the grandkids to grab ahold and get interested in Electronics or Physics. Either I am not a very good teacher or I have a crop of liberal arts majors.

    John

    • Cancel
    • Vote Up 0 Vote Down
    • Sign in to reply
    • More
    • Cancel
  • DAB
    DAB over 10 years ago

    Nice project.


    I agree, it has just the right balance of challenge and simplicity to entice students into the world of making.


    I am impressed that your son is capable of programming python at such a young age.

    If he continues to grow his skills, he should have a very fun future ahead of him.


    DAB

    • Cancel
    • Vote Up 0 Vote Down
    • Sign in to reply
    • More
    • Cancel
  • clem57
    clem57 over 10 years ago

    The best way for young people to learn is to break the tasks into simple byte size(pun intended) pieces. Introduce each sensor code and let them attack the one. Also it is much easier to debuf/fix one at a time. Later combine together and let them learn functions/modules in python using classes IMHO.


    Clem

    • Cancel
    • Vote Up 0 Vote Down
    • Sign in to reply
    • More
    • Cancel
element14 Community

element14 is the first online community specifically for engineers. Connect with your peers and get expert answers to your questions.

  • Members
  • Learn
  • Technologies
  • Challenges & Projects
  • Products
  • Store
  • About Us
  • Feedback & Support
  • FAQs
  • Terms of Use
  • Privacy Policy
  • Legal and Copyright Notices
  • Sitemap
  • Cookies

An Avnet Company © 2025 Premier Farnell Limited. All Rights Reserved.

Premier Farnell Ltd, registered in England and Wales (no 00876412), registered office: Farnell House, Forge Lane, Leeds LS12 2NE.

ICP 备案号 10220084.

Follow element14

  • X
  • Facebook
  • linkedin
  • YouTube