


This is my first post as part of the Raspberry Pi Educators Roadtest scheme. Unfortunately I am a little behind with this blog mainly due to the delay in receiving the kit - I was expecting to have it well before Christmas when I would have some time off work to experiment with it, but it didn't actually arrive until the end of the first week in January. This has given me a limited timeframe in which to work. The other surprise was that the camera supplied was a PiNoIR which has a different range of applications to the standard Raspberry Pi camera which I was expecting, and I hadn't really thought of any suitable projects for this type of camera beforehand.
Anyway, I thought I'd use my three blog posts to record my investigations and experiments with using the PiNoIR as a first time user from opening the box to a final project. My initial ideas involved doing something in the dark outside the house and to that end I was thinking of using it as a night time wildlife recording system or a planet/star movement tracker. Neither of these are really innovative I know, but they seemed reasonable for a first project with this kit.
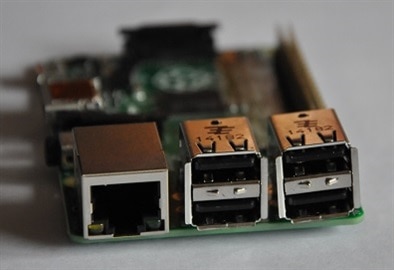
The kit supplied included a Raspberry Pi Model B+ with a case, the PiNoIR camera with the infra-red filter removed to make it sensitive to IR light, a Wi-Pi wireless dongle, a 5 volt 1.8A power supply and the latest NOOBs software on a microSD card. The first issue I had was that the USB ports had not been seated or soldered very well to the Pi PCB and so the openings in the case did not quite line up for the USB sockets. This can be seen in the photograph to the right.
Installing the camera with its ribbon connector was easy enough and with a bit of easing, I managed to make all four of the ports accessible through the holes in the case in spite of them not lining up perfectly. I did like the fact that the Raspberry Pi camera can be installed completely inside this case, with the lens looking out through a suitably placed hole. The ribbon cable folds back on itself quite neatly to position the lens through the hole.
After connecting the keyboard, mouse, network and power cables to the Pi, the next step was to install the Raspian Operating System from the NOOBs card which I did using a wired network connection. I was pleased to see that it installed the latest Pi desktop which is much improved over the previous version. On first boot I ran raspi-config to enable the camera and SSH as well as give it the hostname of NoIRCam and I then I rebooted and updated everything using the command line (sudo apt-get update, sudo apt-get upgrade, sudo rpi-update) in LX Terminal.
At this point I unplugged my Pi from the wired network and started to set up the Wi-PI wi-fi dongle to talk to my home network. I did have some trouble with this as it didn't seem to find my network when I scanned for it even when close to the wireless router. I wondered if it might have been due to a bad connection due to the USB port problem I mentioned earlier. Eventually I did get it work but it wasn't really that reliable and the signal was frequently dropped. This could be due to many things including the strength and quality of my home Wi-Fi signal, so I'm keeping an open mind as to what the problem is. The bottom line though is that I will probably be using a wired network connection for reliability.
After setting up the basic system I needed to test that the camera was working, so I ran a few RaspiCam commands in LXTerminal to check that I had a working camera system. I tried:
Still Images
raspistill -t 5000 - this command previews an image from the camera for 5 seconds (5000 milliseconds)
raspistill -o photo1.jpg -t 2000 - this command captures an image from the camera after 2 seconds and stores it a file called photo1.jpg
To view these images I used the Image Viewer application available in Menu > Accessories on the Raspberry Pi desktop.
Video
raspivid -o video1.h264 -t 5000 - this command captures 5 seconds of video from the camera and stores it in a file called video1.h6264
To view the video I used omxplayer from the command line: omxplayer video1.h264
Time Lapse
raspistill -t 50000 -tl 5000 -o photo%d.jpg - this command captures a set of still images every 5 seconds over a period of 50 seconds
The %d part of the output filename names the files sequentially photo1.jpg, photo2.jpg, photo3.jpg etc.
To view the images as a timelapse video I downloaded and installed Mencoder (sudo apt-get install mencoder) which is not part of the standard Raspian distro. I created the video from the LXTerminal command line with these commands:
ls *.jpg > stills.txt
mencoder -nosound -ovc lavc -lavopts vcodec=mpeg4: aspect=16/9:vbitrate=8000000 -vf scale=1920:1080 -o timelapse.avi -mf type=jpeg:fps=24 mf://@stills.txt
These commands build a list of sequential jpg files to be combined into a single video file called timelapse.avi
There are plenty of other RaspiCam settings and special effects that can be used but I didn't have time to investigate them all. Plus what I am really after is a wireless GUI interface to the PiNoIR to make things easier. My experiments with that are coming in Part 2 of this blog, but for now I'll finish this post by recording a few ideas that I have for possible PiNoIR projects:
- OwlCam - a wearable PiNoIR camera system to be used to look for Tawny Owls roosting in a local wood. It needs to be fully portable with infrared illumination and a wireless interface to an iPad Mini for controlling the PiNoir settings and recordings.
Timelapse movie creation system of the tides ebbing and flowing - again portability is the main issue as with OwlCam.
Planet and star timelapse tracker - this doesn't need to be portable as it can be run from power cables outside the house.
Garden wildlife nightcam to find out what is eating the bird food in the garden shed.
Nightime security camera to see who's knocking on your door at that late hour when you're in bed.
Top Comments