


This week I received the Raspberry Pi Model B+ Camera Kit as part of the element14 Raspberry Pi Educators Roadtest. In this blog I'd like to share a bit of my background and then talk about this kit's included parts and setup.
I am a STEM educator in Minnesota, teaching high school physics and middle school science. I also help coach our extracurricular science team. My interest in DIY electronics has grown over the past year and I've explored both Arduino and Raspberry Pi projects. My favorite so far is a backyard weather station created with various sensors and run by a Python script on the Raspberry Pi Model B. I also taught a Raspberry Pi programming class last summer for elementary aged kids using Minecraft Pi. I was really excited to hear about the improvements made to the RPi B+ but haven't gotten my hands on one until now. So, I'd like to share a few thoughts about this Camera Kit from the perspective of an educator who is familiar with the Raspberry Pi and wants to see what this kind of kit could offer to my students.
Out of the box, the B+ Camera Kit provides a basic setup to get one started fast. First off, my experience in the past has involved downloading the large Raspbian image and creating my own SD card. This worked fine, but of course the download is considerable and it was a bit of a learning curve the first time (I was new to both Linux distributions as well as the Raspberry Pi). This kit comes with the NOOBS 8Gb SD card ready to go. I know that teachers are busy creatures, and finding the time to tinker through the process of manually creating these boot cards can be a barrier to trying out the Raspberry Pi. This time, the pre-flashed card took away all the hassle and is great to have in a kit like this. I chose to install Raspbian since I am familiar with it, although other distros are included with NOOBS. Plus, I can always re-install a clean image if I mess anything up! 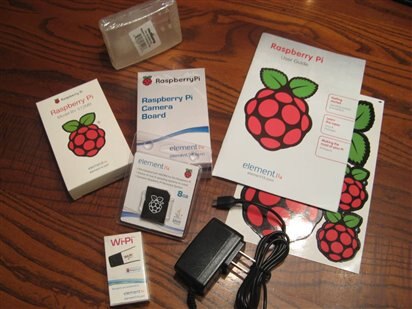
While I avoided the initial download, I did take the time to run:
sudo apt-get update
sudo apt-get upgrade
This takes some time and requires downloads on the order of hundreds of Mb. But, the included Wi-Pi wifi dongle was plug-and-play and connected to my home network without a snag.
I really notice the extra USB ports on the Model B+ (4 of them, compared with 2 on the Model B). I use a USB dongle to connect to wireless keyboard/mouse (not included in this kit), and another for the wifi. I actually have TWO MORE left open on the B+! Also included is the power supply, which is a nice 2100mA. It feels really solid, not flimsy and cheap. This might seem a trivial feature, but it's good to have a "wall wart" I can trust that will provide more than enough juice for any USB peripherals I choose.
I'll mention two more things that I appreciate about this kit. First, the included element14 manual goes beyond "how do you plug this in." It includes a description of how to use raspi-config, how to start the GUI, and some basic command line commands. It is a nice introduction split into sections that are printed in glossy full-color and nicely laid out to be non-intimidating. I know it took me a while as a new Linux user just to get the darn thing to turn on and off! This book is something I would use directly with students. And having it in a hard copy makes it immediately useful.
Second, the included RPi B+ case has holes for mounting the camera inside of it. The case itself is a straightforward snap together deal, but the camera board is screwed in with two included screws so that is faces out on the top of the case. This means the whole thing can be mounted to the wall or a stand and the camera is already nicely tucked away. I installed the camera module right away, even though I haven't used it yet.
In future blog posts, I intend to tinker with the camera to create a time lapse (something I haven't tried before). I'll also explore the lower power capabilities of the B+ compared to the Model B. I am interested in using this RPi in a high altitude balloon this spring to collect atmospheric data with my students. This will necessarily be battery powered, and the B+ will likely make this work better.

Top Comments
-

gsimerlink
-
Cancel
-
Vote Up
+1
Vote Down
-
-
Sign in to reply
-
More
-
Cancel
Comment-

gsimerlink
-
Cancel
-
Vote Up
+1
Vote Down
-
-
Sign in to reply
-
More
-
Cancel
Children