

.jpg)

 Industrial automation has transformed business operations by making them more competitive and cost-effective. This tech-driven shift has helped industries optimize processes, reduce errors, increase productivity, and cut costs. A key component of industrial automation systems is the programmable logic controller (PLC). They are the central control units for machines and manufacturing processes. When integrated with IoT and edge computing, PLCs can perform data analytics, automatic decision-making, failure prediction, and process optimization. However, programming a PLC has been complex and challenging, requiring specialized knowledge. Common challenges in PLC programming have included debugging syntax errors, logic errors, communication errors, and interfacing with external devices. This article explores how Arduino-based Opta® PLC can mitigate PLC programming challenges. It also introduces the Arduino PLC programming environment, highlighting its benefits and applications in automation.
Benefits of Arduino PLC Programming
The Arduino PLC IDE is an integrated development environment that bridges the gap between traditional PLC systems and the Arduino ecosystem. This open-source, free-to-use software offers a unified programming environment. It provides a range of debugging tools and access to a wide array of pre-installed libraries and function blocks, with the option to create custom libraries. This enables users to program and control PLCs, leveraging Arduino’s intuitive interface and capabilities for industrial automation applications.

Figure 1: ARDUINO AFX00002 Arduino Board Module, Opta Wifi, STM32H747XI, 32 bit, ARM Cortex-M4/Cortex-M7
The Arduino PLC IDE supports five programming languages defined by the IEC 61131-3 standard:
- Ladder Diagram (LD)
- Sequential Function Chart (SFC)
- Function Block Diagram (FBD)
- Structured Text (ST)
- Instruction List (IL)
Figure 2 illustrates a sample ladder logic program created with the the Arduino PLC IDE. In this program, a fan and an indicator lamp start after a delay of 10,000 ms. The timer is triggered by a proximity sensor. When a metal object comes within range of the proximity sensor, the timer starts. After 10,000 ms, the fan is energized, and the LED indicator illuminates.
The Arduino PLC IDE includes a comprehensive suite of monitoring and debugging tools. Users can view all PLC operations during debugging, as well as perform detailed code analysis.
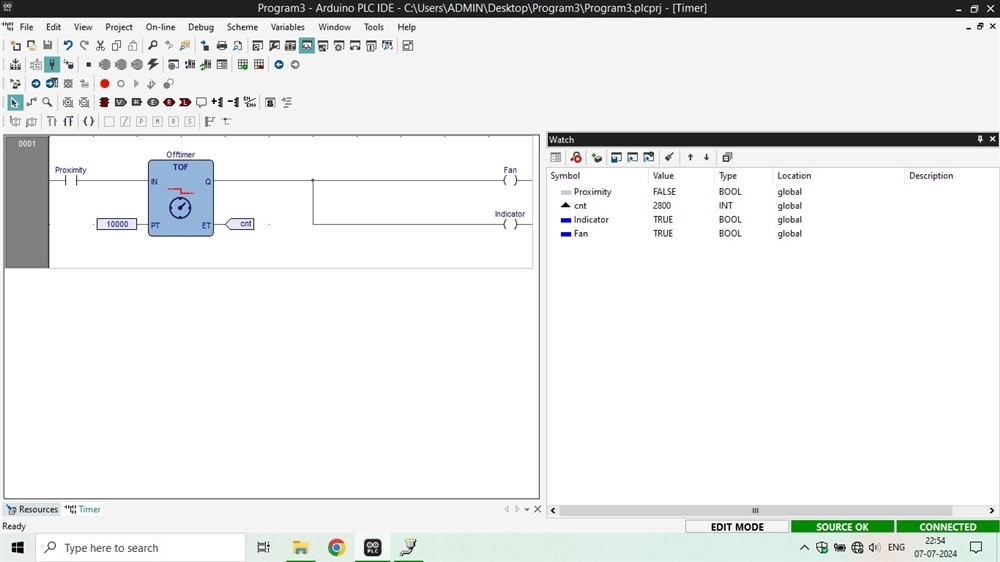
Figure 2: A sample ladder logic program running on Opta® PLC.
Getting Started with Programming the Arduino Opta® Micro-PLC
Designed as a collaboration between Arduino and tech company Finder®, the Arduino Opta® is a secure micro-PLC with Industrial IoT capabilities and is CE/UL certified for industrial, OEM, or building automation projects. The Opta® PLC offers ultra-secure connectivity, support OTA (Over-the-Air) firmware updates and enables remote control via the Arduino Cloud or third-party services. They can be programmed using either the Arduino programming language or the standard IEC-61131-3 PLC programming languages, with access to many ready-to-use software libraries and sketches.

Figure 3: ARDUINO AFX00003 Arduino Board Module, Opta Lite, STM32H747XI, 32 bit, ARM Cortex-M4/Cortex-M7
The Arduino Opta® is available in three variants:
- Opta® Lite
- Opta® RS485
- Opta® WiFi
Table 1 details the differences between each variant. All options feature an STM32H747XI dual Cortex®-M7+M4 32-bit low-power Arm® MCU from STMicroelectronics, operating at 240 MHz. The two cores communicate via a remote procedure call mechanism, allowing functions to be called on the other processor. Opta® offers multiple choices for network connectivity, including Ethernet, USB, Wi-Fi® / Bluetooth® Low Energy (BLE), and industry-specific protocols such as RS-485. It also includes the ATECC608B, a secure element from Microchip®, which provides advanced security in IIoT environments. The compact design of Opta® allows for DIN rail mounting and can operate between temperature ranges of -20 °C to +50 °C without the need for external cooling.
|
Feature |
Opta |
Opta |
Opta |
|
USB |
USB-C® |
USB-C® |
USB-C® |
|
Ethernet Support |
10/100BASE-T Port |
10/100BASE-T Port |
10/100BASE-T Port |
|
RS-485 |
Half-duplex |
Half-duplex |
N/A |
|
Wi-Fi® |
N/A |
802.11 b/g/n |
N/A |
|
SKU |
AFX00001 |
AFX00002 |
AFX00003 |

Table 1: Differences between the variants of Arduino Opta® micro-PLCs
How to Program the Opta®
Programming of Arduino Opta® can be done using Arduino IDE or Arduino PLC IDE software, both of which are open-source environments. These tools simplify complex automation projects. It is recommended that users download and install both packages on their computers. Let's discuss how to program an Arduino Opta® PLC and connect it with Arduino Cloud.

Figure 4: ARDUINO AFX00001 Arduino Board Module, Opta RS485, STM32H747XI, 32 bit, ARM Cortex-M4/Cortex-M7
Creating Your First Program using Ladder Logic for Arduino Opta® PLC
Follow these basic steps to create a ladder logic-based program on the Opta® PLC:
- Connect the Opta® PLC and open the Arduino IDE tool. Install the core for the Opta® by navigating to Tools > Board > Boards Manager. In the Boards Manager section, search for Opta mbed and install it.
- After installing Opta mbed, open the Arduino PLC IDE tool and create a new project. Name your project and select ‘Opta 1.0’ as the target.
- Download the initial sketch, but only on a complete reset or first use. The overview page will show the device info and status along with an image of your Opta® PLC. At the bottom of the image, you will find the ‘Other’ option for manual sketch download. Select the correct COM port (check Device Manager on your computer) and download it.
- After the initial download, you can connect to the Opta® PLC online through the On-line menu > Connect. You can now see the status of your connected PLC.
- The next step is to define the Opta I/O tags. To define the I/O tags, navigate to the 'Resources' tab > 'Button Inputs' and assign the one called 'User' with any variable name ( for example, 'User_A' ). Repeat the process in the ‘LED Outputs’ tab, locate L1(or any other LED), and name it simply 'LED_1' for physical input and output map programmable input and relay outputs accordingly. After mapping is complete, save the Program using the icon on the main page or go to the main menu > ‘File’ > ‘Save Program’.
- To Create a new program, go to the main menu > ‘Project’ > ‘New Object’ > ‘New Program’. Select the LD option for ladder logic, name it, and define how it will run (Fast/slow/Background/Init).
- Now, a new ladder logic program will be displayed in the work area. It will contain a single rung with an input and output condition. This program also appears under the fast task folder and the project as a ladder diagram symbol. Now configure the rung by double-clicking or right-clicking > 'properties' and enter the variable names that are already defined.
- Go to ‘On-line’ > ‘Download code’, and your Opta® should now run on the Ladder logic program.
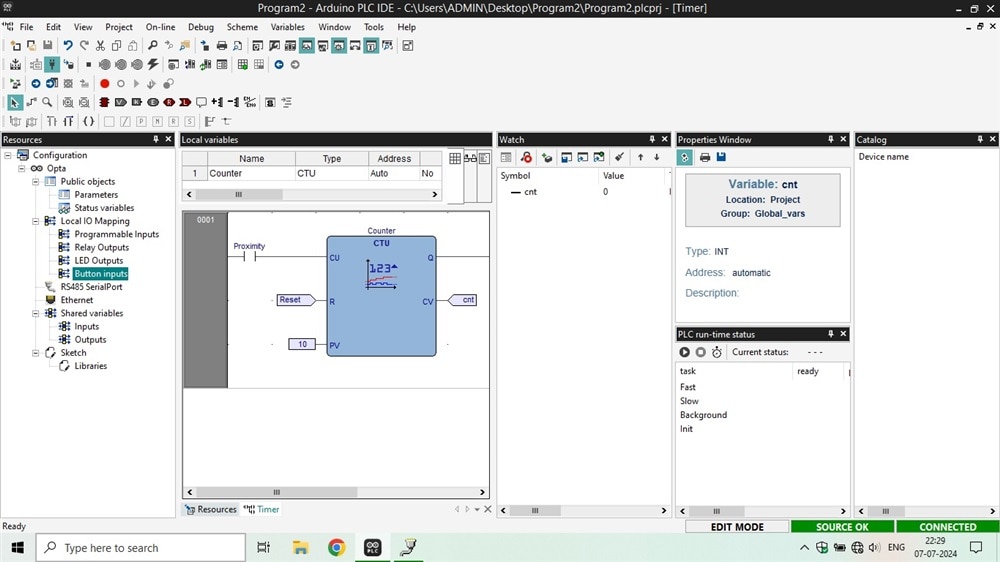
Figure 5: Programming Arduino Opta® PLC using Ladder Logic
Connecting Arduino Opta® PLC with Arduino Cloud
To integrate the Opta® PLC with the Arduino Cloud, follow these steps:
- Configure Arduino Cloud: we need to configure the Arduino Cloud with Opta® to create a Thing. This involves registering Opta® with Cloud variables and configuring a dashboard to perform various actions.
- Access the Full Editor: Navigate to 'Things'> 'Opta PLC IDE Cloud Thing > 'Sketch' > 'Open full editor,' of which ‘Opta® PLC IDE Cloud’ is the name of the Thing you created.
- Extract the Web-Based code: Once your Arduino Cloud Thing is successfully created, we can extract the web-based code. This code will serve as the base for the Arduino sketch for Opta® in the desktop PLC IDE. The code can be accessed by going to the full editor.

Figure 6: Dashboard created in the Arduino Cloud. Image Source: Arduino
Conclusion
PLCs will continue to play an essential role in the real-time manufacturing environment. With the launch of Opta®, Arduino has enabled entry-level engineers to learn and explore IEC-61131-3 standard programming. It also allows system engineers and integrators to retrofit legacy equipment for the Industry 4.0 environment with IIoT capability. With the help of the highly configurable pre-installed and customizable libraries and function blocks of the PLC IDE tool, users can design and develop their IIoT applications on Opta® devices.
Review the Arduino Opta Micro-PLC
To learn more varieties about the different variants of the Opta® from Arduino Shop Now
About the Sponsor
Arduino designs, manufactures, and supports electronic devices and software, allowing people around the world to easily access advanced technologies that interact with the physical world. Our products are straightforward, simple, and powerful, ready to satisfy users’ needs from students to makers and all the way to professional developers. For more information, please visit this page: go here

