element14 Community
element14 Community
    Register Log In
  • Site
  • Search
  • Log In Register
  • Members
    Members
    • Benefits of Membership
    • Achievement Levels
    • Members Area
    • Personal Blogs
    • Feedback and Support
    • What's New on element14
  • Learn
    Learn
    • Learning Center
    • eBooks
    • STEM Academy
    • Webinars, Training and Events
    • Learning Groups
  • Technologies
    Technologies
    • 3D Printing
    • FPGA
    • Industrial Automation
    • Internet of Things
    • Power & Energy
    • Sensors
    • Technology Groups
  • Challenges & Projects
    Challenges & Projects
    • Design Challenges
    • element14 presents
    • Project14
    • Arduino Projects
    • Raspberry Pi Projects
    • Project Groups
  • Products
    Products
    • Arduino
    • Dev Tools
    • Manufacturers
    • Raspberry Pi
    • RoadTests & Reviews
    • Avnet Boards Community
    • Product Groups
  • Store
    Store
    • Visit Your Store
    • Choose Another Store
      • Europe
      •  Austria (German)
      •  Belgium (Dutch, French)
      •  Bulgaria (Bulgarian)
      •  Czech Republic (Czech)
      •  Denmark (Danish)
      •  Estonia (Estonian)
      •  Finland (Finnish)
      •  France (French)
      •  Germany (German)
      •  Hungary (Hungarian)
      •  Ireland
      •  Israel
      •  Italy (Italian)
      •  Latvia (Latvian)
      •  
      •  Lithuania (Lithuanian)
      •  Netherlands (Dutch)
      •  Norway (Norwegian)
      •  Poland (Polish)
      •  Portugal (Portuguese)
      •  Romania (Romanian)
      •  Russia (Russian)
      •  Slovakia (Slovak)
      •  Slovenia (Slovenian)
      •  Spain (Spanish)
      •  Sweden (Swedish)
      •  Switzerland(German, French)
      •  Turkey (Turkish)
      •  United Kingdom
      • Asia Pacific
      •  Australia
      •  China
      •  Hong Kong
      •  India
      •  Korea (Korean)
      •  Malaysia
      •  New Zealand
      •  Philippines
      •  Singapore
      •  Taiwan
      •  Thailand (Thai)
      • Americas
      •  Brazil (Portuguese)
      •  Canada
      •  Mexico (Spanish)
      •  United States
      Can't find the country/region you're looking for? Visit our export site or find a local distributor.
  • Translate
  • Profile
Members
Members
Blog Adjustable Bed for Laser Cutting
  • Blog
  • Forum
  • Documents
  • Events
  • Leaderboard
  • Members
  • Mentions
  • Sub-Groups
  • Tags
  • More
  • Cancel
  • New
Members requires membership for participation - click to join
Blog Post Actions
  • Subscribe by email
  • More
  • Cancel
  • Share
  • Subscribe by email
  • More
  • Cancel
Group Actions
  • Group RSS
  • More
  • Cancel
Engagement
  • Author Author: ralphjy
  • Date Created: 18 Mar 2020 11:50 PM Date Created
  • Views 482 views
  • Likes 7 likes
  • Comments 8 comments
  • laser cutting
Related
Recommended

Adjustable Bed for Laser Cutting

ralphjy
ralphjy
18 Mar 2020

It feels a bit strange to be working on my projects in the midst of this Covid-19 crisis but since the advice is social distancing - I guess it is an appropriate activity.  Hopefully isolation will slow the rate at which the virus is spreading so that a mitigation strategy can be implemented.


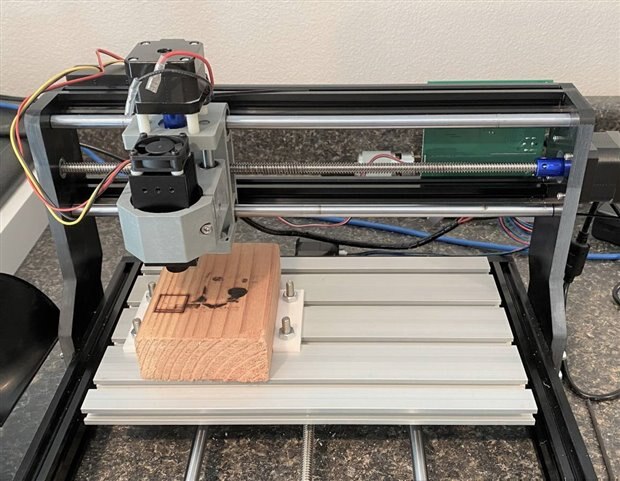
I've been working on my low power (5.5W) laser setup that I've described in previous blogs.  I've recently been doing some lightweight cutting of 2.5mm thick craft wood.  I've been using a scrap 2"x4"x5" block of wood to cut against but I need something larger for general purpose cutting and also should use something that doesn't burn.


Here is the setup I've been using.  You can see the burn marks from cutting a square and also where I burned through when I was adjusting settings for engraving cardstock.

image


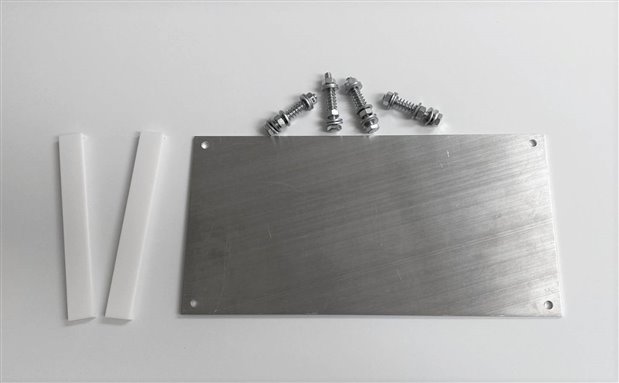
The bed of the CNC base is 7 inches deep and 12 inches wide so I got a 6"x12"x1/8" aluminum plate and drilled mounting holes at the corners.  I also used some 1/4-20 hardware and some springs so that I could have the capability to level the bed.  Here's the parts along with some guides that I printed to do material alignment.

image

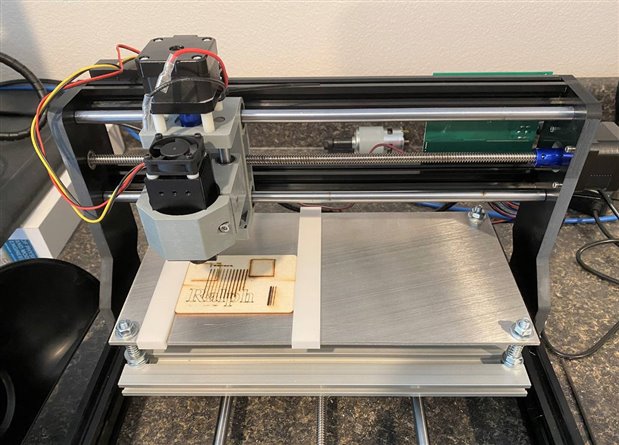
And the finished assembly.

image


To provide a convenient way to make the leveling measurements I printed an adapter for a Digital Dial Indicator Gage to mount it to the spindle holder.

imageimage

image


I'd like to have a way to do the laser focus calibration automatically so I've considered buying the serial interface cable for the dial indicator but I want to see if I can use a mini Lidar time-of-flight sensor instead to do a non-contact measurement.  The absolute accuracy of the TOF sensor at 40mm is probably only 2mm but I'm hoping the measurement repeatability would be good enough to use for focusing.  I'd like the repeatability to be about +/- 0.25mm but I think +/- 0.5mm would be okay.  The other accuracy problem would be the reflectance of the material I'm cutting/engraving but it would be fun to give it a try.

  • Sign in to reply

Top Comments

  • ankur608
    ankur608 over 2 years ago +2
    Even, I have faced similar issues on 3018 Woodpecker (though I used it for PCB milling, hence solved through 'conductive feedback heightmapping' ). The Gauge-mod looks 'Perfect' on the machine.
  • Fred27
    Fred27 over 2 years ago +2
    I made a similar adjustable bed a while ago but used an aluminium honeycomb because I was doing more cutting than engraving. https://0xfred.wordpress.com/2013/02/22/laser-improvements-an-adjustable-honeycomb…
  • ralphjy
    ralphjy over 2 years ago in reply to Fred27 +2
    Thanks for the link to your project. I was hoping to find thicker rigid honeycomb that I could use - I think you are mainly cutting bigger pieces of material - maybe I am overly concerned with flatness…
  • ralphjy
    ralphjy over 2 years ago in reply to DAB

    Yes, the slotted bed was part of the CNC kit.  This is a Sainsmart Genmitsu 3018-Pro.  The kit was easy to assemble and I've been happy with it, but it is only good for lightweight applications which is what I needed.  I haven't tried to mill any aluminum yet but I think it should do fine as long as I get the feed rate right and make multiple passes.  Mainly been routing wood and PCBs.

    • Cancel
    • Vote Up +2 Vote Down
    • Sign in to reply
    • More
    • Cancel
  • DAB
    DAB over 2 years ago

    Very nice test.


    DAB


    PS, did the CNC bed come with the system?

    • Cancel
    • Vote Up +1 Vote Down
    • Sign in to reply
    • More
    • Cancel
  • Fred27
    Fred27 over 2 years ago

    The honeycomb is only really needed to draw smoke away from the rear when you're cutting and prevent reflections from marking the back of the work. It was very easy to cut as it's quite thin. It would definitely need a bit more support if engraving something small and heavy. If you were in the UK I'd send you some.

    • Cancel
    • Vote Up +2 Vote Down
    • Sign in to reply
    • More
    • Cancel
  • ralphjy
    ralphjy over 2 years ago in reply to Fred27

    Thanks for the link to your project.  I was hoping to find thicker rigid honeycomb that I could use - I think you are mainly cutting bigger pieces of material - maybe I am overly concerned with flatness cutting smaller pieces (I've been using a lot of 3"x5"). 


    I have been using a printed calibration block to set focus that works fine but I guess I've always wanted to use a dial gauge.  It will also allow me to measure surface flatness of material and/or the bed.  I'm trying this out on the CNC router because that's what I'm currently playing with, but I had been thinking about it previously in context of my 3D printer.  I've had flatness (warping issues) on a couple of heated beds.

    • Cancel
    • Vote Up +2 Vote Down
    • Sign in to reply
    • More
    • Cancel
  • ralphjy
    ralphjy over 2 years ago in reply to dubbie

    I agree with you and Fred that using an aluminum or steel honeycomb would probably be the proper way of doing this (especially with a higher power laser).  I don't have the tools to do a good job of cutting the honeycomb material to the size that I need.  I haven't seen rigid honeycomb beds cut for small desktop lasers - maybe I haven't looked hard enough.


    I am concerned about the reflection - mainly if I make a mistake and run the laser off the material I'm using - but I am pretty careful and I normally monitor my jobs from an adjacent room using a camera (don't want to fully rely on the laser safety glasses).  I had wanted to use an anodized plate but couldn't find one that I didn't need to cut.  I have seen people use flat black paint to minimize reflections (also saw some cool laser etching of paint on aluminum).  I am doing more engraving than cutting but I'll report back on how well the aluminum holds up when I am cutting.  I don't think that I'll have heat issues with the 5.5W laser but I could be surprised...

    • Cancel
    • Vote Up +1 Vote Down
    • Sign in to reply
    • More
    • Cancel
>
element14 Community

element14 is the first online community specifically for engineers. Connect with your peers and get expert answers to your questions.

  • Members
  • Learn
  • Technologies
  • Challenges & Projects
  • Products
  • Store
  • About Us
  • Feedback & Support
  • FAQs
  • Terms of Use
  • Privacy Policy
  • Legal and Copyright Notices
  • Sitemap
  • Cookies

An Avnet Company © 2023 Premier Farnell Limited. All Rights Reserved.

Premier Farnell Ltd, registered in England and Wales (no 00876412), registered office: Farnell House, Forge Lane, Leeds LS12 2NE.

ICP 备案号 10220084.

Follow element14

  • Facebook
  • Twitter
  • linkedin
  • YouTube