


A DAM (Decentralized Autonomous Manager) is the AI agent that watches a cluster of devices, evaluates alarm rules every few seconds, and acts autonomously. In this project you create one with the 5-step wizard, define its behavior and alarm rules, pick the model it thinks with, and decide whether to turn on optional x402 pay-per-use.
This is a beginner build: it takes about 15 minutes and involves no soldering and no firmware flashing. You work entirely in the DOBI dashboard. Before you start, make sure you have a DOBI account and you are signed in, at least one device already registered (see the ESP32 guide if you have none), and a clear idea of which metric thresholds matter for your cluster, for example temperature, power, or stock.
You also need a provisioning key if you plan to link devices to the DAM later. After the DAM exists, open its detail page to link devices, watch the activity log, and read the decision traces as the agent runs its sensing and thinking cycles.
Read the original guide at https://dobi.guru/guides/configure-dam.
Supplies
- A DOBI account
- At least one registered device
- A provisioning key (to link devices later)
Step 1: Open the DAM wizard
You start in the dashboard because the wizard is the only place where identity, behavior, and model selection are assembled into a consistent agent definition. If you skip a field here you cannot patch it from the device side later, so take the full pass now.
From the dashboard, go to the DAMs section and click "Create a new DAM". The wizard has 5 steps: Identity, Behavior, Agent, Monetize and Review. You can go back at any time without losing what you typed, so there is no penalty for experimenting with a type or prompt and returning later.
The usual failure mode is closing the browser tab or navigating away mid-wizard: any step that had not been submitted is lost, and you have to start the wizard over.
Step 2: Identity: name and type
Naming and typing first matters because the type preselection drives the rest of the wizard. Give the DAM a name, an optional description, and pick the asset class it manages.
The type preselects a sensible system prompt and alarm rules for that domain: Fleet, Commerce, Energy, Industrial, Smart building or Custom. Choosing the closest domain saves you from rewriting defaults, while Custom is the correct choice when your cluster does not fit any of the others.
The usual failure here is picking a domain type for a cluster it does not describe. The prefilled prompt and thresholds will then reference metrics your devices never report, and the agent will spend its cycles deciding nothing useful.
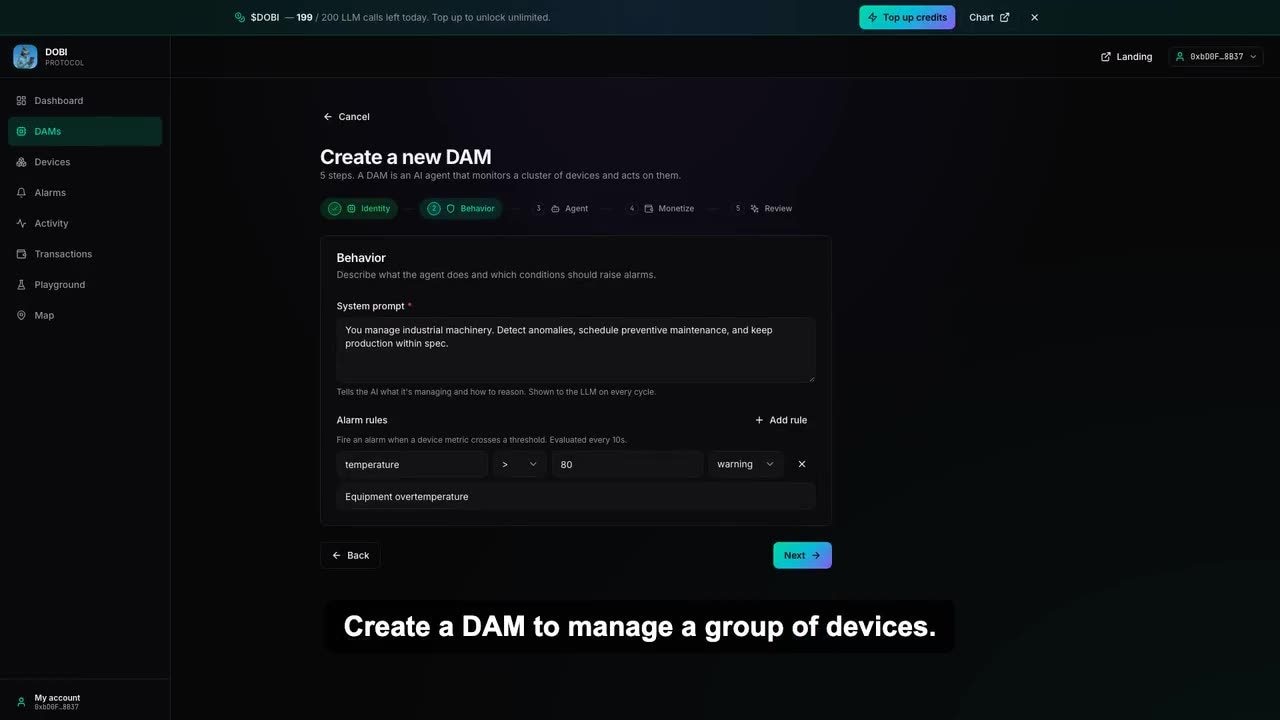
Step 3: Behavior: system prompt and alarm rules
Behavior is where the agent gets its job description. The system prompt tells the AI what it is managing and how to reason; it is shown to the LLM on every cycle, so be explicit about the metrics you care about and the actions you permit.
Alarm rules fire when a device metric crosses a threshold. They are evaluated every 10 seconds, with no LLM required, so they keep working even when the model is slow or unavailable. Define them as data with the metric name, the comparison, and the threshold, matching the shape below.
Example alarm rules · json
[
  { "metric": "temperature", "operator": ">", "value": 60, "severity": "warning", "message": "High charger temperature" },
  { "metric": "power_kw", "operator": ">", "value": 130, "severity": "critical", "message": "Power overload" }
]
The usual failure is writing a threshold that never matches a real reading, for example a unit mismatch or a metric name that the device does not publish. Watch the activity log after creation: no alarms with devices clearly out of range means the rule never matches.
Step 4: Agent: pick the AI model
Here you choose the model the agent will use for its "thinking" cycles. You can leave it at the default; the provider is resolved server-side from the LLM_PROVIDER env var, so the choice on this screen is the model, not the vendor wiring.
When no LLM is configured, the DAM falls back to deterministic rule-based decisions. That is a deliberate degradation, not an error: alarm rules still evaluate every 10 seconds and the agent still acts on them, it just does not reason beyond the rules.
The usual failure is assuming you need a model configured before the DAM does anything. If you intentionally want a rule-only agent, leaving the LLM unconfigured is a valid setup.
Step 5: Monetize (optional): x402 pay-per-use
This step is optional. If you enable x402, the DAM charges a small fee per managed action, settled on-chain. Enabling it makes each action an economically accounted event; if you leave it off, the DAM simply runs without charging.
You can change this later, so there is no lock-in at creation time. Pick based on whether the agent is meant to meter its work for third parties or just manage your own cluster.
If you enable x402, be aware that settlement happens on-chain and actions become chargeable. Test with a small, non-critical action first so you understand the fee behavior before it touches production devices.
The usual failure is turning x402 on for an exploratory agent you are still tuning, then being surprised that tuning actions are billed.
Step 6: Review and create
Before creating, read the summary end to end: name, type, model, number of alarm rules and monetization. This is your last chance to catch a wrong domain type or a missing rule, since the agent starts behaving the moment it exists.
When everything matches what you intended, click "Create DAM". The platform also creates a shadow asset record so the DAM fits into the x402 flow automatically, which is why you do not need to wire anything extra for monetization to be recognized.
The usual failure here is skipping the review and creating a DAM whose type prefilled rules you never inspected. If the shadow asset appears unexpectedly, that is the platform's automatic record, not a duplicate you created.
Step 7: Create a DAM via API
If you would rather automate provisioning, you can create a DAM through the API instead of the wizard. All five fields are supplied in the request body, so the same identity, behavior, agent and monetize decisions apply.
Copy and paste this whole block into your environment. Replace the credentials with your own. Keep the endpoint exactly as written, since it targets the DOBI API rather than the dashboard.
Create a DAM via API · bash
curl -X POST https://dobi.guru/api/dams \
  -H "Authorization: Bearer $DOBI_TOKEN" \
  -H "Content-Type: application/json" \
  -d '{
    "id_dam": "my-fleet-dam",
    "name": "Nairobi charger cluster",
    "description": "EV charging fleet with load monitoring",
    "dam_type": "fleet",
    "ai_model": "gpt-4o-mini",
    "ai_behavior_rules": {
      "system_prompt": "You manage an EV charging fleet. Optimize utilization, balance load across stations, and flag maintenance needs.",
      "alarm_rules": [
        { "metric": "temperature", "operator": ">", "value": 60, "severity": "warning", "message": "High charger temperature" },
        { "metric": "power_kw", "operator": ">", "value": 130, "severity": "critical", "message": "Power overload" }
      ]
    }
  }'
The usual failure is running the block with the placeholder credentials: the request returns an authentication error, or worse, a partially applied configuration if only some fields were replaced. Check each credential before you send it.