


This guide walks you through the minimal firmware skeleton that turns a plain ESP32 into a DOBI-managed device. Every DOBI integration follows the same three-part flow: register with a provisioning key, send a heartbeat with metrics, and listen for commands. Once this skeleton runs, you only add the sensor or actuator code that makes your project specific.
You do not need any prior DOBI experience. You need an ESP32 (any variant), a USB cable for flashing, and Arduino IDE 2.x with the ESP32 board package installed. The whole build takes about ten minutes.
Supplies
- ESP32 (any variant)
- USB cable for flashing
- Arduino IDE (2.x)
- Arduino libraries: WiFi, HTTPClient, and ArduinoJson (all available in the Library Manager)
- Your own provisioning key, generated from the DOBI dashboard
Before you start, make sure the ESP32 board is added in the Boards Manager and that the three libraries above are installed. The provisioning key is the credential your device uses to identify itself; keep it out of public repositories.
Step 1: Configure the device credentials
Before the ESP32 can talk to DOBI, it needs to know who it is. You define four constants here: the device identifier, its human-readable name, its type, and the provisioning key. The id must be unique within your account, so pick something stable rather than a value that changes on every boot. The type is what tells DOBI which metrics and actions to expect from this device, so choose a type that matches what you are actually building.
Set DOBI_PLATFORM to https://dobi.guru unless you run your own instance. The provisioning key is the secret the registration call will use, so do not commit it to a public repository.
Credentials · cpp
#define DOBI_PLATFORM      "https://dobi.guru"
#define WIFI_SSID          "YOUR_WIFI"
#define WIFI_PASSWORD      "YOUR_PASSWORD"
#define DOBI_DEVICE_ID     "my-esp32-01"
#define DOBI_DEVICE_NAME   "Living room ESP32"
#define DOBI_PROVISION_KEY "your-provision-key"
#define DOBI_DEVICE_TYPE   "iot_sensor"
The usual failure here is a duplicate id: if you flash two boards with the same identifier, the second registration will overwrite the first and you will only ever see one device online.
Step 2: Register the device on the platform
Registration is what creates the device record on the platform. Your ESP32 makes a POST request to /api/devices/register and passes the provisioning key as proof that the device belongs to your account. The call is idempotent, which means you can restart the ESP32 as many times as you want without duplicating the device entry. That makes it safe to call on every boot.
Wire the call after WiFi is connected, and check the HTTP response code before you continue; a rejected key will return an error instead of a device record.
Registration · cpp
void dobiRegister() {
  HTTPClient http;
  http.begin(String(DOBI_PLATFORM) + "/api/devices/register");
  http.addHeader("Content-Type", "application/json");

  StaticJsonDocument<256> doc;
  doc["provision_key"] = DOBI_PROVISION_KEY;
  doc["id_asset"] = DOBI_DEVICE_ID;
  doc["device_name"] = DOBI_DEVICE_NAME;
  doc["device_type"] = DOBI_DEVICE_TYPE;

  String body;
  serializeJson(doc, body);
  http.POST(body);
  http.end();
}
If registration succeeds, the heartbeat that follows will attach metrics to the device you just created.
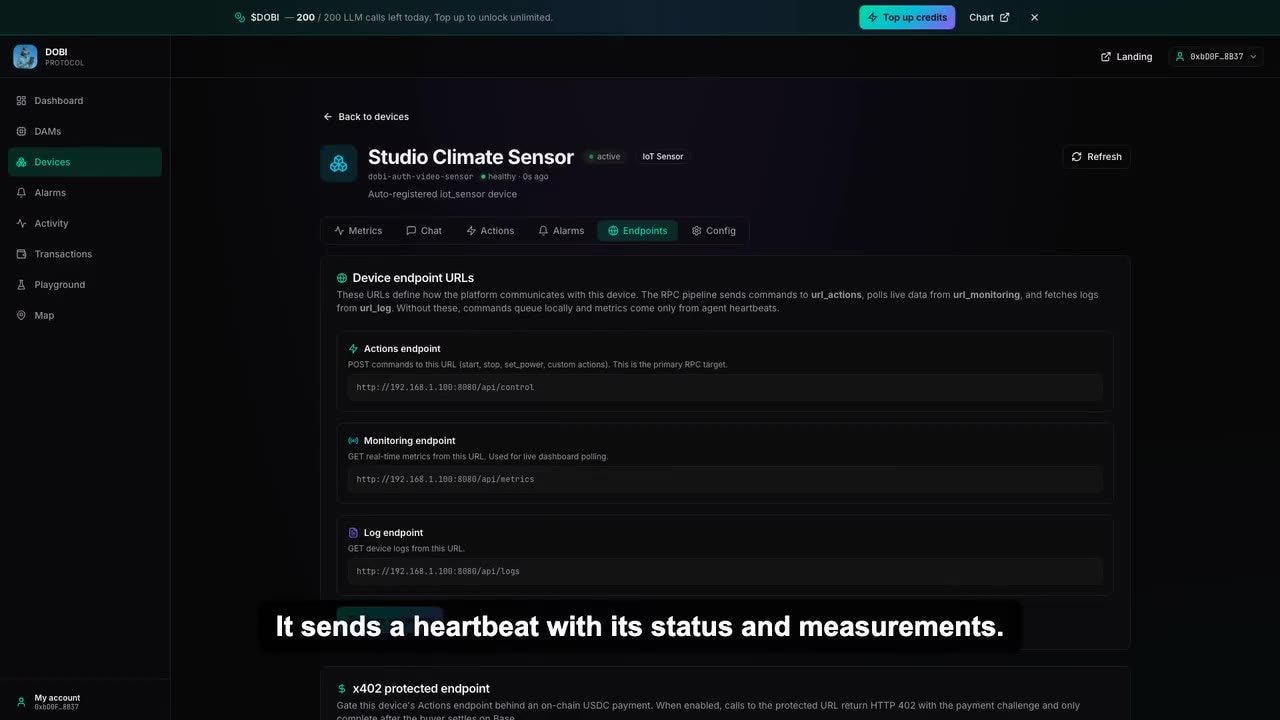
Seconds after the first heartbeat the device shows up as healthy.
The most common failure mode is a provisioning key with a trailing space or newline. The request will go through but the platform will reject it, so copy the key carefully.
Step 3: Send a heartbeat every 30 seconds
The heartbeat is the pulse of the device. DOBI uses it to mark the device as online and to feed real-time metrics into the dashboard. Without a heartbeat, the device appears as stale after a while, even if it is physically running. Send this every 30 seconds from your main loop or a timer.
Include the metrics you care about in the heartbeat payload. For a bare skeleton, an empty or minimal payload is fine; once you add sensors, this is where their readings go. Keep the interval at 30 seconds unless you have a specific reason to change it.
Heartbeat · cpp
void dobiHeartbeat() {
  HTTPClient http;
  http.begin(String(DOBI_PLATFORM) + "/api/devices/" + DOBI_DEVICE_ID + "/heartbeat");
  http.addHeader("Content-Type", "application/json");

  StaticJsonDocument<256> doc;
  JsonArray metrics = doc.createNestedArray("metrics");
  JsonObject m = metrics.createNestedObject();
  m["name"] = "temperature";
  m["value"] = 22.5;
  m["unit"] = "C";

  String body;
  serializeJson(doc, body);
  http.POST(body);
  http.end();
}
The usual mistake is blocking code between heartbeats. If your loop does a long delay or a synchronous sensor read that takes longer than the interval, the heartbeat will drift and the device will flap between online and stale in the dashboard.
Step 4: Complete ESP32 skeleton
This is the complete skeleton: WiFi connection, registration call, heartbeat loop, and the credentials block all in one file. Copy the whole block into your Arduino environment and replace the credential constants with your own values before flashing.
Upload it to the ESP32, open the Serial Monitor, and watch for the registration confirmation and the first heartbeat. Then open the Devices tab in the DOBI dashboard: your device should appear online with its status and latest metrics.
Complete ESP32 skeleton · cpp
#include <WiFi.h>
#include <HTTPClient.h>
#include <ArduinoJson.h>

#define DOBI_PLATFORM      "https://dobi.guru"
#define WIFI_SSID          "YOUR_WIFI"
#define WIFI_PASSWORD      "YOUR_PASSWORD"
#define DOBI_DEVICE_ID     "my-esp32-01"
#define DOBI_DEVICE_NAME   "Living room ESP32"
#define DOBI_PROVISION_KEY "your-provision-key"
#define DOBI_DEVICE_TYPE   "iot_sensor"
#define DOBI_HEARTBEAT_MS  30000

static unsigned long lastTick = 0;

void dobiRegister() {
  HTTPClient http;
  http.begin(String(DOBI_PLATFORM) + "/api/devices/register");
  http.addHeader("Content-Type", "application/json");
  StaticJsonDocument<256> doc;
  doc["provision_key"] = DOBI_PROVISION_KEY;
  doc["id_asset"] = DOBI_DEVICE_ID;
  doc["device_name"] = DOBI_DEVICE_NAME;
  doc["device_type"] = DOBI_DEVICE_TYPE;
  String body;
  serializeJson(doc, body);
  http.POST(body);
  http.end();
}

void dobiHeartbeat() {
  HTTPClient http;
  http.begin(String(DOBI_PLATFORM) + "/api/devices/" + DOBI_DEVICE_ID + "/heartbeat");
  http.addHeader("Content-Type", "application/json");
  StaticJsonDocument<256> doc;
  JsonArray metrics = doc.createNestedArray("metrics");
  JsonObject m = metrics.createNestedObject();
  m["name"] = "temperature";
  m["value"] = 22.5;
  m["unit"] = "C";
  String body;
  serializeJson(doc, body);
  http.POST(body);
  http.end();
}

void setup() {
  Serial.begin(115200);
  WiFi.begin(WIFI_SSID, WIFI_PASSWORD);
  while (WiFi.status() != WL_CONNECTED) delay(500);
  dobiRegister();
  lastTick = millis() - DOBI_HEARTBEAT_MS;
}

void loop() {
  if (WiFi.status() != WL_CONNECTED) {
    WiFi.reconnect();
    delay(1000);
    return;
  }
  if (millis() - lastTick >= DOBI_HEARTBEAT_MS) {
    dobiHeartbeat();
    lastTick = millis();
  }
  delay(200);
}
From here, the only thing left to add is the hardware that makes your project useful. If the device never appears in the dashboard, verify that the provisioning key matches the one in your DOBI account and that the ESP32 actually reached the internet.