element14 Community
element14 Community
    Register Log In
  • Site
  • Search
  • Log In Register
  • Community Hub
    Community Hub
    • What's New on element14
    • Feedback and Support
    • Benefits of Membership
    • Personal Blogs
    • Members Area
    • Achievement Levels
  • Learn
    Learn
    • Ask an Expert
    • eBooks
    • element14 presents
    • Learning Center
    • Tech Spotlight
    • STEM Academy
    • Webinars, Training and Events
    • Learning Groups
  • Technologies
    Technologies
    • 3D Printing
    • FPGA
    • Industrial Automation
    • Internet of Things
    • Power & Energy
    • Sensors
    • Technology Groups
  • Challenges & Projects
    Challenges & Projects
    • Design Challenges
    • element14 presents Projects
    • Project14
    • Arduino Projects
    • Raspberry Pi Projects
    • Project Groups
  • Products
    Products
    • Arduino
    • Avnet & Tria Boards Community
    • Dev Tools
    • Manufacturers
    • Multicomp Pro
    • Product Groups
    • Raspberry Pi
    • RoadTests & Reviews
  • About Us
    About the element14 Community
  • Store
    Store
    • Visit Your Store
    • Choose another store...
      • Europe
      •  Austria (German)
      •  Belgium (Dutch, French)
      •  Bulgaria (Bulgarian)
      •  Czech Republic (Czech)
      •  Denmark (Danish)
      •  Estonia (Estonian)
      •  Finland (Finnish)
      •  France (French)
      •  Germany (German)
      •  Hungary (Hungarian)
      •  Ireland
      •  Israel
      •  Italy (Italian)
      •  Latvia (Latvian)
      •  
      •  Lithuania (Lithuanian)
      •  Netherlands (Dutch)
      •  Norway (Norwegian)
      •  Poland (Polish)
      •  Portugal (Portuguese)
      •  Romania (Romanian)
      •  Russia (Russian)
      •  Slovakia (Slovak)
      •  Slovenia (Slovenian)
      •  Spain (Spanish)
      •  Sweden (Swedish)
      •  Switzerland(German, French)
      •  Turkey (Turkish)
      •  United Kingdom
      • Asia Pacific
      •  Australia
      •  China
      •  Hong Kong
      •  India
      •  Japan
      •  Korea (Korean)
      •  Malaysia
      •  New Zealand
      •  Philippines
      •  Singapore
      •  Taiwan
      •  Thailand (Thai)
      •  Vietnam
      • Americas
      •  Brazil (Portuguese)
      •  Canada
      •  Mexico (Spanish)
      •  United States
      Can't find the country/region you're looking for? Visit our export site or find a local distributor.
  • Translate
  • Profile
  • Settings
Community Hub
Community Hub
Member's Forum Steel Conduit - How to Install ?
  • Blog
  • Forum
  • Documents
  • Quiz
  • Events
  • Leaderboard
  • Polls
  • Files
  • Members
  • Mentions
  • Sub-Groups
  • Tags
  • More
  • Cancel
  • New
Join Community Hub to participate - click to join for free!
Actions
  • Share
  • More
  • Cancel
Forum Thread Details
  • State Suggested Answer
  • Replies 17 replies
  • Answers 10 answers
  • Subscribers 633 subscribers
  • Views 6370 views
  • Users 0 members are here
  • galvanised_conduit
  • 25mm conduit
  • conduit_installation
  • electrical
  • conduit
Related

Steel Conduit - How to Install ?

14rhb
14rhb over 5 years ago

Looking around the internet I've found very little to help me understand how electrical steel conduit is installed.....but I'm sure someone on Element14 knows the answers image


The question relates to the 20/25mm galvanised steel conduit often used in the UK - this comes as 3m lengths with a external make thread on one end and a female coupler on the other. Unless the fittings are 3m apart the conduit requires cutting and a new thread to be formed, which I already have tools for. The outlets/fixings also come with pre-cut threads; and example of the 90 degree box is shown below:
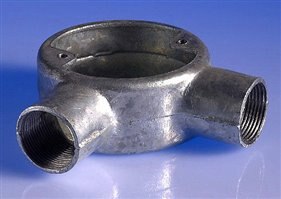
image

Whilst I can envisage fixing one of the box outlets to the required position and screwing in a piece of cut/pre-threaded conduit I wonder how the next fitting is added. Assuming that is a cut end which I have added a thread to this second fixing would need rotating onto the conduit. Because the first fixing is on the wall there would be no clearance to rotate the second fixing without putting strain on the existing system, this is especially true when the next fitting has additional bosses on it or as the system design grows.


Maybe the entire system is designed and then mounted to the wall ? I would imagine that could result in a very heavy setup plus inaccuracies in getting the fittings where required.


Any pointers would be gratefully read, thank you image

  • Sign in to reply
  • Cancel
Parents
  • three-phase
    0 three-phase over 5 years ago

    It is generally installed on a case by case basis working your way along the conduit.


    In some instances, where the access is tight, it is installed as you say, with the conduit cut to size, bent, threaded and accessories screwed in place. The saddles for the conduit are installed on the wall and then the 'preformed section' screwed in place. Yes some times it takes a couple of people to install a larger section. We would frequently make the conduit in sections, mount up the first section and then make the next section, taking all the measurements from the end of the first section. We would then loosen off or remove the first section to allow the section section to be coupled onto it, then re-secure the first section along with the second. A lot of going backwards and forwards, securing, removing and refitting to get the job done.


    However, longer runs of conduit have a certain level of flexibility, so you can fix the box at one end, with one conduit saddle and there will be enough movement in the other end to allow the box to still be screwed onto the conduit at the other end. the box can then be fixed in place and you go back along the conduit securing the remaining saddles.


    When using conduit in industry, we will also bend the conduit instead of using boxes to change direction. It looks nicer and the cables are easier to pull through.


    Instead of using the threaded conduit boxes, you can also utilise adaptable steel boxes with a clearance hole to put the conduit through with a lock ring either side to secure it to the box. This isn't as water tight as the threaded boxes. We also use brass bushings over the end of the thread on the inside of the conduit box to protect the cables.


    As a last resort, you can use the combination of a coupler, nipple and a lock ring. You can screw the nipple into the coupler on the end of the conduit as far as it will go in, put the lock ring onto the nipple, then offer up the conduit box and unscrew the nipple from the coupler into the conduit box, once in far enough it is locked in place with the lock ring. Looks awful after it is done mind you. You can make longer nipples up than standard by threading offcuts of conduit.


    It is a real art form on big installations and quite time consuming unless you are constantly using it. Probably why flexible conduit was developed to ease some of the installation into tight areas and ultimately why plastic conduit was developed, that tends to be easier with the glue together concept.


    Kind regards

    • Cancel
    • Vote Up +4 Vote Down
    • Sign in to reply
    • Verify Answer
    • Reject Answer
    • Cancel
Reply
  • three-phase
    0 three-phase over 5 years ago

    It is generally installed on a case by case basis working your way along the conduit.


    In some instances, where the access is tight, it is installed as you say, with the conduit cut to size, bent, threaded and accessories screwed in place. The saddles for the conduit are installed on the wall and then the 'preformed section' screwed in place. Yes some times it takes a couple of people to install a larger section. We would frequently make the conduit in sections, mount up the first section and then make the next section, taking all the measurements from the end of the first section. We would then loosen off or remove the first section to allow the section section to be coupled onto it, then re-secure the first section along with the second. A lot of going backwards and forwards, securing, removing and refitting to get the job done.


    However, longer runs of conduit have a certain level of flexibility, so you can fix the box at one end, with one conduit saddle and there will be enough movement in the other end to allow the box to still be screwed onto the conduit at the other end. the box can then be fixed in place and you go back along the conduit securing the remaining saddles.


    When using conduit in industry, we will also bend the conduit instead of using boxes to change direction. It looks nicer and the cables are easier to pull through.


    Instead of using the threaded conduit boxes, you can also utilise adaptable steel boxes with a clearance hole to put the conduit through with a lock ring either side to secure it to the box. This isn't as water tight as the threaded boxes. We also use brass bushings over the end of the thread on the inside of the conduit box to protect the cables.


    As a last resort, you can use the combination of a coupler, nipple and a lock ring. You can screw the nipple into the coupler on the end of the conduit as far as it will go in, put the lock ring onto the nipple, then offer up the conduit box and unscrew the nipple from the coupler into the conduit box, once in far enough it is locked in place with the lock ring. Looks awful after it is done mind you. You can make longer nipples up than standard by threading offcuts of conduit.


    It is a real art form on big installations and quite time consuming unless you are constantly using it. Probably why flexible conduit was developed to ease some of the installation into tight areas and ultimately why plastic conduit was developed, that tends to be easier with the glue together concept.


    Kind regards

    • Cancel
    • Vote Up +4 Vote Down
    • Sign in to reply
    • Verify Answer
    • Reject Answer
    • Cancel
Children
  • 14rhb
    0 14rhb over 5 years ago in reply to three-phase

    Hi Donald,


    A great explanation, thank you, with plenty of tips to try out.

    A lot of going backwards and forwards, securing, removing and refitting to get the job done.

    It's really helpful to know that rather than push onwards regardless, thinking I must keep adding and not taking a step or two back. Maybe I should opt for the PVC, its much cheaper, but I liked the idea of trying my hand at this....definitely an art form though, just like plumbing copper pipework together image

    • Cancel
    • Vote Up +2 Vote Down
    • Sign in to reply
    • Verify Answer
    • Cancel
element14 Community

element14 is the first online community specifically for engineers. Connect with your peers and get expert answers to your questions.

  • Members
  • Learn
  • Technologies
  • Challenges & Projects
  • Products
  • Store
  • About Us
  • Feedback & Support
  • FAQs
  • Terms of Use
  • Privacy Policy
  • Legal and Copyright Notices
  • Sitemap
  • Cookies

An Avnet Company © 2026 Premier Farnell Limited. All Rights Reserved.

Premier Farnell Ltd, registered in England and Wales (no 00876412), registered office: Farnell House, Forge Lane, Leeds LS12 2NE.

Follow element14

  • X
  • Facebook
  • linkedin
  • YouTube