element14 Community
element14 Community
    Register Log In
  • Site
  • Search
  • Log In Register
  • Community Hub
    Community Hub
    • What's New on element14
    • Feedback and Support
    • Benefits of Membership
    • Personal Blogs
    • Members Area
    • Achievement Levels
  • Learn
    Learn
    • Ask an Expert
    • eBooks
    • element14 presents
    • Learning Center
    • Tech Spotlight
    • STEM Academy
    • Webinars, Training and Events
    • Learning Groups
  • Technologies
    Technologies
    • 3D Printing
    • FPGA
    • Industrial Automation
    • Internet of Things
    • Power & Energy
    • Sensors
    • Technology Groups
  • Challenges & Projects
    Challenges & Projects
    • Design Challenges
    • element14 presents Projects
    • Project14
    • Arduino Projects
    • Raspberry Pi Projects
    • Project Groups
  • Products and Partners
    Products and Partners
    • Arduino
    • Avnet & Tria Boards Community
    • Dev Tools
    • Manufacturers
    • Multicomp Pro
    • Product Groups
    • Raspberry Pi
    • RoadTests & Reviews
  • About Us
    About the element14 Community
  • Store
    Store
    • Visit Your Store
    • Choose another store...
      • Europe
      •  Austria (German)
      •  Belgium (Dutch, French)
      •  Bulgaria (Bulgarian)
      •  Czech Republic (Czech)
      •  Denmark (Danish)
      •  Estonia (Estonian)
      •  Finland (Finnish)
      •  France (French)
      •  Germany (German)
      •  Hungary (Hungarian)
      •  Ireland
      •  Israel
      •  Italy (Italian)
      •  Latvia (Latvian)
      •  
      •  Lithuania (Lithuanian)
      •  Netherlands (Dutch)
      •  Norway (Norwegian)
      •  Poland (Polish)
      •  Portugal (Portuguese)
      •  Romania (Romanian)
      •  Russia (Russian)
      •  Slovakia (Slovak)
      •  Slovenia (Slovenian)
      •  Spain (Spanish)
      •  Sweden (Swedish)
      •  Switzerland(German, French)
      •  Turkey (Turkish)
      •  United Kingdom
      • Asia Pacific
      •  Australia
      •  China
      •  Hong Kong
      •  India
      •  Japan
      •  Korea (Korean)
      •  Malaysia
      •  New Zealand
      •  Philippines
      •  Singapore
      •  Taiwan
      •  Thailand (Thai)
      •  Vietnam
      • Americas
      •  Brazil (Portuguese)
      •  Canada
      •  Mexico (Spanish)
      •  United States
      Can't find the country/region you're looking for? Visit our export site or find a local distributor.
  • Translate
  • Profile
  • Settings
Community Hub
Community Hub
Member's Forum Share A Design Tip to be included in our next Engineers eBook
  • Blog
  • Forum
  • Documents
  • Quiz
  • Events
  • Leaderboard
  • Polls
  • Files
  • Members
  • Mentions
  • Sub-Groups
  • Tags
  • More
  • Cancel
  • New
Join Community Hub to participate - click to join for free!
Actions
  • Share
  • More
  • Cancel
Forum Thread Details
  • Replies 65 replies
  • Subscribers 636 subscribers
  • Views 4475 views
  • Users 0 members are here
  • ebooks
  • share an idea
  • tech journal
  • essentials
  • learning center
  • design tips
Related

Share A Design Tip to be included in our next Engineers eBook

jwatson
jwatson over 9 years ago

Let your fellow makers in on your design secrets here!


Have you found a solution to a common design problem?  Have you found an easier / cheaper way to do something?


Share your ideas with us for your chance to have your tip appear in Premier Farnell's edition of ebooks.


It’s your opportunity to share with your peers and promote your ideas or business at the same time.

Of course, please steer away from the obvious or too simple, such as ‘if you are writing software, take backups, OR drill holes this way instead of that way’.


We would like to create an ebook to provide both inspiration and assistance that help readers create interesting and fun projects, whether they are trying to kickstart a business or simply developing something for their own home.


Here’s some topics to get you thinking:

  • Using Maker boards – how do you get boards to do what you need, or configure boards to give you the inputs or outputs to do something cool?
  • Using Sensors – ideas for collecting information about what’s happening in the world, whether it’s temperature data or interfacing a camera...
  • Robotics and Controls – how do you control motors and movement? Ideas for making robots or simply just controlling a motor to close your curtains..
  • Displays – some boards have built-in displays, while don’t others? What are your best tips for displaying information in your projects?
  • IoT and Connectivity – soon almost everything will be connected, so tell us how you make it easier to get connected to the internet and transfer data...
  • Software development – what are your tips for writing better software, or just overcoming specific challenges? Show off your software expertise...
  • Just for fun – perhaps you’ve had a great idea for a new way of doing things, but aren’t sure if there are any serious uses. Tell us about your less serious tips and ideas!


We’re looking for tips of around 40 to 50 words with a simple diagram or image. 


Share your ideas as a comment on this discussion and we will be in touch with you to let you know if your tip will be included in the next edition of ebooks.

  • Sign in to reply
  • Cancel
  • ntewinkel
    ntewinkel over 9 years ago in reply to shabaz

    I have a parts spreadsheet too, though I think my spouse will "frown upon" me ever allowing my inventory to require bin locations!

    Recently I've also added dev boards, microcontrollers, and SBCs into the list, to keep details handy as well as keeping track of where some of them are (inside of projects).

    • Cancel
    • Vote Up +1 Vote Down
    • Sign in to reply
    • Cancel
  • shabaz
    shabaz over 9 years ago in reply to jw0752

    Hi John,


    That's awesome! I too keep a spreadsheet of parts, although I don't have any bin locations stored yet so still have to end up searching!

    • Cancel
    • Vote Up +2 Vote Down
    • Sign in to reply
    • Cancel
  • jw0752
    jw0752 over 9 years ago in reply to shabaz

    Hi Shabaz,

    This is a great tip. I use the Xcel already to keep track of my parts and bin locations. Putting the formulas into Xcel also would save a lot of searching and rework each time I need one.

    John

    • Cancel
    • Vote Up +3 Vote Down
    • Sign in to reply
    • Cancel
  • shabaz
    shabaz over 9 years ago

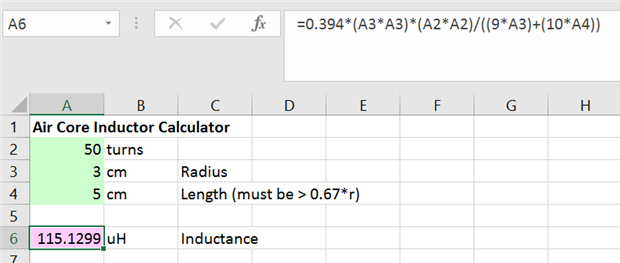
    Maybe obvious, but it is really worth using a spreadsheet program (Excel or otherwise) and keep a file to store all your favourite calculations : )

    I still use online calculators but it's not the same as keeping a local file where I can put my own notes, save the calculations and modify later, etc.

    I create a new worksheet for each topic (e.g. RC circuits, LC circuits, 555 circuits and so on) and have the formulas in there. I can then use the spreadsheet like as if it were Casio's answer to an Electronic Engineer's Calculator.

    I use green to indicate inputs, and pink to indicate calculated outputs.

    image

    • Cancel
    • Vote Up +5 Vote Down
    • Sign in to reply
    • Cancel
  • assissin
    assissin over 9 years ago

    Perfect Front Panel layouts.


    Copy and Paste your PCB layout to the desktop, open.

    Drag and highlight the layout, use the "group" tool to

    lock the layout into a single object.


    Select the "Mechanical" layer and create "+" center marks for

    switches, Pots, sockets etc. (This method is also used for

    layouts for "off-board only" component panel layouts).


    Create the lid/panel outline and centers for PCB mounting holes


    Drag the grouped PCB layout to a clear area and check that all

    the panel centers have been marked, if correct - delete the PCB.


    Draw the mounting holes with corresponding size circles and tidy

    up the centers.


    Now switch to the "Silkscreen" layer and produce the artwork for

    the front panel.


    Save as "(project name)Front Panel" to your project folder.


    Print the "Mechanical" layer. Do the same with the

    "Silkscreen" layer(use a coloured paper for Pro. results)


    Stick the drilling template("Mechanical" layer) to the panel or

    lid. Use a center punch on hole centers and drill holes, de-burr.

    I use "Pritt-stick" for this stage to glue the template as it

    peels off easly on completion. Check for a test fit. Trim Pot,

    Rotary switch shafts etc. Remove the PCB and/or components

    and set aside.


    Clean and dry the panel surface. Use a good contact adhesive to

    stick the paper to the panel(lightly coat the back of the print

    a few times with clear enamel as a sealant to stop the adhesive

    "bleeding" through the paper causing disscoloured patches).

    Use clear Enamel or clear adhesive film to seal the front paper layer.

    Trim the holes of all excess paper/film and mount the PCB and/or

    components.


    By saving the panel layout in the project folder allows for future

    builds.

    • Cancel
    • Vote Up +2 Vote Down
    • Sign in to reply
    • Cancel
  • mcb1
    mcb1 over 9 years ago in reply to assissin

    Used that trick and it works great.

    I almost forgot about that now that boards fom our asian friends are cheap and have everything done for you.


    Thanks

    • Cancel
    • Vote Up +1 Vote Down
    • Sign in to reply
    • Cancel
  • COMPACT
    COMPACT over 9 years ago in reply to assissin

    That's wanderful!

    Also useful if you use sharp drill bits rotating at the right speed and the right feed rate.

    • Cancel
    • Vote Up 0 Vote Down
    • Sign in to reply
    • Cancel
  • assissin
    assissin over 9 years ago

    Drilling PCB holes.

    To reduce the drill bit "wandering" when drilling holes in your PCB...

    Before processing etch stages, copy a layout of the final version to your desktop. Open this copy and reduce all component and mounting holes to 0.5mm, save and close. Process in your usual way (photoresist-etch, hot or cold toner transfer or milling using this copied version.

    If you are milling your PCB, on completion of using this method you now load your original excellion drill file before removing the PCB from the CNC mill. With the "real" excellion files to drill the holes to the required sizes

    • Cancel
    • Vote Up +2 Vote Down
    • Sign in to reply
    • Cancel
  • COMPACT
    COMPACT over 9 years ago in reply to ipv1

    I wouldn't because the bandwidth and signal amplitudes are limited for audio use.

    The general rule of thumb for oscilloscope selection is 5x the maximum analog signal frequency component being observed.

    I forked out a whole years savings for my oscilloscope in the early 1980's and it was only a dual trace 20MHz.

    It was able to display 10 MHz digital clock signals but with considerable distortion due to its limited bandwidth.

    (with square waves being morphed into sine waves)

    • Cancel
    • Vote Up +2 Vote Down
    • Sign in to reply
    • Cancel
  • ipv1
    ipv1 over 9 years ago

    Tip for beginners

    For basic Oscilloscope and Function Generator needs, use your Android Phone or iPhone. There are lots of apps that allow you to use your headphone jack as a source of signal input as well as output and can be very handy at times. Make your own cable from an old headphone or solder up a new one and add alligator clips at the end. Works for beginners with a budget.

    • Cancel
    • Vote Up +3 Vote Down
    • Sign in to reply
    • Cancel
<>
element14 Community

element14 is the first online community specifically for engineers. Connect with your peers and get expert answers to your questions.

  • Members
  • Learn
  • Technologies
  • Challenges & Projects
  • Products
  • Store
  • About Us
  • Feedback & Support
  • FAQs
  • Terms of Use
  • Privacy Policy
  • Legal and Copyright Notices
  • Sitemap
  • Cookies

An Avnet Company © 2026 Premier Farnell Limited. All Rights Reserved.

Premier Farnell Ltd, registered in England and Wales (no 00876412), registered office: Farnell House, Forge Lane, Leeds LS12 2NE.

Follow element14

  • X
  • Facebook
  • linkedin
  • YouTube