


To put it simply, I absolutely love the Raspberry Pi. There is almost an infinite amount of things you can do with it and it seems almost everyday there is someone, somewhere, doing something new and innovative with it. When I first heard about the Raspberry Pi, I nearly lost my marbles. The thought of a low cost credit card sized computer was phenomenal and the instant I read up more about it, I knew I had to have one. I have used the Raspberry Pi in several of my own projects with plenty more projects already planned. Before my first Raspberry Pi even arrived, I already had a project planned for it. My main problem with the Pi however, was the power supply. I didn't like the thought of having to continuously unplug and plug it back when I wanted to use it, so my first thought was to create a power supply that I could switch the Pi on and off with. Since I already had a project planned for my Pi and I knew I would be using a small TFT LCD in the project, I wanted to also make the power supply power both the TFT LCD and the Pi to reduce the need of so many cords laying about. Thus my 2-in-1 Raspberry Pi Power Supply was born.
I first started this project a little over a year ago and the first prototype of the power supply can be found lingering lost in the discussion forums here on Element 14.
I wasn't satisfied with the prototype I made, so I ended up recently scrapping it and completely re-designing it.
So without further ado I present my 2-in-1 Raspberry Pi Power Supply:
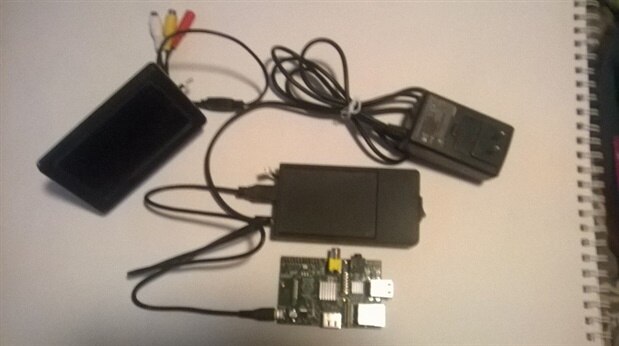
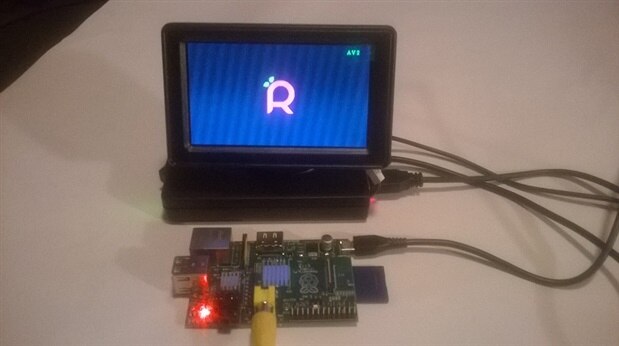
As mentioned before, I call it a "2-in-1" power supply because it is also meant to power a TFT LCD alongside the Pi, although with a quick disconnect, I am able to take the LCD out of the picture altogether if it is not needed. Allbeit I made this power supply specifically for my Raspberry Pi, it could essentially be used for almost anything that requires a 5v power supply using the USB port on the power supply.
Here are a few more pictures of the power supply, showing either ends:


I will admit, it's not the cleanest work I have done, but it's functional, and that is what matters.
The way this power supply works is pretty simple to say the least. I recycled an old AC Power Adapter I had laying around with an output of 12v 1800mA which is required for the 12 volts necessary to power the TFT LCD. I used a Size M Coaxial power plug and jack to connect the AC Adapter to the power supply. The positive lead from the power jack runs to the rocker switch, which then runs to the LED indicator light and a PCB. The negative lead runs directly to the negative wire of the LED and the PCB. (The PCB is used simply just has a positive and negative power rail, otherwise it serves no real purpose.) A quick disconnect I recycled, runs directly to the PCB so it can pull the full 12v from the power supply which is used to the power the display. Another set of positive and negative wires run from the PCB to a step-down module (Buck converter). This has an input of 7-24v and outputs 5v via a female USB connector already on board.
Here is a look at inside:

Between using recycled parts and making a few purchases, I spent less than $15 on this project.
Parts used:
Plastic Enclosure - I got this one as a sample product from OKW.
Size M Coaxial DC Power Jack - Purchased from Radioshack
Size M Coaxial DC Power Plug - Purchased from Radioshack
12v LED w/ resister - Purchased from Radioshack
12v AC Adapter - Recycled
Rocker Switch - Recycled
Quick Disconnect - Recycled
Heat Shrink Tubing
Wire - Recycled (I used red and black to indicate + & -)
KIS3R33S 7V-24V to 5V 3A USB Step-Down Module - Purchased on Ebay
The KIS3R33S is the most crucial part to this power supply, but there are other alternatives to step down the power.
I chose this because it was cost effective at only $4, ready to go, easy to connect, and had a USB output.
If you have any questions regarding this project, feel free as I would love to answer them.

