My cousin emailed me on Friday to let me know that she was having problems with her USB flash drive. Her employer provides these to allow their employees to store files. She mentioned in the email that the drive felt wobbly and that she thought that something might be loose inside. She was not able to access any of the files on the drive.
Since she had her work files there she was concerned about losing her information. I was not sure what was wrong with the drive and could not determine whether the files were lost of not. Since diagnosing the drive via remote control was as easy as brushing a badger’s teeth we agreed that she would come over so I could see the drive first hand.
She came over the next day. It was a small 128 MB USB flash drive and the connector seemed wobbly.
The first step was to ry and access the drive by holding the connector in different position, hoping that the loose contact would make momentary contact long enough to rescue the files from the drive. I connected the drive to the PC’s USB port. Windows did not recognize the drive. I tried slowly moving the connector to different position in hopes of establishing momentary contact, but this proved to be futile. Next plan.
The case seemed to be made of one piece of plastic and I thought that I would have to cut it open with some tool. To begin with I tried to cut the soft plastic with a utility knife. To my surprise not only did I not cut myself, but I also saw that the casing was actually made of two pieces that easily came apart once the knife's blade was inserted between the two pieces.
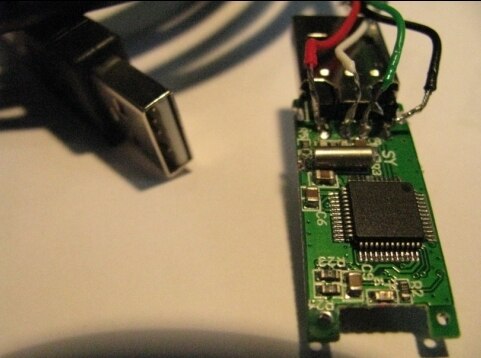
I opened the drive and removed the PCB. The connector was loose. There were two points on the PCB which seemed to hold the connector in place. One was clearly loose and the other had no solder at all! My cousin then mentioned that she had another drive that she had been given. I asked to see it and once it was in my hands I opened it up to look at the PCB.
I confirmed that both points had solder and the connector was tightly attached to the PCB. I took out my soldering iron and applied some solder to both pads. That did the trick; the connector was now firmly attached to the small PCB. Would it work? There was one way to find out. I connected the drive to the PC. No dice. Something else was bad. I removed the drive and examined it more carefully.
I saw that the PCB had four solder pads which had a small tab soldered to them that came from the connector. The third tab seemed to be missing. I assumed that it broke away from wiggling the USB drive one too many times. So now the plan was to bridge that gap.
I took out some wire wrapping wire. My plan was to solder one end of the wire to the pad and then use a USB extension cable to connect the drive to the computer. I would feed the other end of the wire into the USB connector and hope that it would make contact with the corresponding connector pad. I managed to get the wire inside the connector and I connected it to the extension, but by using a multimeter I determined that the wire was not making contact with the connector’s pad. I tried various times without success. Next plan.
My next plan was to get a junk USB cable, snip off one end and solder the four wires from the cable directly onto the drive’s PCB’s pads. This was easier said than done since I first needed to locate a junk cable and prep it. My wife suggested that perhaps she could create a solder bridge from the pad to the connector’s broken tab, so she worked on this while I located a suitable cable.
I found a cable with a standard USB connector on one end and a flat connector on the other. My employer recently threw out a bunch of cables and I confiscated them, so my best guess is that that cable was for some sort of mobile device. I snipped the end of the cable and started to strip the four wires. By the time I was done my wife had completed the solder bridge and was ready to test. She connected the drive to the computer, but it was not recognized. Next plan.
I tinted the four wires and was ready to solder. Now I needed to determine which wire went to which pad. The cable’s wires were red, black, green and white. I searched for USB pin outs and got the information that I needed:

I carefully soldered the four wires to the PCB’s pads according to the table. I connected the ground wire incorrectly, so I re did that and was finally finished. It was time to test. By this time almost three hours had gone by and my cousin was getting ready to leave as it was getting late.
I connected the drive to the computer and lo and behold the message “Found new USB hardware” appeared! I held my breath for a few seconds. Finally I got the “Hardware is ready to use” message and a new file explorer window opened. I quickly selected all the files and moved them to my computer. I then inserted the other USB drive that she had given me and moved the files to her new USB flash drive.
We talked for a few minutes more before we all went outside to remove the snow that had settled on her car. Once that was done she was on her way quite happy. I suggested that she make a second copy of her data on her computer once she got home. The image below shows how the drive ended up looking after the USB cable was attached to it.