


Introduction
Back in 2007 my current production computer died a grisly death at the hands of a merciless inflated capacitor. While the prospect of rebuilding was not desirable, I never turn away an adventure. Within a week I had done the research to determine what kind of computer I wanted and had ordered the necessary components. I had a “massive” 250GB hard drive which I decided to partition in two. The first partition for Windows XP and the second for whatever version came after that.
When Windows 7 came out I got that and installed it on the second partition. As time went on I started to use Windows 7 more until I hardly used Windows XP at all.
Currently I am aggressively learning and enhancing skills, such as Java with Eclipse, ASP.NET, CSS and Oracle 11g. As I installed more applications on my Windows 7 partition the 117GB partition began to fill up until I was left with 4GB of space. Of course the easiest solution would be to purchase a nice 1TB hard drive and simply swap out the drive and reinstall everything, but no, my love for adversity led me to try to reclaim the 115GB partition from Windows XP and have my Windows 7 partition occupy all of the available hard drive space. Plus, I already had numerous applications installed and only one Windows 7 Pro upgrade license, so I did not want to install everything from scratch.
The Research
The Internet is my friend. I used my favorite search engine to find relevant information. During that search I also found ways to remove a Windows 8 partition from a dual boot Win 7/8 PC. Since I also had another PC with such a configuration I decided to do a practice run on that computer, especially since I did not want Windows 8 on it anymore.
The practice run went without a hitch. I basically did the following
- Checked my hard drive configuration using Win 7 Disk Management. I found that my Windows 7 partition was already active and system.
- Using Disk Management I removed the Win 8 partition and expanded the Win 7 partition to occupy all unallocated space.
- I then used bcdedit to remove the Windows 8 option from the boot menu.
I rebooted the PC and all was well.
I then concentrated on my primary computer. I searched for information to remove the XP partition and have the entire hard drive space allocated to Windows 7. There were various procedures for doing this depending on the dual boot configuration. Since both operating systems were on the same hard drive I discarded all processes that corresponded to a computer where each operating system was installed on an individual hard drive.
After going over the different options I found the following page:
http://www.pagestart.com/dualbootdelxp01pg01.html
These instructions were specifically for an installation matching mine. I decided to follow these instructions.
The Execution
I started out by downloading and installing the two recommended applications: Partition Wizard and EasyBCD. I also created the bootable CD with Partition Wizard. The screen caps in the instructions indicated that it was version 5 of Partition Wizard, mine was 9.1.
I did not download Norton Ghost or any other image creating software. I had already decided that if I trashed my Windows 7 partition I would just reinstall everything. The first few steps went well.
I got to step 4 where it instructs to delete the Windows XP partition using Partition Wizard. The moment of truth had arrived. I took a deep breath and I went ahead and removed the XP partition. Having done that I set the Windows 7 partition to Active. I then restarted the PC, booting from the original Windows 7 Pro install DVD and followed the instructions outlined in Step 6.
It was when I got to part “h” of this step that I noticed something different. I did not get the dialog with the “Your computer was unable to start” message. From then on everything was different. I restarted the computer, but Windows 7 did not come up. Instead I got a blue screen (not the classic BSOD) indicating that Windows failed to start. The status was 0xc0000225 and it referenced the boot\bcd folder. The following image shows an almost identical screen, save for the status.

Here started my second wave of research to determine the cause of this problem. I found some pages that describe solutions to this problem, but none worked for me. I tried everything. Most of these solutions consisted of booting into the repair menu of either the Windows Installation Disc or of the System Repair Disc. The solution involved using two options: The command prompt and the Repair Startup option.
In the command prompt I used the bootrec, bootsec and diskpart commands to analyze and modify the environment. After various attempt at “fixing” the mbr (Master Boot Record) and rebuilding the BCD (Boot Configuration Data). I wondered if I would ever have a bootable system after all of these haphazard modifications. I event booted with the Partition Wizard CD and had a look around. I did not see anything out of the ordinary. The only constant was the “Windows failed to start” message.
Not knowing what else to do I recovered the XP partition using Partition Wizard and restarted the computer. It booted! I saw the familiar dual boot option menu, selected Windows 7 and it booted just fine into this operating system. The one aspect that I saw of the XP Partition was that it was categorized as System. Perhaps the boot process continued to look at that partition for the critical start up files bootmgr, ntldr and the boot folder. What if I moved the System partition from the XP to the Win 7 partition?
I made a few attempts, but failed at each one of them. I removed the XP partition a couple of times only to be welcomed by the “Windows failed to Start” screen. I then started to look for information about reassigning the system partition to another partition. I found the following page:
I noticed something that I had not tried: Removing the drive letter from the XP System partition. I was going to follow the steps outlined in the above page, but found that I did not have any disk space where to create the small 100MB partition. My first task was to shrink my XP Partition then create the 100MB partition in the newly found space.
I went into disk management and tried to shrink the XP partition, not knowing whether it would work or not. It did work! I was happy! The next step was to create the new 100MB partition. I took a risk and created one of about 90 MB. I then proceeded to format it. Once that was done I followed the steps in the forum post:
- I assigned it the drive letter Z
- Copied the boot folder and the bootmgr and bootsect.bak files to the new partition
- I removed the drive letter from the XP partition
- Marked the new partition as Active.
I then went ahead and restarted the computer. The boot menu option displayed, I selected Windows 7 and it booted! That was good. At least I did not make it worse! I then opened Disk Management and reviewed my disk structure. I noted that the new partition was now marked as Active and as System.
I restarted the computer and booted from the Partition Wizard CD. Using that application I once again removed the XP partition and restarted, allowing the PC to boot from the hard drive. The boot menu came up and I selected Windows 7. It booted just fine! Yes!
I now had a fully bootable Windows 7 PC and without the XP Partition. My next step was to recuperate the unallocated space. I went back into Disk Management, selected the Windows 7 partition and right clicked it to display the context menu. I selected the extend option, but the dialog that displayed indicated that I could only extend it about 8 MB! I noticed that I had an allocated space of 8 MB after the Windows 7 partition. It seems that I can only extend the partition over contiguous unallocated space. The following image shows how my disk was structured at this time.
I remembered that I saw a “Move/Resize” option in Partition Wizard, so I started the Windows version of this application. I located and selected the option and noticed that the dialog permitted me to select the amount of space before and after the selected partition. I selected the System partition (100MB) and indicated that I wanted 0 space before it. I applied the changes and the partition moved. Partition Wizard restarted my computer and moved some files around. It took a little time but in the end this step worked out fine. Happy again!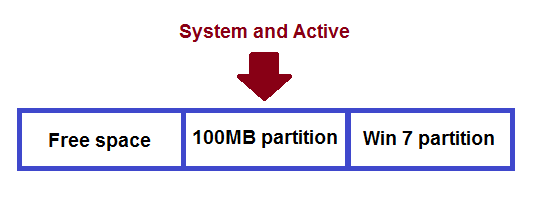
I restarted the computer and booted Windows 7. I went back into Disk Management and tried the extend process again. This time it worked! I now had a nice 233GB Windows 7 partition! Awesome!
I resumed with step 7 of the original instructions to remove the Windows XP boot menu option. I used easyBCD and as its name implies, it was an easy task. I then moved on to the next step to extend the Win 7 partition, but found that I had already done it!
I tested everything to verify that Windows 7 booted just fine. All tests were successful! I now had a single boot system with Windows 7. I will probably upgrade to Windows 10, but first I need to verify that my Virtual PC VHD virtual machines will load and run under Hyper V, as Windows 10 no longer supports Virtual PC. However, that adventure is for another day. The following image shows how my disk structure ended up.
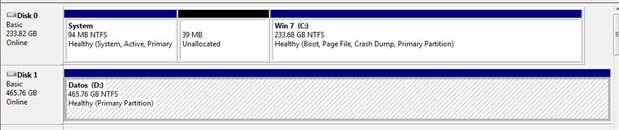
Note that the System partition does not have a drive letter. Although I assigned Z: to it, it lost it somewhere along the way. No problem for me. I still have 39MB of unallocated space. The instructions say that Windows’ Disk Management can’t recover this space, but I can use Partition Wizard to recover that space, but at 39MB, I just don’t see a great benefit in doing that. Also notice that in fact I have two physical hard drives. The instructions recommend that any other drives be physically disconnected to avoid any possible mishap. Since the second drive is my data drive I did not want any kind of mishap to fall on this device, so I physically disconnected it.
The only noticeable change in the end result is that the data drive’s letter changed from E: to D:. Eclipse did not like this and has not been behaving right. Worst case I’ll uninstall it and reinstall it again. Since I have it configure for Android development, I see another adventure in the horizon.
Now I wonder whether I could have switched the System partition to the Win 7 partition just by removing the XP partition's drive letter and setting the Win 7 partition to Active. The world will never know<eg>. This was a harrowing experience, but had a happy ending in that I did not have to reinstall everything again.
Regards!
