


This is the first part of R2 User Guide.
Parts
1) ATmega/ATtiny Microcontroller Programming Shield for Arduino As ISP R2.
2) Arduino UNO compatible microcontroller board:
- Genuine Arduino UNO R3 is recommended but most of all compatible boards will work with no problem.
- USB cable to hook it up to your PC is also required.
3) Microcontrollers to be programmed:
- Only 8 pin, 14 pin, 20 pin or 28 pin DIP(N) or 40 pin DIP types are supported.
- Supported microcontrollers.
ATtiny 13, 25, 45, 85
ATtiny 24, 44, 84
ATtiny 2313, 4313
ATtiny 261, 461, 861
ATtiny 48, 88
ATmega 8, 48, 88, 168, 328
ATmega 8535, 16, 32, 164, 324, 644, 1284
4) Arduino IDE:
- The latest version of this software should be installed on your PC.
- You can download it form here. https://www.arduino.cc/en/Main/Software
Preparations
1) Arduino as ISP:
- If you have an Arduino compatible board, you can simply turn the board into a programmer just by loading a sketch ‘ArduinoISP’.
- To do so, get your Arduino connected to your PC using its USB cable first.
- Run Arduino IDE on your PC and open the sketch under File > Examples > 11. ArduinoISP > ArduinoISP.

- Click on 'Upload' button to get the sketch compilied and uploaded to your Arduino.
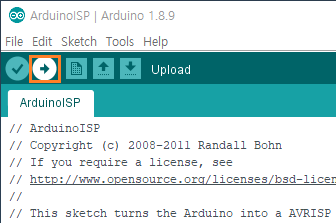
- If the sketch is loaded with no error, your Arduino is now a programmer ‘Arduino As ISP’!
- To be able to program your microcontrollers using it, choose the programmer under Tools > Programmer: > Arduino as ISP. Do Not Choose ‘ArduinoISP’.

2) Boards Manager:
- If you can’t find your target microcontroller from the list under Tools > Board:, You need to install some Boards Managers to your Arduino IDE.
- I personally recommend you to install MCUdude’s MicroCore, MiniCore, MightyCore and SpenceKonde’s ATTinyCore.
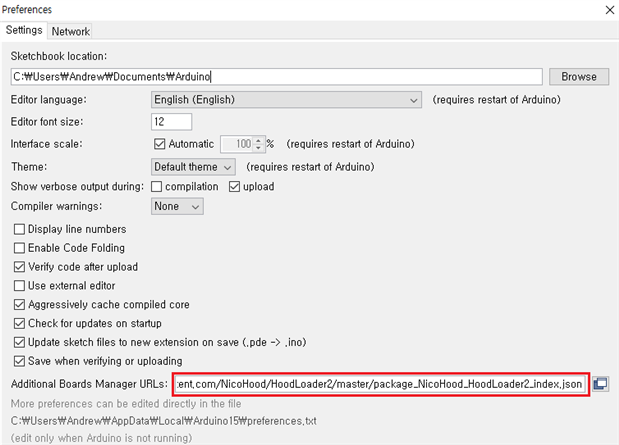
- To install them, go to Files > Preferences and copy following URLs.
MicroCore : https://mcudude.github.io/MicroCore/package_MCUdude_MicroCore_index.json
MiniCore : https://mcudude.github.io/MiniCore/package_MCUdude_MiniCore_index.json
MightyCore : https://mcudude.github.io/MightyCore/package_MCUdude_MightyCore_index.json
ATTinyCore: http://drazzy.com/package_drazzy.com_index.json
- Paste them in Additional Boards Manager URLs: and click 'OK'. You can add more than 2 URLs bt using ','.
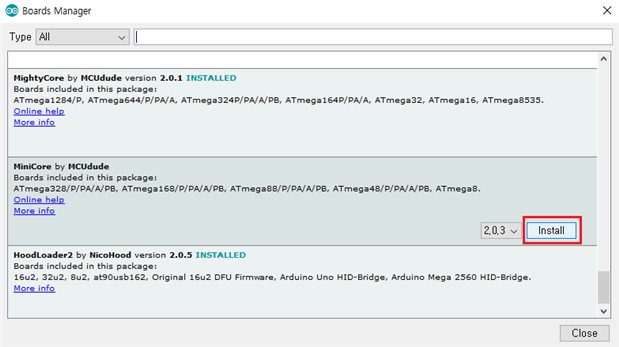
- Go to Tools > Board: > Boards Managers.

- Wait a moment to get the list of Boards Managers loaded, find a Boards Manager to install and click 'Install' to get it installed. After installing all Boards Managers required, click 'Close'.
- You should now be able to find your microcontrollers from Tools > Board:.

3) Hardware
- This is the easiest part of the preparation.
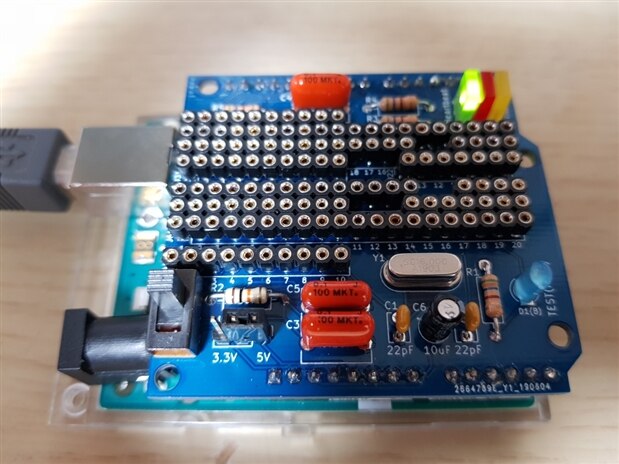
- Turn the R2’s power off before placing it on your Arduino.
- Gently plug the R2’s male header pins in the Arduino’s female headers.
- If nothing goes wrong, Heartbeat(Green) will slowly blink even if the R2 is still powered off.
You are now ready to start programming!!
Please see my other postings for more information.
ATmega/ATtiny Microcontroller Programming Shield for Arduino As ISP R1
ATmega/ATtiny Microcontroller Programming Shield for Arduino As ISP R2 - #1
ATmega/ATtiny Microcontroller Programming Shield for Arduino As ISP R2 - #2
ATmega/ATtiny Microcontroller Programming Shield for Arduino As ISP R2 - #4
ATmega/ATtiny Microcontroller Programming Shield for Arduino As ISP R2 - #5
Top Comments