


“Help! We need to hack the dinosaurs.”

For over a generation, Blackgang Chine Theme Park on the Isle of Wight has been famous for its dinosaurs. In the 70’s the children’s TV program Blue Peter filmed the journey of a group of fiberglass prehistoric creatures as they were flown into the Park. This image has stuck with many as they have grown up. (Image T-Rex being airlifted into Blackgang Chine, 1972 - Credit: Blackgang Chine)

Although they are great, Alexander Dabell, the fifth generation of the Dabell family to own and run the Park, believed they could be even better.
So he asked me to help adapt the dinosaurs to do whatever our imaginations suggested.
Mark Butler, the Park’s Technical Projects coordinator, had already hacked into one of the control panels using a Raspberry Pi and Piface and taught himself enough of the computer language Python to control the dinosaur.
Hearing this gave me the inspiration to try. I had tinkered with the Raspberry Pi and Arduino, but, as a mechanical engineer by training, I found the programming and electronics a slog.
I had heard Andy Stanford-Clark (@andysc) from IBM talk about Node-RED – an easy-to-use way of programming the Pi. There’s an 18 minute video of Andy explaining Node-RED here.
I knew a Raspberry Pi and Node-RED could be used to control the dinosaurs, but I wasn’t convinced I could do it.
With much virtual hand holding from Andy (Thanks Andy!), mainly via DM’s over twitter, I got Node-RED working on my Pi.
Once it was installed (and it really wasn’t that difficult, the hard bit was overcoming my mental block), I was away.
By dragging and placing various “nodes” in Node-RED, I soon had the Pi tweeting me when the International Space Station was due to come over. (This required an MQTT data feed written by Jaap Meijers (@tjaap) and @andysc – link available soon).
Node-RED and the Raspberry Pi can be used for so much more than Twitter, but it’s what I am familiar with, and so made a good starting point.
Then I wanted to use the GPIO pins (General-Purpose Input/Output).
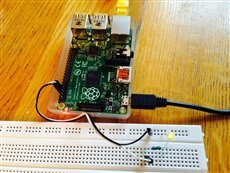
On a bread board I connected an LED and resistor to one of the GPIO pins on the Pi. I dragged a couple of nodes and linked them on Node-RED - and had the LED flashing whenever I received a tweet!
(Note:– This took a bit of trouble shooting, as I used the wrong pin numbers at first.)
Next, I made a user friendly toggle switch, and used it to control the LED. I connected a resistor to the switch, but Node-RED allows you to specify a pull-up or pull-down resistor in the software, without one being in the actual hardware. The blue stuff on the connectors is Sugru.


This gave me the confidence that I could have any input device control any output device via the Pi and Node-RED. Although I knew I needed a few more steps.
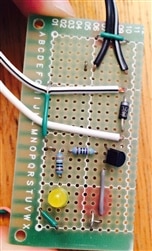
The Pi has an output of 3.3V. As I wanted to control something plugged into the mains, I had to use a relay. But my relay needed 12V to work. After a bit of internet surfing, I found I needed an Open Collector Driver. 
 I didn’t have quite the right components, but Imade do with what I had, and, after a few false starts (I wired the legs of the transistor incorrectly, my diode was in upside down etc.) the switch controlled the relay.

 I didn’t have quite the right components, but Imade do with what I had, and, after a few false starts (I wired the legs of the transistor incorrectly, my diode was in upside down etc.) the switch controlled the relay.
Now I can turn a lamp on in my house, just by sending myself a message on Twitter from anywhere in the world!
With the confidence that “even a mechanical engineer can do this electronics and programming stuff” I suggested to Blackgang that I bring together a group of hackers / makers / electronic engineers and computer experts to help refine the controls they already have, and train other staff members so they could all join in the fun.
#BlackgangPi 2 will discuss how that went!
Connecting Pi to my laptop:
Farnell Number | Description |
Extra Parts needed to connect Pi to external monitor:
| Farnell Number | Description |
Electronics:
| Farnell Number | Description |
| Arduino | |
| 100 ohm Resistor | |
| Toggle Switch |


