


Hi there, by now you've likely read my blog post about the 1977 v2 Electric Mistress I resurrected after someone sold me just the PCB. Well, that's still going strong and is my "go to" flanger. However, I did say in that post that there are a number of clones out there that were developed around MN3007 IC, as the original SAD1024 IC is no longer manufactured. I've done quite a lot of research around the Electric Mistress, especially the 18v mistress, and there's not many, if any manufacturers that sell an 18v Mistress clone. Most have been altered to 9v, which gives less headroom and also they've been substituted for the MN3007 chip.
There was a manufacturer a few years back that started to manufacture Mistress clones using the SAD1024 chip, this pedal was the Hartman Analog Flanger It was a close clone of the later 9v Electric Mistress and a brilliant pedal. You can see a demo of it next to a genuine 18v Mistress in this You Tube clip.
However with supplies of NOS SAD1024 chips drying up even Hartman started to use the MN3007 chip. the Hartman flanger to my mind was the closest modern clone to the 70's 18v Mistress, it's effect was virtually identical and now commands quite high resale value. I wasn't going to buy one, I wanted to make one.
After a lot of scouring, and research I eventually came across a website called Mad Beans Pedals. This site specialises in reproductions of old classic pedals, they sell either kits or just the PCB's. When i looked at the site i noticed they sold a kit/PCB called a Current Lover Flanger. When I researched further i discovered this was a close copy of the Electric Mistress but the later 9v Mistress. I decided to buy a Current Lover PCB and use this for my next project.
The schematic is below along with the PCB layout, and isn't dissimilar to the old Electric Mistress schematic. The PCB is a double layer PCB, this prevents the need for jumpers that the original Mistress had.


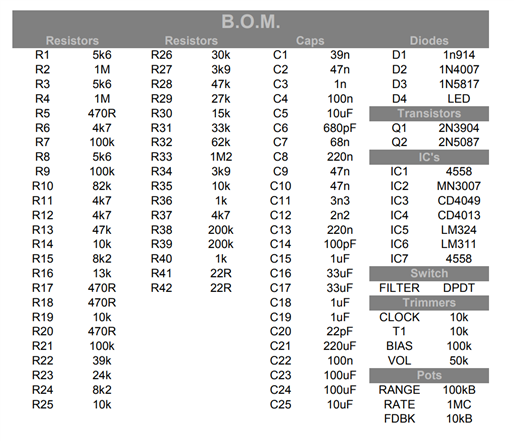
The BOM is below, and has been reproduced from the Mad Beans documentation. It's got a higher IC count than an original Mistress, which only had 5... This one has 7! I'll be building this with all new metal film resistors, I'm going for brand new and the best I can afford. To be honest, it's not come to too much money in parts. I think the most expensive item was the MN3007 which was around £5 (obviously cashing in on the popularity). The rest of the components came to a total of around £20, that's not including the enclosure. Either way, I think it's still a fairly reasonably priced project, and when you consider a genuine Mistress costs around £400 for an original, or £100 for a reissue that sounds nothing like the original it's worth investing the time and effort. This total project has come in at around £35 all in........ Not bad.
WORD OF WARNING. The MN3007 IC is quite a popular chip, and is now used in many effects pedals as the delay chip of choice instead of the SAD1024. For this reason, they now come up on EBay for pence (or cents if you're across the pond), where if you buy them from a reputable source they cost somewhere in the region of £5 to £10. The ones on Ebay from China are likely fakes, so don't waste your money, I bought mine from a highly recommended supplier in Germany called Das Musikding (The Music Thing), I have also however purchased a couple off EBay to test in the circuit. I'll get the pedal working with the "genuine" IC, then swap the genuine for one of the Chinese IC's, just to see if it is real or a dud. Obviously I'll report my findings here.
You can see the Current Lover flanger in action by following this link, this is the Longamp Roxanne Flanger, however when you look at the gut shots of the pedal you can clearly see it's a Current Lover. I like the way he says "everything is hand made by me in Poland"....... except the PCB that is!! Apparently he has developed his own PCB now, and this page is quite old...... I'm not so sure.
Anyhow, on with the build. I checked my inventory of parts and realised i needed to order some IC's and sockets, and also some resistors which i didn't have in stock. After they arrived, I was ready to start populating the board. There are lots of components on this build, but save for stopping for a cup of tea mid-way I had the whole thing populated in around 90 minutes or so. It obviously helps if you have all the resistors separated in containers with their values on the containers. Since I've been doing these pedals I've now amassed a rather large collection of resistors, capacitors and other bits and pieces so thought it only right to organise them. Everything is organised in value order in a small cabinet with draws. 5S hasn't got a patch on me.


You can see in the third from last photograph that I've had to use a larger than required polyester capacitor (The brown 104 one). I squeezed it in, just..... Looks wonky but will work fine. it's a higher voltage than required and that's likely why it's so big, but seeing as I had it in my draw I used it. I'm also really pleased with my soldering ability now..... Much better than it was when I built the power boost all those months ago. Now I just need to wire and test it 
UPDATE 28/08/2018
I'm back from a lovely holiday in Cyprus, and thought I'd try and test the Current Lover Flanger... I finished building it and tested it only to find the LFO LED didn't work, and also the volume when the effect is engaged is very low.... certainly not as it should be. When I checked the LED for the LFO part of the circuit I noticed that I had installed it as it should be. With the negative leg of the diode going to the square pad on the PCB. For some reason I though it might be the wrong way round, so I de-soldered the LED, and turned it around soldering the longer positive leg into the square pad on the PCB, et voila it worked. Looks like the guy that created the PCB didn't use standard convention when he labelled the PCB for the LED's and reversed them.
I still have an issue with the volume drop but i'm hoping that once I start to tweek the trimmers on the PCB that will correct itself. The actually flange effect sounds OK, albeit quiet, and not set up properly yet. I'll have a fiddle and report back