element14 Community
element14 Community
    Register Log In
  • Site
  • Search
  • Log In Register
  • Members
    Members
    • Benefits of Membership
    • Achievement Levels
    • Members Area
    • Personal Blogs
    • Feedback and Support
    • What's New on element14
  • Learn
    Learn
    • Learning Center
    • eBooks
    • STEM Academy
    • Webinars, Training and Events
    • Learning Groups
  • Technologies
    Technologies
    • 3D Printing
    • Experts & Guidance
    • FPGA
    • Industrial Automation
    • Internet of Things
    • Power & Energy
    • Sensors
    • Technology Groups
  • Challenges & Projects
    Challenges & Projects
    • Design Challenges
    • element14 presents
    • Project14
    • Arduino Projects
    • Raspberry Pi Projects
    • Project Groups
  • Products
    Products
    • Arduino
    • Dev Tools
    • Manufacturers
    • Raspberry Pi
    • RoadTests & Reviews
    • Avnet Boards Community
    • Product Groups
  • Store
    Store
    • Visit Your Store
    • 'Choose another store...'
      • Europe
      •  Austria (German)
      •  Belgium (Dutch, French)
      •  Bulgaria (Bulgarian)
      •  Czech Republic (Czech)
      •  Denmark (Danish)
      •  Estonia (Estonian)
      •  Finland (Finnish)
      •  France (French)
      •  Germany (German)
      •  Hungary (Hungarian)
      •  Ireland
      •  Israel
      •  Italy (Italian)
      •  Latvia (Latvian)
      •  
      •  Lithuania (Lithuanian)
      •  Netherlands (Dutch)
      •  Norway (Norwegian)
      •  Poland (Polish)
      •  Portugal (Portuguese)
      •  Romania (Romanian)
      •  Russia (Russian)
      •  Slovakia (Slovak)
      •  Slovenia (Slovenian)
      •  Spain (Spanish)
      •  Sweden (Swedish)
      •  Switzerland(German, French)
      •  Turkey (Turkish)
      •  United Kingdom
      • Asia Pacific
      •  Australia
      •  China
      •  Hong Kong
      •  India
      •  Korea (Korean)
      •  Malaysia
      •  New Zealand
      •  Philippines
      •  Singapore
      •  Taiwan
      •  Thailand (Thai)
      • Americas
      •  Brazil (Portuguese)
      •  Canada
      •  Mexico (Spanish)
      •  United States
      Can't find the country/region you're looking for? Visit our export site or find a local distributor.
  • Translate
  • Profile
Personal Blogs
  • Members
  • More
Personal Blogs
Legacy Personal Blogs DIY Soldering Station Part 3
  • Blog
  • Documents
  • Mentions
  • Sub-Groups
  • Tags
  • More
  • Cancel
  • New
Blog Post Actions
  • Subscribe by email
  • More
  • Cancel
  • Share
  • Subscribe by email
  • More
  • Cancel
Group Actions
  • Group RSS
  • More
  • Cancel
Engagement
  • Author Author: adsicks
  • Date Created: 16 Mar 2017 3:53 PM Date Created
  • Views 968 views
  • Likes 3 likes
  • Comments 15 comments
  • diy rework station
  • openscad
  • carpentry
Related
Recommended

DIY Soldering Station Part 3

adsicks
adsicks
16 Mar 2017

I made the clamp to hold my extra pair of hands in place yesterday. It took about an hour.


I started out measuring the base of my hands and making a 3D model in OpenScad.


image

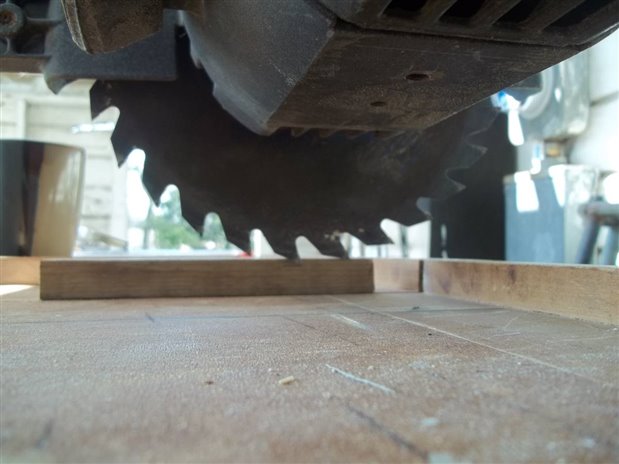
To start my cuts I set my blade to take out approximately half of the height of the base of the hands. I put a mark on a scrap board and used it to set my saw.

image

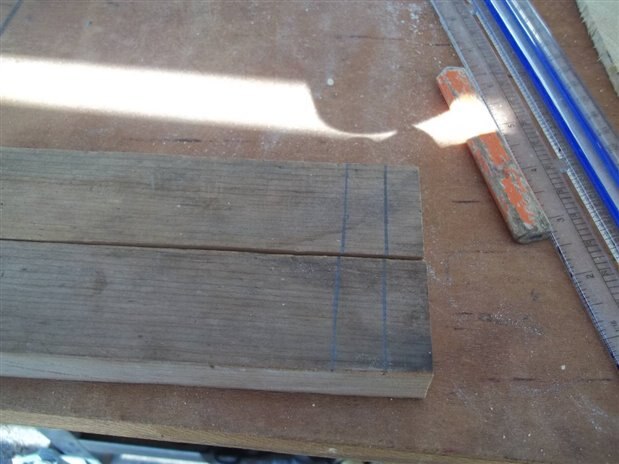
Then a marked two scraps the same width as one of the legs...

image

And cross cut them at the set depth (mindful of my thumb. I didn't want to chop it off today).

image


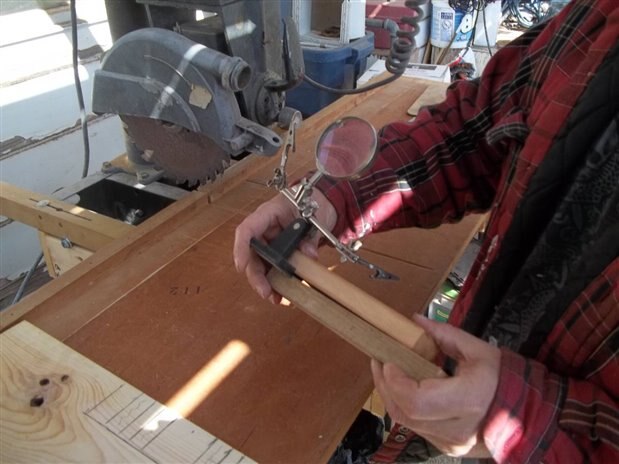
Then I checked my depth against the base of my extra hands.

image

I made adjustments to my saw depth and cut it until I got it flush. Next, I went back to my model and looked at the cut lay out.

image


And marked my wood.


image


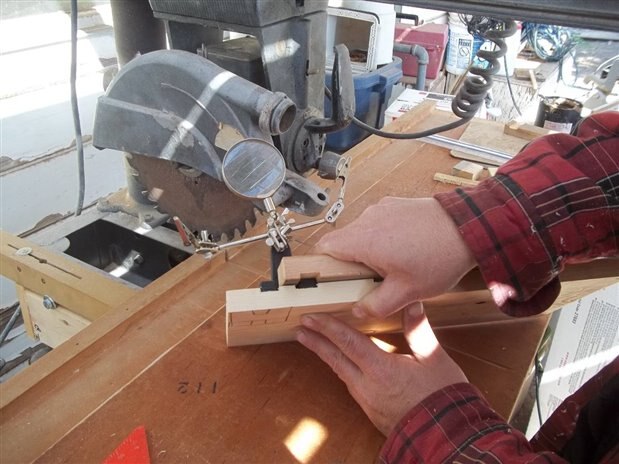
I did the cross cut first. I used a long piece of wood because I like my thumbs.


image


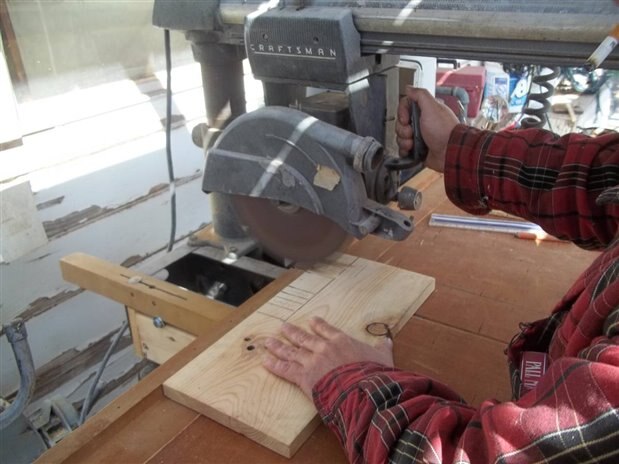
I went a little past the line to make sure my channels were deep enough. It is alright if they aren't as deep towards the line as I am about to cut the channel along the grain of the wood.


To mark the channel for the back of the base I line the back of my extra hands with the line, put a mark and marked it with a speed square.


image

image


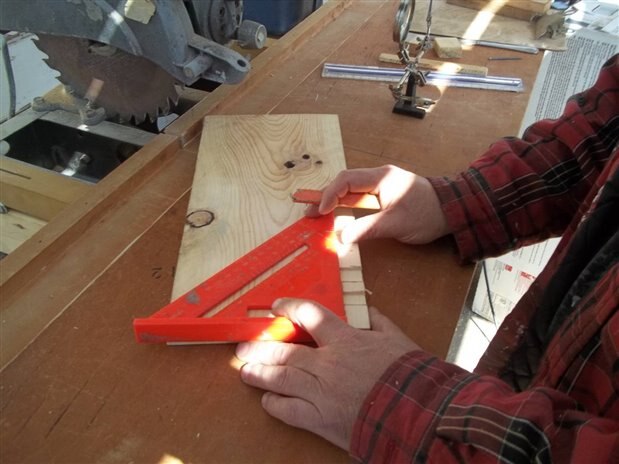
Then I cut the channel to my marks. It is important to have a square edge to work with for this step.


image


I used one of the scraps from my first steps to check my depth with the extra hands.


image

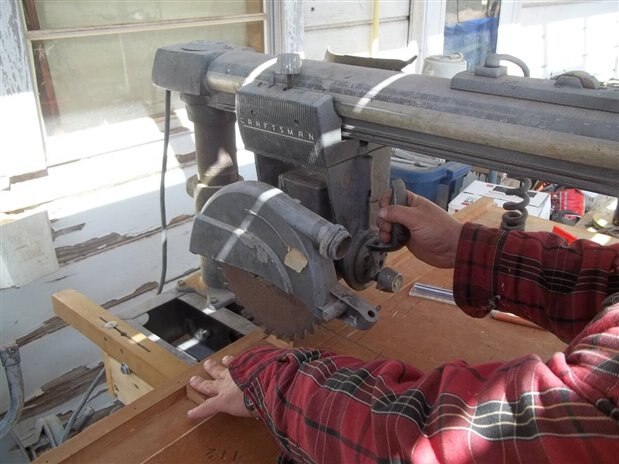
I cut out the top part from the edge. I turned it around and marked the hole for the neck. I adjusted the saw to the table for a full cut and notched out the neck hole. I used the full board to make this safer.


image


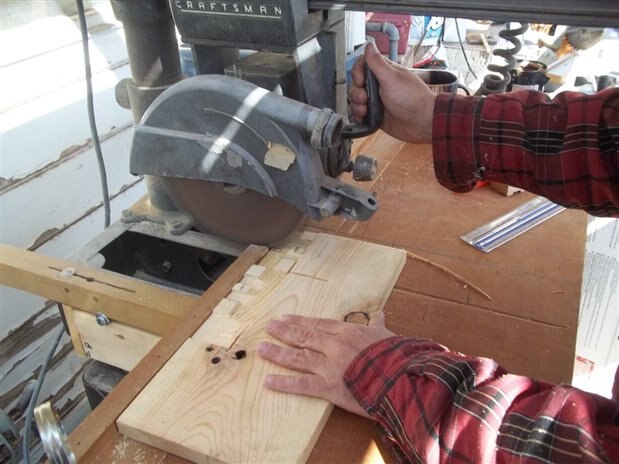
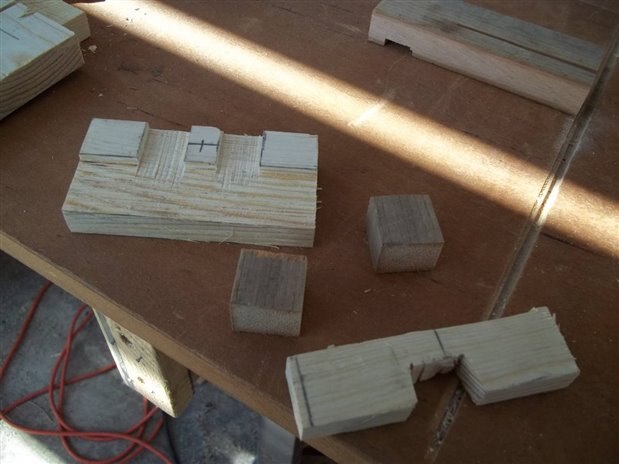
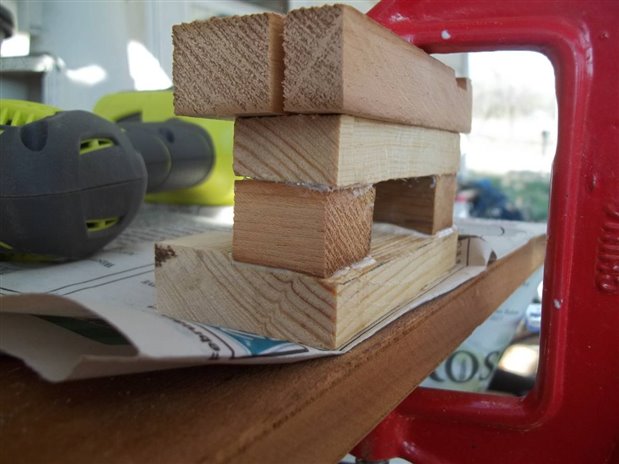
I used a jig saw to finish out the notch. Then I cut my pieces out of the larger board and dry fitted it.

image


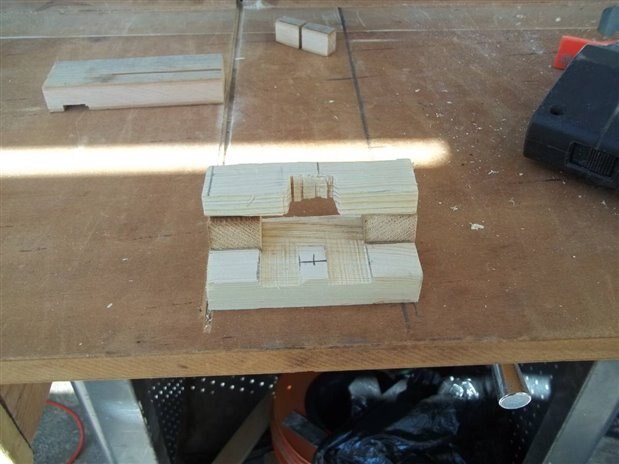
It also helps to put the hands in it at this point to see if it fits the way you want it.


When I was satisfied I started the gluing process. First I glued the risers on the base with Gorilla Glue...

image


And clamped.

image


I only left it clamped for 30 minutes since I was clamping the top part along the same axis. Then I glued the top part with more Gorilla Glue and clamped.


image


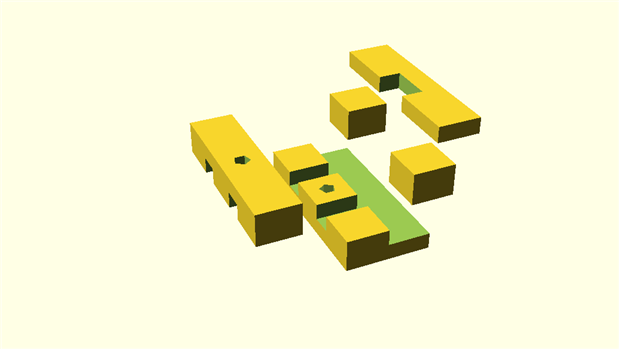
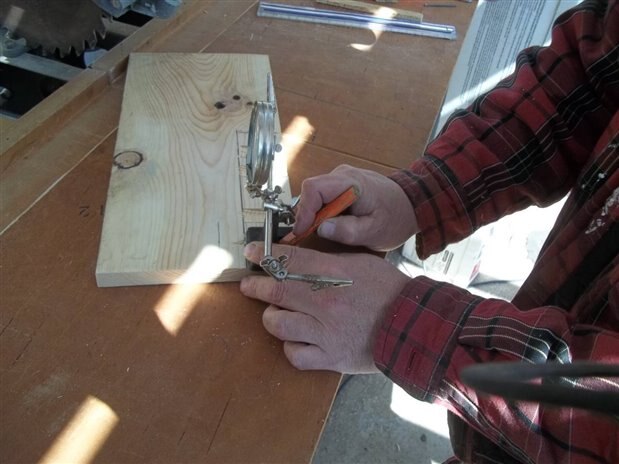
Then I drilled the hole to hold the front clamp on. The finished product holding the hands should look like this:


image


Here is the open scad code for the exploded view:


//Base

rotate([180,0,180])

translate([-4,0,0])

difference(){

cube([4,2,0.75]);

translate([1,-0.01,-0.00005])    cube([0.5,2.01,0.375]);


translate([2.5,-0.01,-0.00005])    cube([0.5,2.01,0.375]);

translate([-0.05,1,-0.00005]) cube([4.1,1.1,0.375]);

    translate([2,0.5,0]) cylinder(r=0.1875);


}


// Front clamp


translate([0,-1,0])

difference(){

    cube([4,1,0.75]);

    translate([1,-0.01,-0.00005])    cube([0.5,2.01,0.375]);


translate([2.5,-0.01,-0.00005])    cube([0.5,2.01,0.3751]);

    translate([2,0.5,0]) cylinder(r=0.1875);

  }


// Back clamp


translate([0,2,1])

difference(){

    cube([4,1,0.75]);

    translate([-0.05,-0.05,-0.0001]) cube([4.1,1.1,0.375]);

    translate([1.5,0,0]) cube([1,0.5,0.75]);


}


translate([0,1.25,.5]) cube([1,1,0.75]);


translate([3,1.25,.5]) cube([1,1,0.75]);


Thanks to my helper, Paul, who took the action shots....

  • Sign in to reply
  • adsicks
    adsicks over 6 years ago in reply to COMPACT

    I've seen that video. That is one of the best ESD rundowns on YouTube....

    • Cancel
    • Vote Up 0 Vote Down
    • Sign in to reply
    • More
    • Cancel
  • adsicks
    adsicks over 6 years ago in reply to COMPACT

    Re-watching that reminded me of a pressing question that I have always

    had -- where are the best suppliers of ESD bags. I've googled and

    searched suppliers and such but I haven't really found one and I've been

    looking for years. Especially now that PC's are $200 items I don't have

    spare ESD bags just lying around.....

    • Cancel
    • Vote Up 0 Vote Down
    • Sign in to reply
    • More
    • Cancel
  • COMPACT
    COMPACT over 6 years ago in reply to adsicks

    You don't have to go overboard but take a few common sense precautions.

    Using wood (and paper) is a great start because it is static neutral.

    Keeping insulators away from your workspace is another.


    I just don't want you to be in a situation where your silicone mat is causing problems.


    ESD measuring equipment is expensive due to its limited use.

    This link has quite a few common sense precautions.

    https://www.youtube.com/watch?v=RbDwcGL3yAk


    Just try some ESD equipment distributors for offcuts and accessories.


    Good Luck!

    • Cancel
    • Vote Up 0 Vote Down
    • Sign in to reply
    • More
    • Cancel
  • adsicks
    adsicks over 6 years ago in reply to COMPACT

    For one, where can I get this?

    For two, can you post a link to an actual test of the mat I have? I've seen the claims that this particular pad is not actually an ESD pad, but the manufacturer says otherwise.

    For three, If a component is placed on a surface by a technician wearing a wrist strap, how likely is a high amp ESD strike from the surface to the component to the hand to the 1 megaohm impedance to the ground?


    I mean, yeah, I could get so paranoid I paint this and my floors with ESD paint and wear ESD shoes like I did when we were working on Disc Drives and such, but $800 worth of paint to save what now amounts to 30 or 40 dollars worth of components. I can buy a large bottle of fabric softener and a bottle of Isopropyl Alcohol  for a couple of dollars and keep it sprayed down and it will do basically the same thing.


    Plus, I have this StarTech mat for staging and assembly.
    image


    But it is about 24"X 24", doesn't have trays and doesn't have the heat tolerance I'm looking for.


    That all being said, it would be nice to incorporate an ESD test circuit in this project. It was part of the brainstorming, but I decided it would be a better add on later part. (I should build the workstation so I can better build the protection curcuit kind of thing).....


    But, heck, what I am doing in this post is open source. I don't have some paramilitary force that is going to come to your house and beat you into using a specific mat, design or saw, or wear special clothes or anything like that....

    • Cancel
    • Vote Up 0 Vote Down
    • Sign in to reply
    • More
    • Cancel
  • COMPACT
    COMPACT over 6 years ago in reply to adsicks

    I've seen far too much damage to electronic equipment due to uncontrolled ESD and I don't want to see you go through so much effort and risk damage to your projects.

    Compliant ESD bench matting is often available as cheap EOR (END OF ROLL) specials. And whilst you're at it purchase some ESD mat cleanser (apparently it is different to normal cleanser).

    Here's photo of some small mats that I use as ESD bench toppers.

    They're the perfect size!

    image

    • Cancel
    • Vote Up 0 Vote Down
    • Sign in to reply
    • More
    • Cancel
>
element14 Community

element14 is the first online community specifically for engineers. Connect with your peers and get expert answers to your questions.

  • Members
  • Learn
  • Technologies
  • Challenges & Projects
  • Products
  • Store
  • About Us
  • Feedback & Support
  • FAQs
  • Terms of Use
  • Privacy Policy
  • Legal and Copyright Notices
  • Sitemap
  • Cookies

An Avnet Company © 2023 Premier Farnell Limited. All Rights Reserved.

Premier Farnell Ltd, registered in England and Wales (no 00876412), registered office: Farnell House, Forge Lane, Leeds LS12 2NE.

ICP 备案号 10220084.

Follow element14

  • X
  • Facebook
  • linkedin
  • YouTube