element14 Community
element14 Community
    Register Log In
  • Site
  • Search
  • Log In Register
  • Members
    Members
    • Achievement Levels
    • Benefits of Membership
    • Feedback and Support
    • Members Area
    • Personal Blogs
    • What's New on element14
  • Learn
    Learn
    • eBooks
    • Learning Center
    • Learning Groups
    • STEM Academy
    • Webinars, Training and Events
  • Technologies
    Technologies
    • 3D Printing
    • Experts & Guidance
    • FPGA
    • Industrial Automation
    • Internet of Things
    • Power & Energy
    • Sensors
    • Technology Groups
  • Challenges & Projects
    Challenges & Projects
    • Arduino Projects
    • Design Challenges
    • element14 presents
    • Project14
    • Project Groups
    • Raspberry Pi Projects
  • Products
    Products
    • Arduino
    • Avnet Boards Community
    • Dev Tools
    • Manufacturers
    • Product Groups
    • Raspberry Pi
    • RoadTests & Reviews
  • Store
    Store
    • Visit Your Store
    • Or choose another store...
      • Europe
      •  Austria (German)
      •  Belgium (Dutch, French)
      •  Bulgaria (Bulgarian)
      •  Czech Republic (Czech)
      •  Denmark (Danish)
      •  Estonia (Estonian)
      •  Finland (Finnish)
      •  France (French)
      •  Germany (German)
      •  Hungary (Hungarian)
      •  Ireland
      •  Israel
      •  Italy (Italian)
      •  Latvia (Latvian)
      •  
      •  Lithuania (Lithuanian)
      •  Netherlands (Dutch)
      •  Norway (Norwegian)
      •  Poland (Polish)
      •  Portugal (Portuguese)
      •  Romania (Romanian)
      •  Russia (Russian)
      •  Slovakia (Slovak)
      •  Slovenia (Slovenian)
      •  Spain (Spanish)
      •  Sweden (Swedish)
      •  Switzerland(German, French)
      •  Turkey (Turkish)
      •  United Kingdom
      • Asia Pacific
      •  Australia
      •  China
      •  Hong Kong
      •  India
      •  Korea (Korean)
      •  Malaysia
      •  New Zealand
      •  Philippines
      •  Singapore
      •  Taiwan
      •  Thailand (Thai)
      • Americas
      •  Brazil (Portuguese)
      •  Canada
      •  Mexico (Spanish)
      •  United States
      Can't find the country/region you're looking for? Visit our export site or find a local distributor.
  • Translate
  • Profile
Personal Blogs
  • Members
  • More
Personal Blogs
Legacy Personal Blogs Getting up and running with Arm Design Start
  • Blog
  • Documents
  • Mentions
  • Sub-Groups
  • Tags
  • More
  • Cancel
  • New
Blog Post Actions
  • Subscribe by email
  • More
  • Cancel
  • Share
  • Subscribe by email
  • More
  • Cancel
Group Actions
  • Group RSS
  • More
  • Cancel
Engagement
  • Author Author: adamtaylorcengfiet
  • Date Created: 19 Nov 2018 10:50 AM Date Created
  • Views 3252 views
  • Likes 9 likes
  • Comments 7 comments
  • xilinx_explore
  • arm m3
  • fpga
  • arty
  • arty s7
  • design start fpga
  • arm m1
Related
Recommended

Getting up and running with Arm Design Start

adamtaylorcengfiet
adamtaylorcengfiet
19 Nov 2018

One of the big announcements at the recent Xilinx Developer Forum (XDF) in San Jose was the Arm design start programme. This opens to FPGA developers license free both the cortex M1 and M3 for our Xilinx FPGA designs.

In our design, we use the Cortex M cores for tasks such as System Management, IO and Sensor Controllers.

So, what do you need to get up and running with the Arm FPGA Design Start?

  • Arty A35T or Arty S50
  • Vivado 2018.2
  • Arm M1 or M3 Design Start pack depending upon core choice

In the remainder of this blog we are going to look at how we can get the initial design example up and running on the Arty hardware. We will follow this up with another blog which examines how we can create our own software applications for the design.

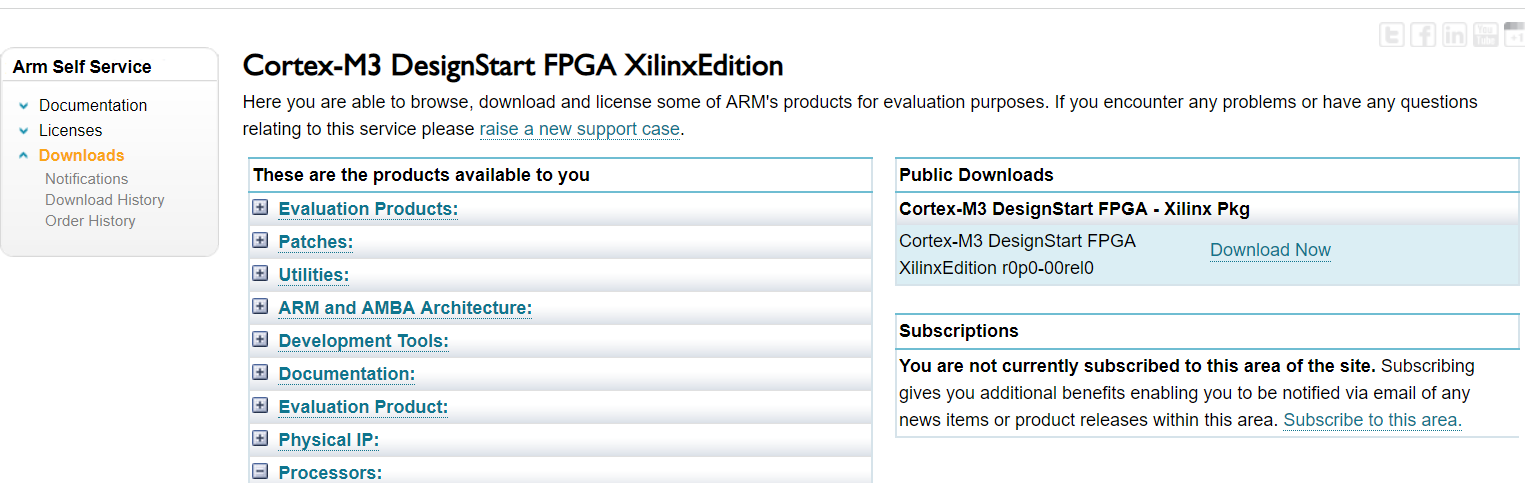
The first step in creating this example is to download the relevant Cortex core from the Arm Design Start page.


To download the design, you will need to register and agree to the license terms.

image

Both M1 and M3 packages are downloaded as compressed files, unzip these files until you see the following file structure.

image

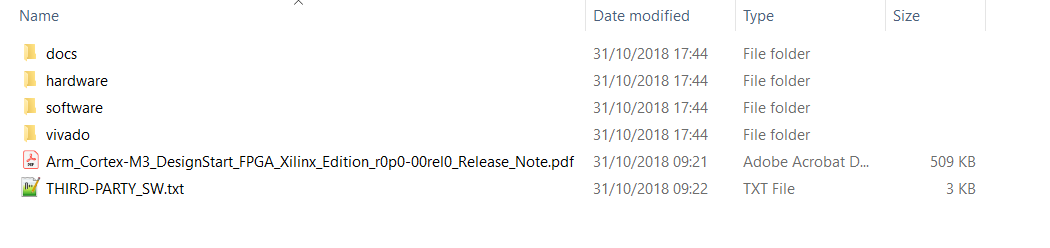
The directories are self-evident

  • Docs – Contains the design documentation
  • Hardware – Contains the design example projects and bit files in Vivado
  • Software – Contains the SW application for the demo application
  • Vivado – Contains Vivado IP and SDK SW repositories required to create a new design from scratch

For this example, we are going to open the existing projects, these are under the hardware directory.

For the M1 example you will see two choices projects and bit files for either the Arty A7 or S7, while for the M3 you will see the project for the Arty A7.

image

Before we can open any of these projects, we need to also set the default IP location, such that when the project is opened it knows where to look for the Arm cores.

We can do this in Vivado before we open a project, click on Tools -> Setting and select IP Defaults and add the path to the Vivado folder we just extracted with the download.

image

Once we have added the default IP search path, we can open the project of our choosing. For this blog I am going to open the M3 Arty design.

The project may take a few minutes to open depending upon the speed of your machine, however once it is opened. We can explore the block diagram of the design

image

The next stage is to program the provided bit file into the Arty.

On the left hand of the screen in Vivado select hardware manager, this will configure Vivado to be able to connect to and download bit files.

image

When the hardware manager is open you will see a green bar across the top and the words Open Target in blue. Ensure your Arty board is connected and left click on Open Target and select Auto Connect.

This will connect to the Arty using the USB JTAG, allowing us to download the bit file.

Before we can download the bit file, we should open a terminal program and connect to the serial port. For this I used PuTTY the serial rate is 115200 with 1 stop and start and no parity.

image

Once we have the terminal program connected the next step is to download the bit file

image


Right click on the device under Hardware and select program device, this will open a dialog window which will include the bit file. Select this bit file and click program.

image

Once the application has programmed in the terminal, we should be able to see the hello world message from the running Cortex M3

image

We can now use the DIP and push button switches to change the states of the LEDs as below.

You don't have permission to edit metadata of this video.
Edit media
x
image
Upload Preview
image

Now we know the basics of how to get the example design up and running we will look next time at how we can write software for our chosen Cortex M core.

In the mean time explore the block diagram and read the documentation to gain further understanding of not only the example design but also the reference documentation.

  • Sign in to reply

Top Comments

  • Fred27
    Fred27 over 5 years ago +2
    A very useful guide. Thanks.
  • Fred27
    Fred27 over 5 years ago in reply to 14rhb +2
    I think only the Cortex-M1 is supported on the Arty S7.
  • DAB
    DAB over 5 years ago +1
    It looks like Xilinx is getting serious about bringing FPGA devices to the maker world. DAB
Parents
  • Fred27
    Fred27 over 5 years ago

    A very useful guide. Thanks.

    • Cancel
    • Vote Up +2 Vote Down
    • Sign in to reply
    • More
    • Cancel
Comment
  • Fred27
    Fred27 over 5 years ago

    A very useful guide. Thanks.

    • Cancel
    • Vote Up +2 Vote Down
    • Sign in to reply
    • More
    • Cancel
Children
No Data
element14 Community

element14 is the first online community specifically for engineers. Connect with your peers and get expert answers to your questions.

  • Members
  • Learn
  • Technologies
  • Challenges & Projects
  • Products
  • Store
  • About Us
  • Feedback & Support
  • FAQs
  • Terms of Use
  • Privacy Policy
  • Legal and Copyright Notices
  • Sitemap
  • Cookies

An Avnet Company © 2023 Premier Farnell Limited. All Rights Reserved.

Premier Farnell Ltd, registered in England and Wales (no 00876412), registered office: Farnell House, Forge Lane, Leeds LS12 2NE.

ICP 备案号 10220084.

Follow element14

  • X
  • Facebook
  • linkedin
  • YouTube