


Step 1- Get the workspace
Follow the steps
http://docs.openhab.org/developers/development/ide.html
Step 2- Recreate the project with the workspace
1: Get the opencean source code in java.
https://github.com/thomasletsch/opencean
Get the enocean source code by dowloading it here and add it to your eclipse
Or just by following the tutorial of your IDE. You can download any addon source code.
http://docs.openhab.org/developers/development/ide.html (following the steps)
Or https://github.com/openhab/openhab and add it to your eclipse.
2: How to open a project with eclipse?
(i found information here but this forum is in french)
3: Compile your final project:
You need to understand how works the enocean addon,
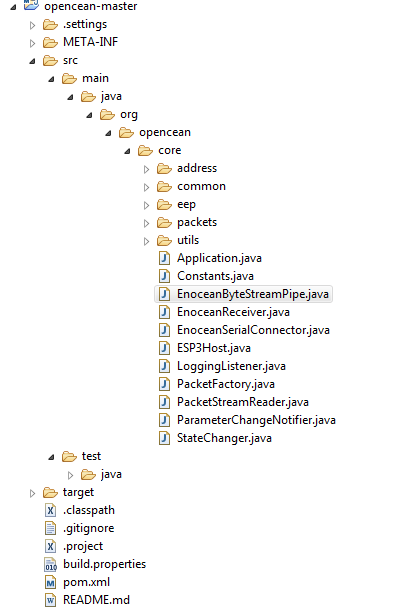
There is 2 parts, the first part is a snapshot called "opencean-core-0.0.1-SNAPSHOT" and content how the data bus is decoded.
This snapshot comes from the opencean-master file.
The second part is the addon itself which is located into the org.openhab.binding.enocean file.
Here is how you will have to build your enocean addon:
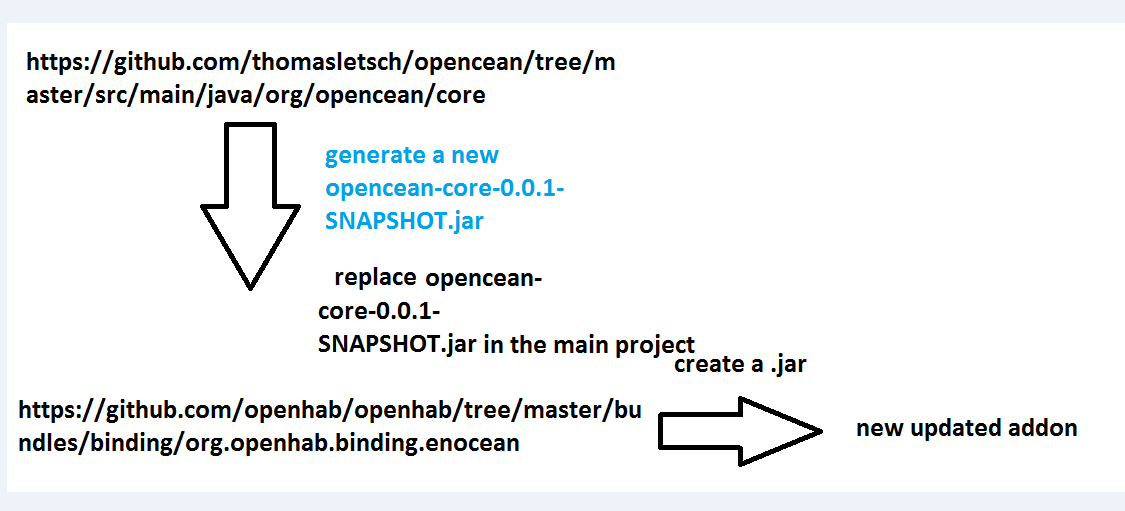
In order to create a new addon you need to create the snapshot first:
opencean-core-0.0.1-SNAPSHOT
With a first eclipse open the project opencean-master. Check that everything is here.
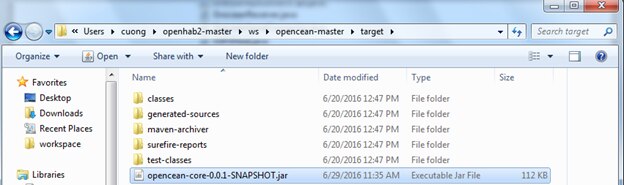
Now you have this file somewhere and you can work/change things on it:
open a cmd.
You NEED to have a maven on your computer.
Go in the folder where is located your opencean-master.
Use the command “mvn install”

It there is no error it should create the snapshot:
opencean-core-0.0.1-SNAPSHOT
This snapshot is located in the “target” folder of opencean-master.
Now we have this snapshot. We have to REPLACE the old snapshot in the org.openhab.binding.enocean folder by the new one.

The new enocean binding is now “updated” .
It's time to build the addon.
There are very detailed information on the github website.
https://github.com/openhab/openhab/wiki/How-To-Implement-A-Binding
=> You just need to remember that now you have to open with eclipse the org.openhab.binding.enocean
and follow the steps
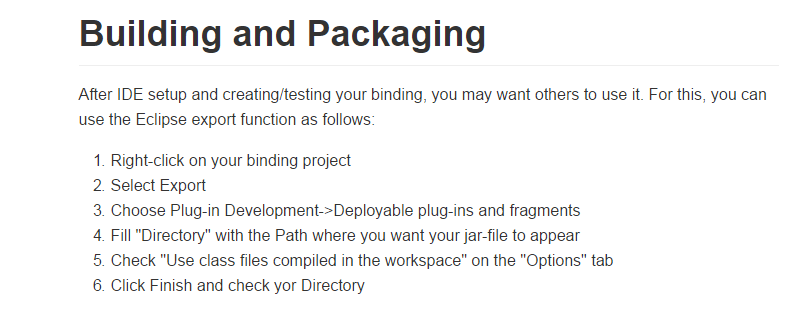
Once you get the .jar your have to replace this .jar in the openhab folder.
Now compile your openhab with debug mode and test it with your sensors.
If it works it means you know how to create your own addon.
Step 3: Adapt your own addon, for example here A5-12-01.
1- You need to get the latest enocean datasheet: write “enocean equipment profile” on google and download it.
2- Find the datasheet of your sensor.
For example we decided to look at A5-12-01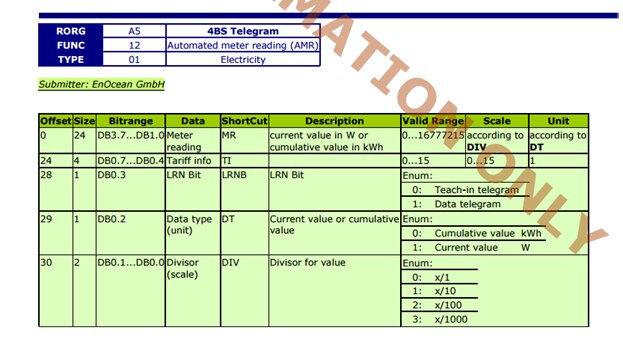
Your have to understand what does it mean by looking the explanation at the beginning of the datasheet.
Now we have to change the source code in order to add a new device.
I suggest you to open 2 eclipses in the same time (one for your opencean-master and one for the enocean-master file).
Add an unit if you need it: for me it was killowatthours

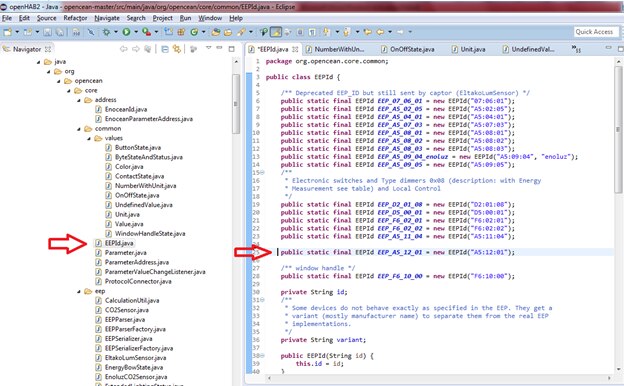
Add your device in the EepId.java file
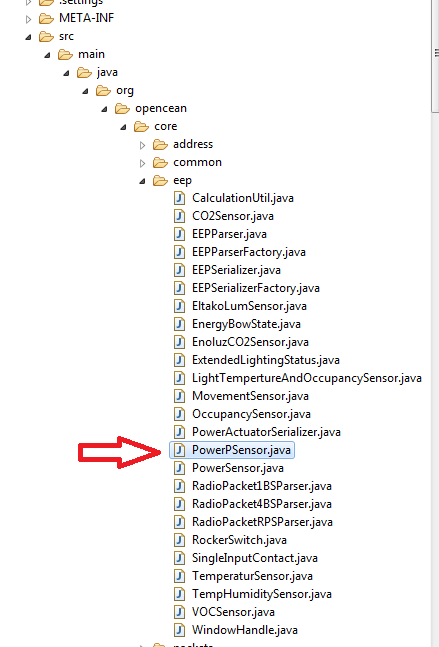
Add your file in the eep.
Now you have to find out what you need in order to analyse the data that you will get.
For example, In the datasheet we see that for the A5-12-01, it is a 4BS Telegram. So we will use the file in the projet that use 4Bsparser.
Look at the other files to get clues how it is done and create your own solution.
For the A5-12-01. I did this in order to make it work.
package org.opencean.core.eep;
import java.math.BigDecimal;
import java.math.MathContext;
import java.util.HashMap;
import java.util.Map;
import org.opencean.core.address.EnoceanParameterAddress;
import org.opencean.core.common.Parameter;
import org.opencean.core.common.values.NumberWithUnit;
import org.opencean.core.common.values.Unit;
import org.opencean.core.common.values.Value;
import org.opencean.core.packets.BasicPacket;
import org.opencean.core.packets.LearnButtonState;
import org.opencean.core.packets.RadioPacket4BS;
import org.slf4j.Logger;
import org.slf4j.LoggerFactory;
public class PowerPSensor implements EEPParser {
private static Logger logger = LoggerFactory.getLogger(OccupancySensor.class);
private LearnButtonState learnButton;
private int a;
private CalculationUtil calculationUtil = new CalculationUtil();
@Override
public Map<EnoceanParameterAddress, Value> parsePacket(BasicPacket packet) {
Map<EnoceanParameterAddress, Value> map = new HashMap<EnoceanParameterAddress, Value>();
if (packet instanceof RadioPacket4BS) {
RadioPacket4BS radioPacket4BS = (RadioPacket4BS) packet;
byte db0 = radioPacket4BS.getDb0();
byte db1 = radioPacket4BS.getDb1();
byte db2 = radioPacket4BS.getDb2();
byte db3 = radioPacket4BS.getDb3();
int parameter1 = ((db0 & 0x2) >> 0); // bit 0-1 of db0
int parameter2 = ((db0 & 0x4) >> 2); // bit 2 of db0
int bit3 = db3 & 0xFF;
int bit2 = db2 & 0xFF;
int bit1 = db1 & 0xFF;
int parameter3 = concatenator(bit3, bit2, bit1);
if (parameter2 == 0) {
map.put(new EnoceanParameterAddress(radioPacket4BS.getSenderId(), Parameter.ENERGY_METERING_VALUE),
getEnergy(parameter1, parameter2, parameter3));
} else if (parameter2 == 1) {
map.put(new EnoceanParameterAddress(radioPacket4BS.getSenderId(), Parameter.POWER),
getEnergy(parameter1, parameter2, parameter3));
}
learnButton = LearnButtonState.values()[(db0 & 0x08) >> 3]; // bit 3 of db0
}
return map;
}
private NumberWithUnit getEnergy(int parameter1, int parameter2, int parameter3) {
// Unit
Unit unit = null;
double value = 0;
if (parameter2 == 0) {
unit = Unit.KILOWATTHOURS;
} else if (parameter2 == 1) {
unit = Unit.WATT;
}
// Value
switch (parameter1) {
case 0:
value = parameter3;
break;// *1
case 1:
value = (double) parameter3 / 10;
break; // *10
case 2:
value = (double) parameter3 / 100;
break; // *100
case 3:
value = (double) parameter3 / 1000;
break; // *1000
default:
break;
}
BigDecimal b = new BigDecimal(value, MathContext.DECIMAL64);
return new NumberWithUnit(unit, b);
}
private int concatenator(int b3, int b2, int b1) {
b3 = (b3 << 8) + b2;
b3 = (b3 << 8) + b1;
return b3;
}
}
Now I have to create a snapshot of this opencean file. Make sure you saved every file before. Open the cmd and type the “mvn install” command in the right directory.
Replace the old snapshot by your new snapshot.
Let’s have a look at the enocean project now.
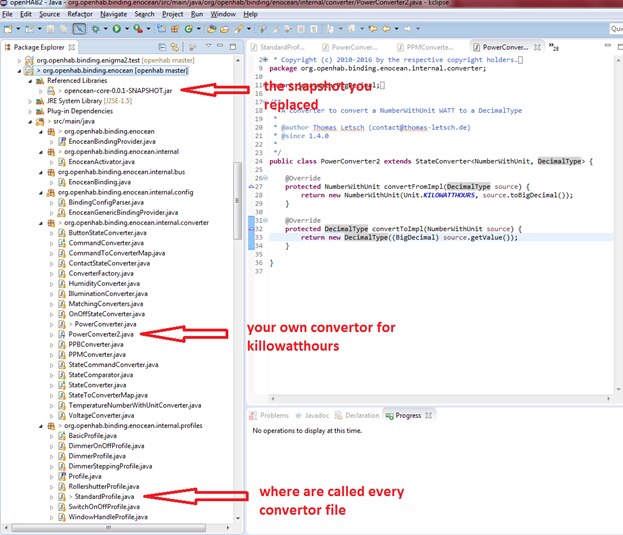
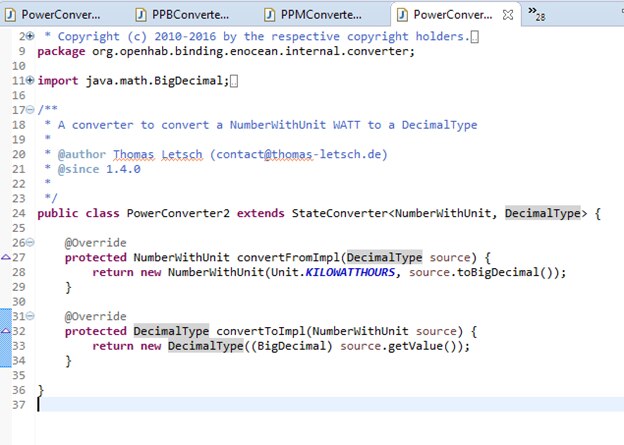
Take example of the other converters if you need it. My new converter for KILLOWATTHOURS looks like this.
And finally you add an import for the the StandardProfile.java file
If you look my source code I just added a line with the new converter.
/**
* Copyright (c) 2010-2016 by the respective copyright holders.
*
* All rights reserved. This program and the accompanying materials
* are made available under the terms of the Eclipse Public License v1.0
* which accompanies this distribution, and is available at
* http://www.eclipse.org/legal/epl-v10.html
*/
package org.openhab.binding.enocean.internal.profiles;
import org.opencean.core.common.Parameter;
import org.opencean.core.common.ParameterAddress;
import org.opencean.core.common.values.Value;
import org.openhab.binding.enocean.internal.converter.ButtonStateConverter;
import org.openhab.binding.enocean.internal.converter.ContactStateConverter;
import org.openhab.binding.enocean.internal.converter.ConverterFactory;
import org.openhab.binding.enocean.internal.converter.HumidityConverter;
import org.openhab.binding.enocean.internal.converter.IlluminationConverter;
import org.openhab.binding.enocean.internal.converter.OnOffStateConverter;
import org.openhab.binding.enocean.internal.converter.PPBConverter;
import org.openhab.binding.enocean.internal.converter.PPMConverter;
import org.openhab.binding.enocean.internal.converter.PowerConverter;
import org.openhab.binding.enocean.internal.converter.PowerConverter2;
import org.openhab.binding.enocean.internal.converter.StateConverter;
import org.openhab.binding.enocean.internal.converter.TemperatureNumberWithUnitConverter;
import org.openhab.binding.enocean.internal.converter.VoltageConverter;
import org.openhab.core.events.EventPublisher;
import org.openhab.core.items.Item;
import org.openhab.core.library.types.DecimalType;
import org.openhab.core.library.types.OnOffType;
import org.openhab.core.library.types.OpenClosedType;
import org.openhab.core.library.types.PercentType;
import org.openhab.core.types.State;
import org.slf4j.Logger;
import org.slf4j.LoggerFactory;
/**
* The default profile which maps some parameters to some states / command.
*
* @author Thomas Letsch (contact@thomas-letsch.de)
* @since 1.3.0
*
*/
public class StandardProfile extends BasicProfile {
private static final Logger logger = LoggerFactory.getLogger(StandardProfile.class);
private ConverterFactory converterFactory = new ConverterFactory();
public StandardProfile(Item item, EventPublisher eventPublisher) {
super(item, eventPublisher);
converterFactory.addStateConverter(Parameter.TEMPERATURE.name(), DecimalType.class,
TemperatureNumberWithUnitConverter.class);
converterFactory.addStateConverter(Parameter.HUMIDITY.name(), PercentType.class, HumidityConverter.class);
converterFactory.addStateConverter(Parameter.CO2_CONCENTRATION.name(), DecimalType.class, PPMConverter.class);
converterFactory.addStateConverter(Parameter.VOC_CONCENTRATION.name(), DecimalType.class, PPBConverter.class);
converterFactory.addStateConverter(Parameter.ILLUMINANCE.name(), DecimalType.class,
IlluminationConverter.class);
converterFactory.addStateConverter(Parameter.MOVEMENT.name(), OnOffType.class, OnOffStateConverter.class);
converterFactory.addStateConverter(Parameter.SUPPLY_VOLTAGE.name(), DecimalType.class, VoltageConverter.class);
converterFactory.addStateConverter(Parameter.POWER.name(), DecimalType.class, PowerConverter.class);
converterFactory.addStateConverter(Parameter.ENERGY_METERING_VALUE.name(), DecimalType.class,
PowerConverter2.class);
converterFactory.addStateConverter(Parameter.I.name(), OnOffType.class, ButtonStateConverter.class);
converterFactory.addStateConverter(Parameter.O.name(), OnOffType.class, ButtonStateConverter.class);
converterFactory.addStateConverter(Parameter.CONTACT_STATE.name(), OpenClosedType.class,
ContactStateConverter.class);
}
@Override
public void valueChanged(ParameterAddress parameterAddress, Value valueObject) {
for (Item item : items) {
if (item == null) {
continue;
}
StateConverter<?, ?> converter = converterFactory.getToStateConverter(parameterAddress.getParameterId(),
item);
if (converter == null) {
logger.warn("No converter found for " + parameterAddress + " - doing nothing.");
return;
}
State value = converter.convertTo(valueObject);
logger.debug("Received new value {} for items {}", value, items);
eventPublisher.postUpdate(item.getName(), value);
}
}
}
When you export your project and create the new .jar file. You will notice that the new addon now work for your device A5-12-01
Number power2 " power1 [%.1f W]" <energy> (All) {enocean="{id=01:8D:C3:FC, eep=A5:12:01, parameter=POWER}"}
Number power22 " power1 [%.2f KWh]" <energy> (All) {enocean="{id=01:8D:C3:FC, eep=A5:12:01, parameter=ENERGY_METERING_VALUE}"}
The new addon you just created now support the enocean device.
If it works for you i suggest to commit the new changes to the opensource in order to help the community.
if you want a look at my terminal when i lauch my openhab it works.

