element14 Community
element14 Community
    Register Log In
  • Site
  • Search
  • Log In Register
  • Community Hub
    Community Hub
    • What's New on element14
    • Feedback and Support
    • Benefits of Membership
    • Personal Blogs
    • Members Area
    • Achievement Levels
  • Learn
    Learn
    • Ask an Expert
    • eBooks
    • element14 presents
    • Learning Center
    • Tech Spotlight
    • STEM Academy
    • Webinars, Training and Events
    • Learning Groups
  • Technologies
    Technologies
    • 3D Printing
    • FPGA
    • Industrial Automation
    • Internet of Things
    • Power & Energy
    • Sensors
    • Technology Groups
  • Challenges & Projects
    Challenges & Projects
    • Design Challenges
    • element14 presents Projects
    • Project14
    • Arduino Projects
    • Raspberry Pi Projects
    • Project Groups
  • Products
    Products
    • Arduino
    • Avnet & Tria Boards Community
    • Dev Tools
    • Manufacturers
    • Multicomp Pro
    • Product Groups
    • Raspberry Pi
    • RoadTests & Reviews
  • About Us
  • Store
    Store
    • Visit Your Store
    • Choose another store...
      • Europe
      •  Austria (German)
      •  Belgium (Dutch, French)
      •  Bulgaria (Bulgarian)
      •  Czech Republic (Czech)
      •  Denmark (Danish)
      •  Estonia (Estonian)
      •  Finland (Finnish)
      •  France (French)
      •  Germany (German)
      •  Hungary (Hungarian)
      •  Ireland
      •  Israel
      •  Italy (Italian)
      •  Latvia (Latvian)
      •  
      •  Lithuania (Lithuanian)
      •  Netherlands (Dutch)
      •  Norway (Norwegian)
      •  Poland (Polish)
      •  Portugal (Portuguese)
      •  Romania (Romanian)
      •  Russia (Russian)
      •  Slovakia (Slovak)
      •  Slovenia (Slovenian)
      •  Spain (Spanish)
      •  Sweden (Swedish)
      •  Switzerland(German, French)
      •  Turkey (Turkish)
      •  United Kingdom
      • Asia Pacific
      •  Australia
      •  China
      •  Hong Kong
      •  India
      • Japan
      •  Korea (Korean)
      •  Malaysia
      •  New Zealand
      •  Philippines
      •  Singapore
      •  Taiwan
      •  Thailand (Thai)
      • Vietnam
      • Americas
      •  Brazil (Portuguese)
      •  Canada
      •  Mexico (Spanish)
      •  United States
      Can't find the country/region you're looking for? Visit our export site or find a local distributor.
  • Translate
  • Profile
  • Settings
Personal Blogs
  • Community Hub
  • More
Personal Blogs
Legacy Personal Blogs How to Make the Wifi Wireless Switch Work Under 5V?
  • Blog
  • Documents
  • Mentions
  • Sub-Groups
  • Tags
  • More
  • Cancel
  • New
  • Share
  • More
  • Cancel
Group Actions
  • Group RSS
  • More
  • Cancel
Engagement
  • Author Author: Former Member
  • Date Created: 26 Oct 2015 1:46 PM Date Created
  • Views 612 views
  • Likes 1 like
  • Comments 0 comments
  • wireless_switch
  • smart_home
  • app_switch
  • itead_wifi_switch
  • home_automation
Related
Recommended

How to Make the Wifi Wireless Switch Work Under 5V?

Former Member
Former Member
26 Oct 2015

As my last post referred  that the Itead wifi switch is set to work under AC current. It is very practical for home appliance. However, when consider to use it in electronic DIY, it is not so convenient. If I can make it work under 5V, I think it would be very helpful for electronics enthusiasts.

So how to make it happen? I find out the schematic and solder it a little bit. I make it able to work under either 5V or 90V-265V. It is not very hard work, just a few steps and some small changes will achieve it.

See the original board picture below:

image

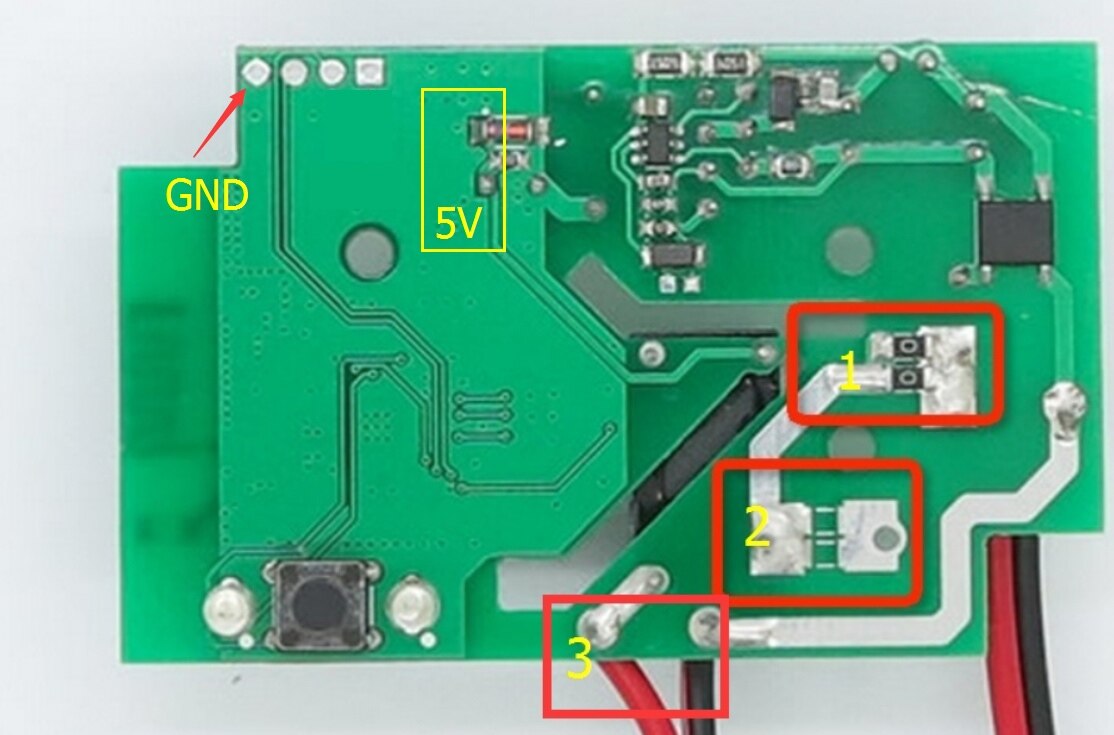
Step 1. Remove the two resistors from 1 to 2.

Step 2. Remove the black cable in 3 to 2, which makes this black cable and the red cable become one for signal output and one for signal input, each can be either signal output or signal input, they works both ways.

Step 3.Now solder a black cable in 5V area, which makes it a 5V power input port.

And solder a black cable in GND to make it GND of 5V power supply.

While the two cables at the lower right corner keep the same. The black one is for 90V-265V output while the red one is for 90V-265V power input.

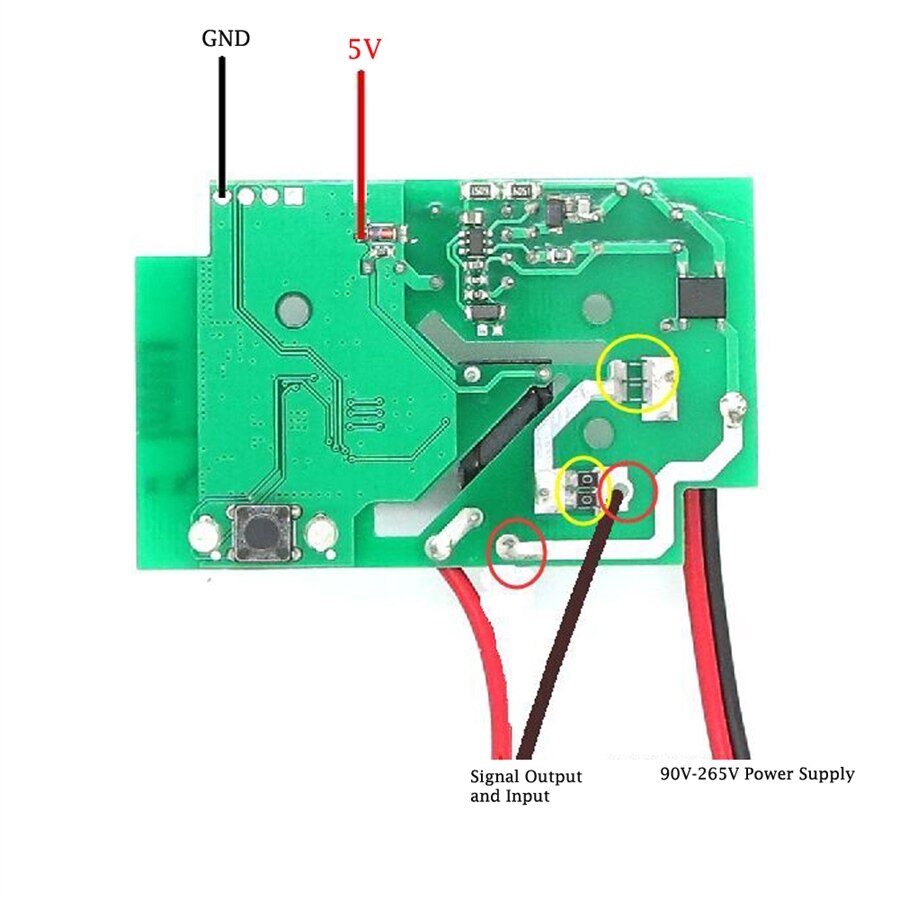
Therefore you can choose to power it up at either 5V or 90-265V, it is up to you.

Please see the below picture how it become. If you are not a professional electrician, never try to make this DIY. You know, the AC current is very dangerous. Your life is everything.

image

As many people ask me to offer a link for shopping. Sorry, all I know is that Itead will get ready for selling to overseas but need some time.  You may ask their support service, I'm sure they will provide a better answer than me.

  • Sign in to reply
element14 Community

element14 is the first online community specifically for engineers. Connect with your peers and get expert answers to your questions.

  • Members
  • Learn
  • Technologies
  • Challenges & Projects
  • Products
  • Store
  • About Us
  • Feedback & Support
  • FAQs
  • Terms of Use
  • Privacy Policy
  • Legal and Copyright Notices
  • Sitemap
  • Cookies

An Avnet Company © 2026 Premier Farnell Limited. All Rights Reserved.

Premier Farnell Ltd, registered in England and Wales (no 00876412), registered office: Farnell House, Forge Lane, Leeds LS12 2NE.

ICP 备案号 10220084.

Follow element14

  • X
  • Facebook
  • linkedin
  • YouTube