


Many tutorials out there state that you need an external monitor, keyboard, and mouse to get started with Raspberry Pi. However, if you don't have these things at hand, there is a solution - headless mode.
Components
You will need the following components:
- Raspberry Pi
- microSD card
- SD card adapter
- Micro USB to USB cable
- Ethernet cable (if connecting via ethernet)
- Computer with an SD slot (or an appropriate SD card adapter)
Installing the operating system
- Download Raspbian and extract the .img file.
- On Windows, right-click on the Zip file in your downloads folder and click
Extract All.
- On Windows, right-click on the Zip file in your downloads folder and click
- Insert the microSD into your computer's SD card slot via the SD card adapter.
- Next, you'll need to flash the Raspbian image to the microSD. There are various applications you can use to do this, such as Etcher for Linux, macOS or Windows.
- Open the SD card from your file explorer - the drive will be labelled
boot. - SSH access is disabled by default. To enable it, create an empty file in the
bootdrive calledssh.- On Windows, inside the
bootdirectory, right-click in the white space, scroll toNewand selectText Document. Entersshas the name.
- On Windows, inside the
Connecting to the network
OPTION 1 - VIA ETHERNET
- Connect the Raspberry Pi to your router via ethernet cable, and proceed to the next section.
OPTION 2 - VIA WIFI
On Mac/Linux
- Create a new file in the
bootdrive calledwpa_supplicant.conf. - Follow code step below.
On Windows
- Download and install Notepad++ from here.
- Once installed, inside Notepad++ go to
File > Newto create a new file. - In the top bar, select
Edit > EOL Conversion. Make sureUnix (LF)is selected. It should appear disabled if it is. - Select
File > Save as, navigate to yourbootdrive and call the filewpa_supplicant.conf.
All OSs
- Paste in the following code:
country=IE
ctrl_interface=DIR=/var/run/wpa_supplicant GROUP=netdev
update_config=1network={
scan_ssid=1
ssid="Your-SSID"
psk="Your-PSK"
key_mgmt=WPA-PSK
}
Replace Your-SSID with your WiFi network, and Your-PSK with your WiFi password.
This file will tell the Raspberry Pi to connect to the specified network when it boots up.
Important
Make sure your computer is connected to the same network as your Raspberry Pi.
Booting up the board
- Eject the microSD card and insert it into the Raspberry Pi's microSD slot.
- Connect the
PWR INmicro USB on your Raspberry Pi to a 5v power source (e.g. your computer's USB port). - Wait for the board to boot up - the green LED should stop flashing when it's finished booting up.
Get your Raspberry Pi's IP Address
Option 1 - Login to your router
- If you have access to your router, you can login to it's admin panel via a browser. It's usually something like
192.168.0.1,192.168.1.1or192.168.1.254. - Look at the list of devices and find the IP address of your Pi. It should look something like
192.168.1.8.
Please note
When entering a password in terminal or command prompt, you won't see it being typed, for security reasons. Simply type the password and hit the enter key.
Option 2 - Scan using Nmap
The nmap command (Network Mapper) is a free and open-source tool for network discovery, available for Linux, macOS, and Windows.
To install on Linux, install the nmap package. To do this, load your terminal and run the command apt-get install nmap. (If it does not run due to permissions, try sudo apt-get install nmap).
To install on macOS or Windows, see the nmap.org download page here.
To use nmap to scan the devices on your network, you need to know the subnet you are connected to. First find your own IP address, in other words the one of the computer you're using to find your Pi's IP address:
On Linux, type hostname -I into a terminal window
On macOS, go to System Preferences then Network and select your active network connection to view the IP address
On Windows, go to the Settings, then under Network and Internet, select your connection type i.e. Wi-Fi, Ethernet, click Properties (for some this is called Hardware Properties.
In here, you will see IPv4 address.
Now you have the IP address of your computer, you will scan the whole subnet for other devices. For example, if your IP address is 192.168.1.5, other devices will be at addresses like 192.168.1.2, 192.168.1.3, 192.168.1.4, etc.
In your terminal or Command Prompt, now use the nmap command with the -sn flag (ping scan) on the whole subnet range. This may take a few seconds:nmap -sn 192.168.1.0/24
Note: The 192.168.1 part in the command above should be replaced by the first 3 parts of the IP address you attained previously.
Ping scan just pings all the IP addresses to see if they respond. For each device that responds to the ping, the output shows the hostname and IP address like so:
Starting Nmap 6.40 ( http://nmap.org ) at 2018-04-02 12:51 GMT
Nmap scan report for Conalls-MBP (192.168.1.4)
Host is up (0.0017s latency).
Nmap scan report for iPhone (192.168.1.45)
Host is up (0.0021s latency).
Nmap scan report for raspberrypi (192.168.1.8)
Host is up (0.0038s latency).
Nmap done: 256 IP addresses (3 hosts up) scanned in 2.21 seconds
Here you can see a device with hostname raspberrypi has IP address 192.168.1.8.
Option 3 - Use the hostname
By default, the hostname for the Raspberry Pi is raspberrypi. If you cannot get your IP address, you can try using raspberrypi.local instead.
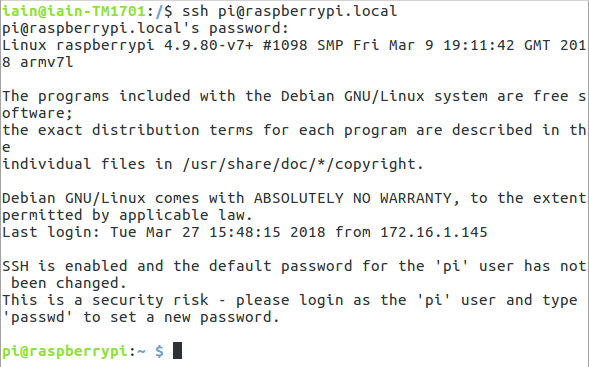
Connecting to Raspberry Pi via SSH
On Mac and Linux
- Open a terminal window, and run
ssh pi@ip-address.- Replace
ip-addresswith the one you attained in the previous step.
- Replace
- You will be prompted to enter a password - the default password is
raspberry.
On Windows
- Download Putty from here to allow you to communicate with your board via SSH.
- Under
Host Name (or IP address)enter the IP address for your Raspberry Pi. - Click the
Openbutton to create the connection.

That's it! You're now connected to your Raspberry Pi via SSH. You can configure the board by running sudo raspi-config.