element14 Community
element14 Community
    Register Log In
  • Site
  • Search
  • Log In Register
  • Community Hub
    Community Hub
    • What's New on element14
    • Feedback and Support
    • Benefits of Membership
    • Personal Blogs
    • Members Area
    • Achievement Levels
  • Learn
    Learn
    • Ask an Expert
    • eBooks
    • element14 presents
    • Learning Center
    • Tech Spotlight
    • STEM Academy
    • Webinars, Training and Events
    • Learning Groups
  • Technologies
    Technologies
    • 3D Printing
    • FPGA
    • Industrial Automation
    • Internet of Things
    • Power & Energy
    • Sensors
    • Technology Groups
  • Challenges & Projects
    Challenges & Projects
    • Design Challenges
    • element14 presents Projects
    • Project14
    • Arduino Projects
    • Raspberry Pi Projects
    • Project Groups
  • Products
    Products
    • Arduino
    • Avnet & Tria Boards Community
    • Dev Tools
    • Manufacturers
    • Multicomp Pro
    • Product Groups
    • Raspberry Pi
    • RoadTests & Reviews
  • About Us
  • Store
    Store
    • Visit Your Store
    • Choose another store...
      • Europe
      •  Austria (German)
      •  Belgium (Dutch, French)
      •  Bulgaria (Bulgarian)
      •  Czech Republic (Czech)
      •  Denmark (Danish)
      •  Estonia (Estonian)
      •  Finland (Finnish)
      •  France (French)
      •  Germany (German)
      •  Hungary (Hungarian)
      •  Ireland
      •  Israel
      •  Italy (Italian)
      •  Latvia (Latvian)
      •  
      •  Lithuania (Lithuanian)
      •  Netherlands (Dutch)
      •  Norway (Norwegian)
      •  Poland (Polish)
      •  Portugal (Portuguese)
      •  Romania (Romanian)
      •  Russia (Russian)
      •  Slovakia (Slovak)
      •  Slovenia (Slovenian)
      •  Spain (Spanish)
      •  Sweden (Swedish)
      •  Switzerland(German, French)
      •  Turkey (Turkish)
      •  United Kingdom
      • Asia Pacific
      •  Australia
      •  China
      •  Hong Kong
      •  India
      • Japan
      •  Korea (Korean)
      •  Malaysia
      •  New Zealand
      •  Philippines
      •  Singapore
      •  Taiwan
      •  Thailand (Thai)
      • Vietnam
      • Americas
      •  Brazil (Portuguese)
      •  Canada
      •  Mexico (Spanish)
      •  United States
      Can't find the country/region you're looking for? Visit our export site or find a local distributor.
  • Translate
  • Profile
  • Settings
Personal Blogs
  • Community Hub
  • More
Personal Blogs
Legacy Personal Blogs ImageCraft JumpStart Microbox Education Kit - Part 2: Stepping Through an Example - what do I learn?
  • Blog
  • Documents
  • Mentions
  • Sub-Groups
  • Tags
  • More
  • Cancel
  • New
  • Share
  • More
  • Cancel
Group Actions
  • Group RSS
  • More
  • Cancel
Engagement
  • Author Author: Jan Cumps
  • Date Created: 31 Oct 2015 9:20 AM Date Created
  • Views 2962 views
  • Likes 3 likes
  • Comments 23 comments
  • educational
  • firmware
  • imagecraft
  • embedded
  • arm_cortex
  • stm32
  • stmicro
  • kit
  • nucleo
Related
Recommended

ImageCraft JumpStart Microbox Education Kit - Part 2: Stepping Through an Example - what do I learn?

Jan Cumps
Jan Cumps
31 Oct 2015

The ImageCraft JumpStart Microbox Education Kit is a set of hardware and software tools to teach C and Cortex-M embedded programming.

In essence, it's an Arduino compatible shield, an STMicro Nucleo dev board, a C book, an IDE, a compiler and libraries.


In this blog series I'm trying to find out if it's more then just an existing 3rd party dev board paired with a shield. And if (and how) this kit can turn you into an embedded programmer.


In part 1, I checked the out-of-box experience.

This time I'm going to review one of the example projects, and check if I learn something about embedded development.

I'll use the real time clock example, because the source for the RTC driver is available, and it uses I2C.


I'm going to use 2 methods to check the learning path: Can I step through the example in the debugger to see what's happening, and I'll use the Hardware Guide to step through a tutorial.


The Hardware Guide


The tutorial for the MicroBox Education Kit projects is called the Hardware Overview.


It's a rich document with info on basics of the ARM microcontroller like clocks, memory and GIO. It also has a section for all the hardware available on the educational shield.

I would like to see a better index though. I had a hard time navigating to the chapter for the real time clock, and had to use the scroll wheel to go to the correct chapter.


image


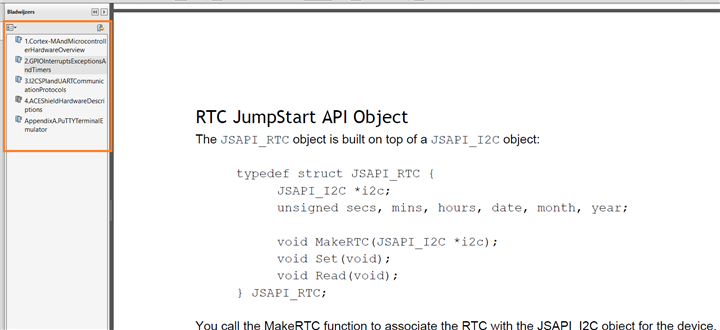
If you do not know up front where the chapter is in the pdf, you'll have to scroll page by page through a 100 page document untill you are at the desired location. There's no overview at the beginning of the document either that explains what's in the manual or on what page/section to find it.

So I spent time browsing through the full PDF first to find out what's covered and where it is. Search works - but then you have to know up front what you're looking for, and it takes a fair bit of pushing next before you reach the RTC chapter.


The hardware guide asks you to review info in a document called <Examples and Tutorials>. I couldn't find that document so I put this on hold and tried method 2: stepping through an example


Stepping through an Example Project


The second way to learn something is by taking an existing example, and step through it. I'll do this with the RTC example.

I ran into an issue with the newest IDE install that I received earlier this week. When I set a breakpoint, things go wrong.


image


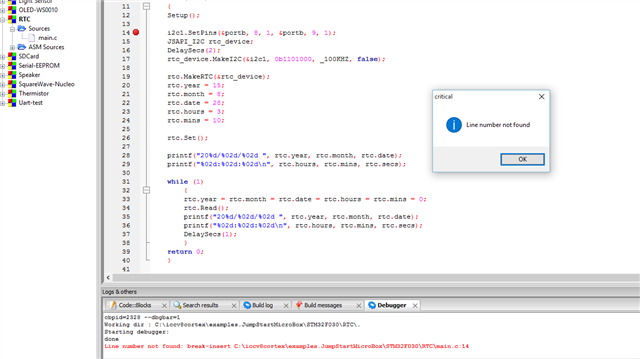
I get messages like Line Number not found, and removing breakpoints doesn't work. They reappear randomly while debugging or after restarting the IDE.

Line number not found: break-insert C:\iccv8cortex\examples.JumpStartMicroBox\STM32F030\RTC\main.c:14

Cannot open file: C:\Work\V8\examples.JumpStartMicroBox\STM32F030\RTC\main.c

I don't have a c:\work folder on my pc. Needs to be looked at


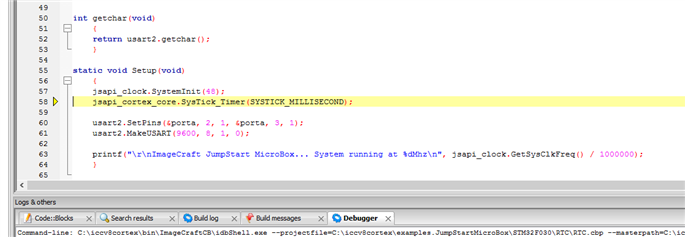
Debugging works after that, but there's not much to learn. The example uses an abstraction layer, and you can't step into that code.

You see that the program calls a function clock.SystemInit() , but there's nothing more that you can learn than that the proprietary library has a function with that declaration.

You don't see what's happening with the controller. You don't learn something generic about embedded.


image


It's a difficult call for me. All works out of the box, IDE and compiler are fast. The examples work.

But I haven't found a compelling educational path yet. And the experience with the latest IDE/tool chain download is rough.

I'm in two minds on this kit at the moment. I'll put it to rest for a day and review it with a clear and fresh mind soon...


Related posts
ImageCraft JumpStart Microbox Education Kit - Part 1: Preview
ImageCraft JumpStart Microbox Education Kit - Part 2: Stepping Through an Example - what do I learn?
ImageCraft JumpStart Microbox Education Kit - Part 3a: The Education Shield - LED matrix and I/O expander
  • Sign in to reply

Top Comments

  • richardman
    richardman over 10 years ago +1
    Jan, sorry for the debugger issue - it sounds like the debug info is stale: the installer should have removed the object and debug files so that it will do a Build before debugging and syncing the source…
  • Jan Cumps
    Jan Cumps over 10 years ago in reply to richardman +1
    Richard, thanks for the reply. I will try the rebuild the projects and report back (I did that for the OLED and RTC projects that were giving the error and it didn't help this morning, but I'll retry once…
  • Jan Cumps
    Jan Cumps over 10 years ago in reply to richardman +1
    Richard Man wrote: ..l There is no point in using the blog for this process. Once we clear the issues, you can report back. Thanks That's not how a review works. i will not continue this exercise…
Parents
  • richardman
    richardman over 10 years ago

    Jan, sorry for the debugger issue - it sounds like the debug info is stale: the installer should have removed the object and debug files so that it will do a Build before debugging and syncing the source code with the debug info file, but that does not appear to be the case. I will look into it. You should be able to do a Project->Rebuild and get everything syncs up.


    re: low level details of I2C etc.: indeed, that's the whole purpose of the JumpStart API - to abstract away (some of) the low level details. Lets take I2c as an example. The actual I2C protocol is relatively simple, if you know how to toggle a square wave, that's the clock (SCL). Toggling another line and you have data (SDA). Do it with the right timing and sequence and there's your I2C. The problem is that with the complex 32-bit Cortex-M devices, it's no longer trivial to toggle a GPIO pin. You have to enable power to the correct bus, for a particular pin, set its mode to output, set open drain or push-pull (for I2C, it should be open drain), set the output speed, set the optional pull-up or pull-down resistor, and all that before you have to figure out how to generate the correct timing.


    Or you can use the built-in I2C subsystem. Great! Except that to use the vendor library, you have to initialize a created structure with fields correspond to the IO register bits. So you end up having to look into the manual for details. Note that they don't bring enlightenment on how the I2C works or anything, it's simply a particular vendor's implementation of the I2C. For example, on the STM32F030, you can set up the subsystem to do "autoend". Wonderful, so you look at STM32F401, and behold, it has a completely different I2C implementation. There is no autoend, but arguably it's a more flexible implementation. So writing I2C on these two chips require completely different sequences of instructions. And these are from the same chip vendor, imagine you then move on to NXP LPC series. Writing I2C on top of them is basically making sure that you fully understand the manuals.


    As I noted in one of my responses to the "Preview" article - our primary target audience is in fact professional engineers. Bit-banging I2C is no fun and it's not a whole lot of fun either to fight with the MCU's I2C subsystem. What they want and need are working I2C code so that they can work on their applications at hand. I2C, or any other low level protocols are for solving application programming and should not be the problem by themselves.


    Again, JumpStart API does not preclude you from bit banging I2C or use the vendor supplied library. However, if your goal is to write a program to talk to an I2C device in as short a time as possible, JumpStart API is the solution.


    Take another example: system clock set up. On every STM32F device's reference manual, there is a "clock tree" diagram. It's non-trivial to see which clock to use, and with all the prescalars and dividers, it's hard to find all the parameters to the PLL variables (some STM32F devices have 2 PLL "variables" and some have as many as 4). Indeed, ST's CubeMX is a valuable tool to see which path a clock may take and to calculate the correct values for PLLQ, PLLN, and so on.


    Well, with our next release of the compiler, to be available by end of Nov 6, 2015, JumpStart API also supports the STM32F4xx series and adds a new clock call:

        _Bool JSAPI_CLOCK::SetSystemClock(unsigned hsi_mhz, unsigned hse_mhz, _Bool hse_bypass, unsigned pll_mhz, unsigned flash_ws);


    You specify the HSI frequency, the optional HSE frequency, if you use an external OsC, and the desired PLL speed (plus a couple other parameters), and the function does all the calculations for you. Does it do everything you possibly want to do with the clock setup? Just like the I2C API, the answer is no. However, for most people, they just want to write "jsapi_clock.SetSystemClock(16, 0, false, 84, 5);" and have their F401 buzzing at 84 Mhz.


    The question is: what would you rather do? Spend times just to get the basic structure going, which is completely useless if you move on to a different chip, even from the same silicon vendor, or spend time writing your application? Again, if the answer is latter, then JumpStart API is for you.

    • Cancel
    • Vote Up +1 Vote Down
    • Sign in to reply
    • More
    • Cancel
  • Jan Cumps
    Jan Cumps over 10 years ago in reply to richardman

    Richard, thanks for the reply.

    I will try the rebuild the projects and report back (I did that for the OLED and RTC projects that were giving the error and it didn't help this morning, but I'll retry once more and see if it's gone).


    On the JumpStart API and learning cycle:


    I don't doubt that the API is a good one. The examples work good and fast. The code is clean. The granularity of the API functions looks alright. So as an abstraction API it works well. You can just see that by trying out the examples.

    I'm a believer in abstraction (I've had some flack on forums for using abstraction libs/layers in the past, and I typically don't engage in discussion about good and bad because all the arguments pro and contra abstraction for embedded controllers can be found on various websites).


    Where I have my doubts is: I'm not convinced that learning one particular abstraction layer -  your 'JumpStart' API  - without further drilling possibilities to see what's happening inside the controller and peripherals - is the right path to learn embedded.

    I understand you want to protect your IP and not public code or allow a trainee to step through it. But it is a blocker for an educational kit that aims to be generic.


    At this moment I feel that the learning path and horizon of the embedded programmer using the kit is restricted - and his decisions funneled towards the JumpStart API.

    If the kit would be positioned as 'Kit to learn the JumpStart library and API on an ARM Cortex', I think you are achieving that.

    As a kit marketed as a 'solution to teach embedded programming on an ARM Cortex' (and I think you position it as that when I read the kit's documentation), it doesn't feel alright for me.

    • Cancel
    • Vote Up +1 Vote Down
    • Sign in to reply
    • More
    • Cancel
Comment
  • Jan Cumps
    Jan Cumps over 10 years ago in reply to richardman

    Richard, thanks for the reply.

    I will try the rebuild the projects and report back (I did that for the OLED and RTC projects that were giving the error and it didn't help this morning, but I'll retry once more and see if it's gone).


    On the JumpStart API and learning cycle:


    I don't doubt that the API is a good one. The examples work good and fast. The code is clean. The granularity of the API functions looks alright. So as an abstraction API it works well. You can just see that by trying out the examples.

    I'm a believer in abstraction (I've had some flack on forums for using abstraction libs/layers in the past, and I typically don't engage in discussion about good and bad because all the arguments pro and contra abstraction for embedded controllers can be found on various websites).


    Where I have my doubts is: I'm not convinced that learning one particular abstraction layer -  your 'JumpStart' API  - without further drilling possibilities to see what's happening inside the controller and peripherals - is the right path to learn embedded.

    I understand you want to protect your IP and not public code or allow a trainee to step through it. But it is a blocker for an educational kit that aims to be generic.


    At this moment I feel that the learning path and horizon of the embedded programmer using the kit is restricted - and his decisions funneled towards the JumpStart API.

    If the kit would be positioned as 'Kit to learn the JumpStart library and API on an ARM Cortex', I think you are achieving that.

    As a kit marketed as a 'solution to teach embedded programming on an ARM Cortex' (and I think you position it as that when I read the kit's documentation), it doesn't feel alright for me.

    • Cancel
    • Vote Up +1 Vote Down
    • Sign in to reply
    • More
    • Cancel
Children
  • Jan Cumps
    Jan Cumps over 10 years ago in reply to Jan Cumps

    jancumps wrote:


    ...I will try the rebuild the projects and report back (I did that for the OLED and RTC projects that were giving the error and it didn't help this morning, but I'll retry once more and see if it's gone).


    I retried and it doesn't help.

    I used project ACE Shield Validation.

    I did a Clean and a Rebuild.

    I opened the main.c

    Clicked line 39, SetupOLED() and have the errors below:

    image


    It's repeatable. If you want I can capture a video of how it happens.

    (edit: note that it's complaining about RTC\main.c even though I have another project active. I've also done a rebuild of that RTC project)

    (edit2: also occurs after doing the full install, making project RTC active, Clean & Rebuild, click on one of the source lines in main.c. I clicked on the margin of line 12 this time:

    "Already have breakpoint at this address: break-insert C:\iccv8cortex\examples.JumpStartMicroBox\STM32F030\RTC\main.c:12"

    )

    • Cancel
    • Vote Up 0 Vote Down
    • Sign in to reply
    • More
    • Cancel
  • richardman
    richardman over 10 years ago in reply to Jan Cumps

    Points taken re: JumpStart API. I will take your observation into consideration.


    As for the debug issues, the debugger and I will contact you via email to see what's going on. There is no point in using the blog for this process. Once we clear the issues, you can report back.


    Thanks

    • Cancel
    • Vote Up 0 Vote Down
    • Sign in to reply
    • More
    • Cancel
  • Jan Cumps
    Jan Cumps over 10 years ago in reply to richardman

    Richard Man wrote:

    ..l

    There is no point in using the blog for this process. Once we clear the issues, you can report back.


    Thanks

    That's not how a review works. i will not continue this exercise when you say when I should or should not blog.


    Feel free to revoke my license.

    • Cancel
    • Vote Up +1 Vote Down
    • Sign in to reply
    • More
    • Cancel
  • richardman
    richardman over 10 years ago in reply to Jan Cumps

    Dear Jan, I'm afraid there is a misunderstanding: I am not dictating how you should write your blog, I am just saying that for the ease of communicating, including possibly sending us log files so we can determine the cause of the problem, is best to do it via email. If you insist that we do it via comments on this blog, that is fine with me. The debugger person, Sid, will have to get an account, we will have to see whether we can duplicate your issue with our set up. If by chance that "it works for us" - which does happen as issues may be related to some configurations, we will need you to send us the log file. To begin with, enabled Settings->Debugger->Full Setting, then run the the debugger til the problem occurs. Then copy and paste the content of the debug window and ... well, you can post it as a comment if you wish.


    Possibly we might even need the Windows message logs, in that case, you need to run the Windows dbgview program, which we install under c:\iccv8cortex\.bin (there's a dot before the bin), and do the exercise again. Then you can save the log file and provide the content to us.


    Thanks

    • Cancel
    • Vote Up 0 Vote Down
    • Sign in to reply
    • More
    • Cancel
  • sidprice
    sidprice over 10 years ago in reply to Jan Cumps

    HI Jan, I am the writer of the debug engine for the this tool chain and would love to figure out what is going on.


    First, we are trying to characterize some issues that users have reported in the area of setting/clearing breakpoints, to date we have not been able to identify the root causes so your ongoing input would be most valuable.


    I have a work-around that you could try that may help and also would also help us to home in on the issue. First activate one of the two projects you have been looking at and start the debugger. Attempt to set a breakpoint on a source code line, if the "not found" popup appears click OK and then on the Debug menu select "Remove all breakpoints." Stop the debugger and repeat this process for the second project you have been looking at.


    Let me know if this resolves the issue of setting breakpoints,

    Sid

    • Cancel
    • Vote Up 0 Vote Down
    • Sign in to reply
    • More
    • Cancel
element14 Community

element14 is the first online community specifically for engineers. Connect with your peers and get expert answers to your questions.

  • Members
  • Learn
  • Technologies
  • Challenges & Projects
  • Products
  • Store
  • About Us
  • Feedback & Support
  • FAQs
  • Terms of Use
  • Privacy Policy
  • Legal and Copyright Notices
  • Sitemap
  • Cookies

An Avnet Company © 2026 Premier Farnell Limited. All Rights Reserved.

Premier Farnell Ltd, registered in England and Wales (no 00876412), registered office: Farnell House, Forge Lane, Leeds LS12 2NE.

ICP 备案号 10220084.

Follow element14

  • X
  • Facebook
  • linkedin
  • YouTube