


Introduction
There are many example/sample AWS IoT examples available, but none address implementing them using the Mbed OS. The preferred solution appears to be using the AWS open source project FreeRTOS (https://www.freertos.org/) and while this solution is appropriate for many, it is not a universal solution for everyone or everything.
The choice of an operation system (OS), be it FreeRTOS, eLinux, or Mbed is a function of the product requirements more than the emotional response that many people have. One the one hand, the benefit of a more robust OS like Embedded Linux provides a lot of 3rd party tools, applications and has an extensive history at the cost of memory and compute requirements. Similarly, a lean OS like IntrOS (https://github.com/stateos/IntrOS) is highly focused and intended for a specific function but minimizes memory and compute requirements. Ultimately, the choice will be made based on the product requirements in terms of responsiveness, available memory, reliability, etc. To be truly overwhelmed, visit https://en.wikipedia.org/wiki/Comparison_of_real-time_operating_systems and review the pleather of options available.
For my needs, I wanted a small OS that provided a variety of connectivity solutions (Wi-Fi, Cellular, Ethernet, etc.) operating on an ARM Cortex-M based device. Additionally, my familiarity when the development environment was desired to minimize my development time. For these reasons, I selected the ARM Mbed OS but I was unable to find a suitable sample program that demonstrated AWS connectivity using the Mbed OS.
To resolve this dilemma, I decided to adopt the AWS IoT Embedded C SDK using the Mbed OS (v5.x). To address the multiple transports, I utilized ARM’s Easy-Connect library framework/APIs. The Easy-Connect APIs allow a developer the ability to select at compile time the underlying network transport and minimizes the effort needed to implement and/or switch between network transports.
Hardware Platform
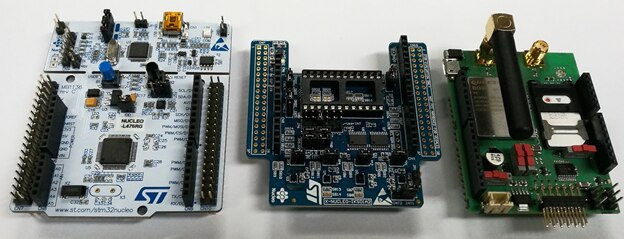
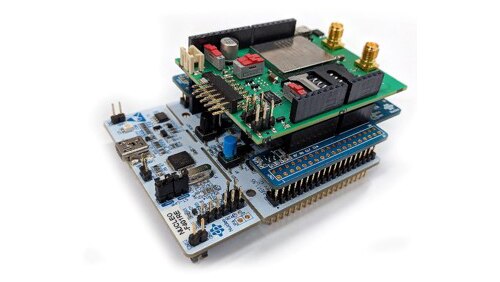
The hardware platform used for this project was an Avnet BG96 Arduino Starter Kit. It consists of:
- STM32 Nucleo-64 development board STM32 Nucleo-64 development board
- Motion MEMS and environmental sensor boardMotion MEMS and environmental sensor board[1]
- Avnet RSR1157 NBIoT BG96 Expansion BoardAvnet RSR1157 NBIoT BG96 Expansion Board
In addition to the hardware, a cellular SIM capable of data is needed. To verify the correct hardware operation and SIM card operation, you may want to download and exercise the demonstration programs from:
AWS IoT Example
Amazon has a written guide for getting started with AWS IoT at https://docs.aws.amazon.com/iot/latest/developerguide/iot-gs.html. The first part of this guide describes all the steps needed to get started and is appropriate for any device you would use. Beginning at the ‘Configure Your Device’ section it becomes tailored towards working with an AWS IoT Button and this is where this document deviates for the Avnet IoT Shield.
AWS IoT SDK Tutorials Differences
While this document follows Amazon’s AWS IoT Guide closely, the primary differences are:
- It uses a Cellular Data Connection rather than a Wi-Fi or Ethernet connection. Specifically, it uses the Quectel BG96 to establish and maintain the network connection.
- This example uses Mbed OS (v5.x) for the operating system. The SDK examples are implemented using Linux and are also available from various locations using FreeRTOS.
- The example programs use the Mbed Easy-Connect API for defining the Network Interface.
- Certificates are integrated into the program rather than read from a file in the file system. The difference in the two approaches is that the program would have to be recompiled if the certificates were changed vs. simply replacing the certificate files, but this additional flexibility isn’t necessary for this example.
- Instead of the samples running from ‘main’, threads are started to execute the example code. This allows for compile time definition of the stack that is utilized. The mbedtls library extensively utilizes the heap/stack and defining it in this manner prevents out of memory issues that occur when running from a single ‘main’ thread.
These differences are further described in the section Changes Made for Mbed OS integration.
Obtaining and Building the Mbed AWS sample code
The AWS Mbed sample code is available at https://github.com/Avnet/aws-iot-device-sdk-mbed-c. This code base can be imported using the Mbed Command Line Interface, or it can be imported directly into the On-line compiler. Both methods are described below.
Using on-line Mbed compiler
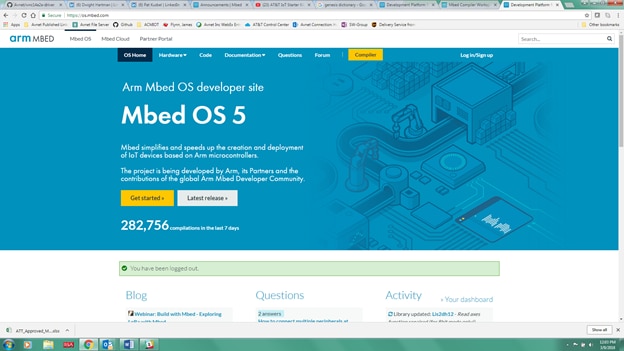
Go to the ARM Mbed OS developer site and login to start the compiler (https://os.mbed.com/). You must register to get to this location (it is free).
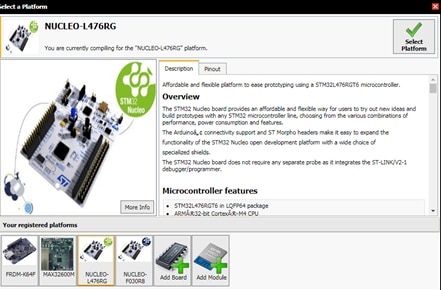
Once you log in, go to the “Compiler” page (yellow button at the top of the screen) and to add the Nucleo L476RG to your platforms (upper right corner of the workspace screen).
After the platform has been selected, you can import the AWS Sample code from the github URL https://github.com/Avnet/aws-iot-device-sdk-Mbed-c. NOTE: select the ‘Update all libraries’ will ensure you get the latest libraries.

With the project now loaded, you must update the security certificates and AWS_IOT_MQTT_HOST URL to reflect your specific values.
The security certificates are contained in the awscerts.h file that is located the certs directory. Using the existing awscerts.h file as a guide, incorporate the contents from *-certificate.pem.crt, *-private.pem.key, and rootCA.crt that you created while working through the AWS IoT Example.
The AWS_IOT_MQTT_HOST URL is defined in the aws_iot_config.h that is located in the ‘examples/shadow_sample’ and ‘examples/subscribe_publish_cpp_sample’ folders. This endpoint will also be unique to you thing that is created during the AWS IoT Example.
While the security certificates and end-point URL updated, you are ready to compile the code. The initial example code created will be from the shadow_sample example program.
When working with the on-line tools, this AWS Mbed code will always compile the code that is located in the shadow_sample folder. So later, if you want to compile the subscribe_publish_cpp_sample, you must copy the source file subscribe_publish_cpp_sample.cpp file to the shadow_sample folder and rename shadow_sample.cpp to shadow_sample.kep (to prevent the compiler from compiling then attempting to link it into the executable image).
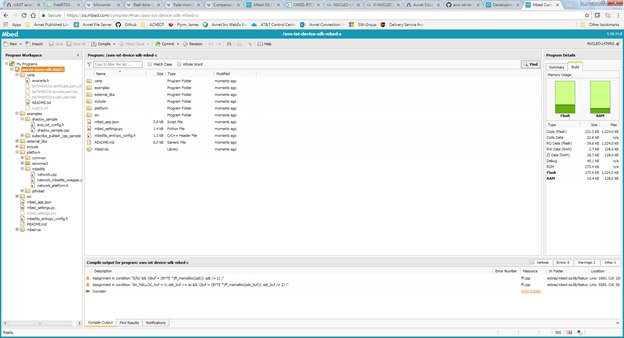
Once the executable image has been created, the screen will look like:
Copy the executable program from your Download folder to the Nucleo board connected to you PC. At this point you can begin the program execution as described in AWS Mbed Sample Execution.
Using the Command Line Interface (CLI)
Using the CLI tools, provides a developer greater flexibility in program development and customization but requires the following tools to be installed:
- Mbed-cli (version 1.3.0 or later) at https://github.com/ARMmbed/mbed-cli
- latest version of GNU ARM Embedded Toolchain: https://developer.arm.com/open-source/gnu-toolchain/gnu-rm/downloads
To get started, Import the project files into you environment with the Mbed import command, e.g., mbed import https://github.com/Avnet/aws-iot-device-sdk-mbed-c
This command will load all the necessary files into the directory aws-iot-device-sdk-mbed-c.
After all the code has been imported, change the active directory to aws-iot-device-sdk-mbed-c so you can update the necessary security certificates and end-point URL.
Go to the certs/ directory and update the awscerts.h to they contain the correct security certifications for your project similar to was done for the on-line compiler.
After the certs/awscerts.h file has been updated, change the active directory to the examples/ directory so you can update the aws_iot_config.h files located in the shadow_sample and subscribe_publish_cpp_sample folders. These files will need to have the AWS_IOT_MQTT_HOST URL updated to correctly reflect you end-points URL.
With the security certificates and end-point URL updated to correctly reflect you thing, you can now determine which project will be build. This is accomplished by editing the .mbedignore file:
mbed_settings.pyc
#examples/shadow_sample/
examples/subscribe_publish_cpp_sample/
To build the example program, comment out the line to be built (with a # in front of the sample to build). Only one sample can be built at a time. First comment out one (in the above example, the program to be built will be shadow_sample) and issue the build command. To build the subscribe_publish_cpp_sample, remove the # in front of examples/shadow_sample and place it in front of examples/subscribe_publish_cpp_sample.
In the mbed_app.json file, remove the "ONLINE_COMPILER=1", line (this macro is used to signal to the on-line compiler how to handle the POSIX time routines).
Lastly, update the mbed_setting.py file so that it reflects the correct location of the compiler to use for compilation. In the file that is provided when imported, it is:
# GCC ARM
#GCC_ARM_PATH = ""
GCC_ARM_PATH = "/usr/local/gcc-arm-none-eabi-7-2017-q4-major/bin/"
This path needs to reflect the location of the compiler for your tools installation.
Finally, build the executable image by issuing the command: mbed compile -m NUCLEO_L476RG -t GCC_ARM
The executable image will be located at ./BUILD/NUCLEO_L476RG/GCC/*.bin once the compile is complete. For reference, this process will look like:
mbed compile -m NUCLEO_L476RG -t GCC_ARM
Building project aws-iot-device-sdk-mbed-c (NUCLEO_L476RG, GCC_ARM)
Scan: .
Scan: env
Scan: mbed
Compile [ 0.2%]: jsmn.c
Compile [ 0.5%]: AnalogIn.cpp
Compile [ 0.7%]: Ethernet.cpp
Compile [ 1.0%]: BusIn.cpp
.
.
.
Link: aws-iot-device-sdk-mbed-c
Elf2Bin: aws-iot-device-sdk-mbed-c
+-------------------------------------------+--------+-------+-------+
| Module                                    |  .text | .data |  .bss |
+-------------------------------------------+--------+-------+-------+
| [fill]                                    |    323 |     7 |    42 |
| [lib]/c.a                                 |  40851 |  2472 |    89 |
| [lib]/gcc.a                               |   7188 |     0 |     0 |
| [lib]/misc                                |    208 |    12 |    28 |
| [lib]/nosys.a                             |     32 |     0 |     0 |
| [lib]/stdc++.a                            |   5301 |    12 |    44 |
| examples/shadow_sample                    |   6726 |     4 |   200 |
| external_libs/jsmn.o                      |    910 |     0 |     0 |
| mbed-os/drivers                           |   3586 |     4 |   100 |
| mbed-os/events                            |   1638 |     0 |   101 |
| mbed-os/features                          | 136959 |   140 |   151 |
| mbed-os/hal                               |   1723 |     4 |    68 |
| mbed-os/platform                          |   4079 |   272 |   189 |
| mbed-os/rtos                              |  14363 |   168 |  6073 |
| mbed-os/targets                           |  13274 |     8 |   945 |
| platform/common                           |    308 |     0 |     4 |
| platform/ezconnect                        |   5920 |    48 |  2450 |
| platform/mbedtls                          |   7578 |     4 |   117 |
| src/aws_iot_json_utils.o                  |   1560 |     0 |     0 |
| src/aws_iot_mqtt_client.o                 |    735 |     0 |    25 |
| src/aws_iot_mqtt_client_common_internal.o |   1240 |     0 |     0 |
| src/aws_iot_mqtt_client_connect.o         |    933 |     0 |     0 |
| src/aws_iot_mqtt_client_publish.o         |    770 |     0 |     0 |
| src/aws_iot_mqtt_client_subscribe.o       |    844 |     0 |     0 |
| src/aws_iot_mqtt_client_unsubscribe.o     |    386 |     0 |     0 |
| src/aws_iot_mqtt_client_yield.o           |    534 |     0 |     0 |
| src/aws_iot_shadow.o                      |    681 |     0 |    80 |
| src/aws_iot_shadow_actions.o              |    184 |     0 |     0 |
| src/aws_iot_shadow_json.o                 |   1858 |     0 |  1936 |
| src/aws_iot_shadow_records.o              |   2415 |     1 |  5726 |
| Subtotals                                 | 263107 |  3156 | 18368 |
+-------------------------------------------+--------+-------+-------+
Total Static RAM memory (data + bss): 21524 bytes
Total Flash memory (text + data): 266263 bytes

Image: ./BUILD/NUCLEO_L476RG/GCC_ARM/aws-iot-device-sdk-mbed-c.bin
Copy the executable program from ./BUILD/NUCLEO_L476RG/GCC_ARM/aws-iot-device-sdk-mbed-c.bin to the Nucleo board connected to your PC.
AWS Mbed Sample Execution
With the program now loaded on the Nucleo board, pressing the reset button will start program execution. For each of the two sample programs, execution will resemble the following[i]:
Shadow_sample output
AWS ./examples/shadow_sample/shadow_sample.cpp Example.

AWS IoT SDK Version 3.0.0-

Shadow Init
Shadow Connect
[EasyConnect] Using BG96
[EasyConnect] Connected to Network successfully
[EasyConnect] MAC address 32:06:91:41:02:72:20
[EasyConnect] IP address 10.192.70.252

=======================================================================================

On Device: window state false
Update Shadow: {"state":{"reported":{"temperature":25.500000,"windowOpen":false}}, "clientToken":"c-sdk-client-id-0"}
*****************************************************************************************

Update Accepted !!

=======================================================================================

On Device: window state false
Update Shadow: {"state":{"reported":{"temperature":26.000000,"windowOpen":false}}, "clientToken":"c-sdk-client-id-1"}
*****************************************************************************************

Update Accepted !!

=======================================================================================

On Device: window state false
Update Shadow: {"state":{"reported":{"temperature":26.500000,"windowOpen":false}}, "clientToken":"c-sdk-client-id-2"}
*****************************************************************************************

Update Accepted !!

=======================================================================================

.
.
.
subscribe_publish_cpp_sample
AWS ./examples/subscribe_publish_cpp_sample/subscribe_publish_cpp_sample.cpp Example.

AWS IoT SDK Version 3.0.0-

Connecting...

[EasyConnect] Using BG96
[EasyConnect] Connected to Network successfully
[EasyConnect] MAC address 32:06:91:41:02:72:20
[EasyConnect] IP address 10.192.159.16
Subscribing...

Subscribe callback
sdkTest/sub   hello from SDK QOS0 : 0

-->yield for MQTT read

Subscribe callback
sdkTest/sub   hello from SDK QOS1 : 1
Subscribe callback
sdkTest/sub   hello from SDK QOS0 : 2

-->yield for MQTT read

Subscribe callback
sdkTest/sub   hello from SDK QOS1 : 3
Subscribe callback
sdkTest/sub   hello from SDK QOS0 : 4

-->yield for MQTT read

.
.
.
Changes Made for Mbed OS integration
The changes made from the stock AWS IoT embedded C SDK are listed below. Most changes are called out in the porting guide (PortingGuide.md), the following are specific changes made to accommodate Mbed OS
Modified platform interface
The source level changes made are in the following directories. Additionally, as delivered by AWS, the security certificates are expected to reside in a file system. Because this system has no file-system, the contents of these files are merged into the awscerts.h file and included in the source build itself.
platform/mbedtls
- mbedTLS is included in Mbed OS so nothing has to be done to obtain the TLS portion.
- The network.cpp file contains the routines for initializing the system and providing the primitives used for accessing the network transport layer.
- The network_mbedtls_wrapper.cpp file contains the _iot_tls_* routines that are called out in the porting guide
platform/common
These routines implement the timing functions that the AWS SDK requires. You will find conditional compiles to account for building either on-line (which uses the ARM compiler) and via the CLI (which uses the GCC ARM) compiler.
platform/ezconnect
This library implements the ARM easy-connect API’s for various Network interfaces. The ARM library available at https://github.com/ARMmbed/easy-connect could be substituted for this library but it does not contain support for the Quectel BG96 (which the ezconnect library) does. You may want to use the ARM version if you are using Wi-Fi or another Network Interface. It is a direct substitution.
Source changes
Source changes are minimal, it primarily involves
- Redefining the SUCCESS macro to be specific to AWS (AWS_SUCCESS). SUCCESS is a common verb that is utilized by many different tools so redefining it to AWS_SUCCESS ensure that is reflects the expected return value.
- Redefining the Timer type to be awsTimer. In Mbed, Timer is a pre-defined data type that is used for Timers. The AWS code uses a POSIX approach to creating timers so redefining the type to awsTimer ensures that there is no inadvertent use of an Mbed Timer vs. an AWS Timer
- Modifying the sample programs so that ‘main’ creates a second task containing the sample code. When using Mbed, the main task is intended to only start the system and it maintains a very small stack. Because the AWS SDK (and MbedTLS specifically) has a high STACK size requirement, it is necessary to start the sample code off as an independent task with which we can define a sufficient stack for sample use. This change is in each of the Sample programs and it sets a Task stack size of 8K (8*1024).
- Unused/Unneeded source code was removed. The Mbed CLI attempts to compile and link any source code within the project directory (unless specifically listed in the .mbedignore file). Removing this code speeds the compile and prevents errors/warnings that are inconsequential.
[1] Though this board is included in the Kit, for the AWS example it isn’t used
[i] You may get a -12 error when running the shadow_sample program. If this occurs, make sure the Thing name in AWS matches the AWS_IOT_MY_THING_NAME definition. Additionally, ensure you have a policy defined for your Thing that looks something like:
{
  "Version": "2012-10-17",
  "Statement": [
    {
      "Effect": "Allow",
      "Action": [
 "iot:Publish",
        "iot:Subscribe",
 "iot:Connect",
 "iot:Receive"
      ],
      "Resource": [
        "*"
      ]
    }
  ]
}
| AWS_using_MBED.pdf |
