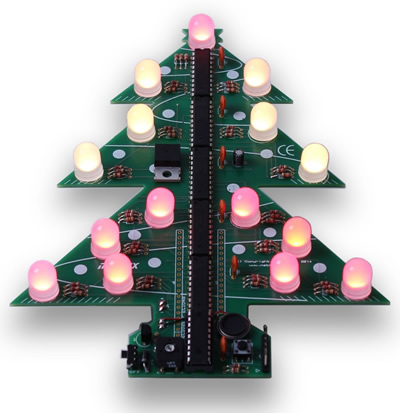
It’s been nearly a year since my last blog on creating a simple LED based Xmas tree so thought it was time for a re-visit.
This time instead of cobbling together a section of breadboard I decided to go with a more professional approach and design an actual PCB to host all the components.
I also wanted something a bit more useful so I stuck with 15 LEDs but this time I replaced the fixed colour LEDs with large 10mm RGB type common cathode LEDs. The tree allows all 15 LEDs to be controlled by using enough octal buffer IC’s to allow each Red, Green and Blue signal to be switched on or off independently. By switching the various internal LEDs on and off at high speed we can then generate a wide selection of colours. Another addition was to add a simple sounder circuit to allow audio to be generated from the board and a simple switch to allow for some user interaction.
The complete set of parts to build the tree have been placed into a kit that is now available as a product to buy from the MatrixTSL website: HPTREE Product Page
Instructions on how to build and test the kit are also available from the resources section of the product page.
To save on money around this expensive time of year and also to reduce complexity I decided not to fit the circuit board with any re-programming circuitry. The supplied 16F88 device comes pre-programmed with the firmware shown in the video. This means that once the tree is assembled it will create a nice centre piece without having to do anything further.
Should you want to re-program the device then you have a few options.
- Use a PICkit 2 or PICkit 3 to re-program the 16F88 device via the ICSP header fitted to the tree PCB.
- Lever the 16F88 chip out of it’s socket and use with a programmer such as our EB006 PIC Multi-programmer.
- Lever the 16F88 chip out of it’s socket and replace with an ECIO device to the larger socket on the reverse side of the PCB.
Also available from the product page is a Flowcode component designed to simplify creation of new animations and audio jingles. All of the complexity of creating the various colours and audio tones has been taken care of for you so you can focus on what colours and what notes you want to display. The source code for the Flowcode component is also available should you want to dig into the world of colour and audio control techniques using a high speed timer interrupt.
The board can be powered from a standard PP3 type 9V battery or any DC supply in the range of 7V – 9V. There is a double check diode fitted to the PCB to avoid any problems should you connect up the power supply with reverse polarity but it is wise to double check your connections before powering up the board for the first time.
Here is the project schematic.
The board features mounting holes to allow it to be hung from a tree, attached to a wall or added to a 3D printed or laser cut casing.
Here is a quick video detailing the MatrixTSL Xmas Tree kit, the software and the fully assembled end product.


Top Comments