element14 Community
element14 Community
    Register Log In
  • Site
  • Search
  • Log In Register
  • Members
    Members
    • Benefits of Membership
    • Achievement Levels
    • Members Area
    • Personal Blogs
    • Feedback and Support
    • What's New on element14
  • Learn
    Learn
    • Learning Center
    • eBooks
    • STEM Academy
    • Webinars, Training and Events
    • Learning Groups
  • Technologies
    Technologies
    • 3D Printing
    • FPGA
    • Industrial Automation
    • Internet of Things
    • Power & Energy
    • Sensors
    • Technology Groups
  • Challenges & Projects
    Challenges & Projects
    • Design Challenges
    • element14 presents
    • Project14
    • Arduino Projects
    • Raspberry Pi Projects
    • Project Groups
  • Products
    Products
    • Arduino
    • Dev Tools
    • Manufacturers
    • Raspberry Pi
    • RoadTests & Reviews
    • Avnet Boards Community
    • Product Groups
  • Store
    Store
    • Visit Your Store
    • Choose Another Store
      • Europe
      •  Austria (German)
      •  Belgium (Dutch, French)
      •  Bulgaria (Bulgarian)
      •  Czech Republic (Czech)
      •  Denmark (Danish)
      •  Estonia (Estonian)
      •  Finland (Finnish)
      •  France (French)
      •  Germany (German)
      •  Hungary (Hungarian)
      •  Ireland
      •  Israel
      •  Italy (Italian)
      •  Latvia (Latvian)
      •  
      •  Lithuania (Lithuanian)
      •  Netherlands (Dutch)
      •  Norway (Norwegian)
      •  Poland (Polish)
      •  Portugal (Portuguese)
      •  Romania (Romanian)
      •  Russia (Russian)
      •  Slovakia (Slovak)
      •  Slovenia (Slovenian)
      •  Spain (Spanish)
      •  Sweden (Swedish)
      •  Switzerland(German, French)
      •  Turkey (Turkish)
      •  United Kingdom
      • Asia Pacific
      •  Australia
      •  China
      •  Hong Kong
      •  India
      •  Korea (Korean)
      •  Malaysia
      •  New Zealand
      •  Philippines
      •  Singapore
      •  Taiwan
      •  Thailand (Thai)
      • Americas
      •  Brazil (Portuguese)
      •  Canada
      •  Mexico (Spanish)
      •  United States
      Can't find the country/region you're looking for? Visit our export site or find a local distributor.
  • Translate
  • Profile
Personal Blogs
  • Members
  • More
Personal Blogs
Legacy Personal Blogs LED Xmas Tree Project using Flowcode 6
  • Blog
  • Documents
  • Mentions
  • Sub-Groups
  • Tags
  • More
  • Cancel
  • New
Blog Post Actions
  • Subscribe by email
  • More
  • Cancel
  • Share
  • Subscribe by email
  • More
  • Cancel
Group Actions
  • Group RSS
  • More
  • Cancel
Engagement
  • Author Author: benmatrix
  • Date Created: 6 Dec 2013 2:53 PM Date Created
  • Views 464 views
  • Likes 1 like
  • Comments 1 comment
Related
Recommended

LED Xmas Tree Project using Flowcode 6

benmatrix
benmatrix
6 Dec 2013

I wanted to create a simple project that could be followed at home to celebrate this festive time of year. As I had some spare PIC16F88 devices lying around I decided to use one of these to create a LED Xmas tree.

image

The 16F88 has an inbuilt internal oscillator and reset functionality so this helps to reduce the complexity of the circuit we want to build.


Parts list:
PIC16F88
18 Pin Chip Socket
15 x LEDs
15 x 120 Ohm Resistor
Some wire - insulated RoadRunner wire is very good for this
Slide or Toggle switch
Piece of single sided copper Veroboard


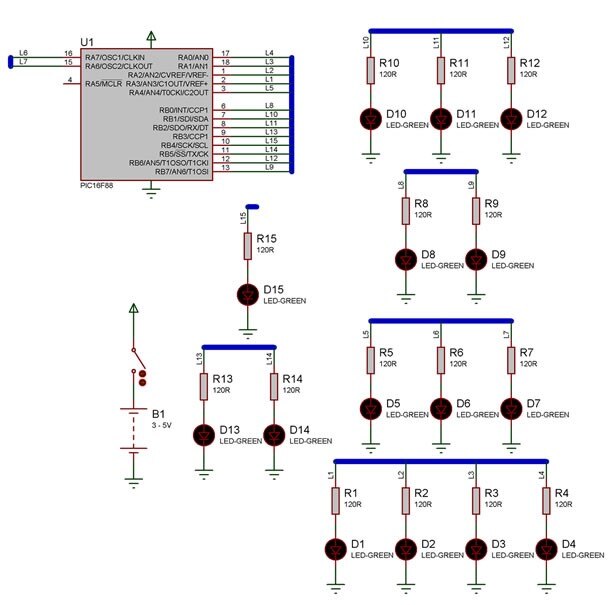
Here is a schematic showing the circuit we are going to be building.

image


Here is a layout image showing the position of the components on the veroboard

image

Here are some build pictures.


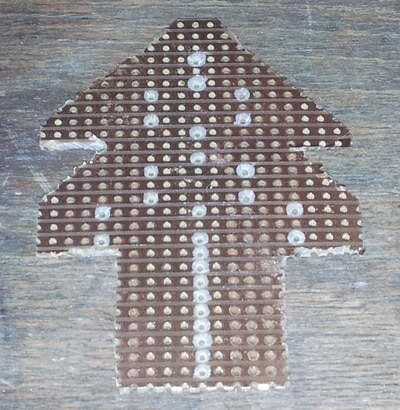
Carefully cut the veroboard to shape and use a 3-5mm drill bit to remove the copper in the areas shown.

image

Next Fit the LEDs and Resistors and solder everything into place ensuring it is flat to the board. Remove the surplus component legs.

image

Here is a picture the solder side of the veroboard

image

Bend out the legs of the chip socket and solder this into place.

image

The board should now stand on it's own.

image

Use solder bridges and the wire from some of the removed LED legs to connect up the first row of LEDs.

image

Here is a picture showing the wires

image

Use more of the LED legs to route the ground to all the LEDs.

image

Next use thin insulated wire or RoadRunner wire to connect up the remaining LEDs.

image

I created a video tutorial which walks through testing the hardware and designing the software to drive the board.


You don't have permission to edit metadata of this video.
Edit media
x
image
Upload Preview
image


All the files from the project can be found here.

http://matrixmultimedia.com/blog/wp-content/uploads/2013/12/LEDXmasTree.zip

  • Sign in to reply

Top Comments

  • DAB
    DAB over 9 years ago +1
    I like it. The Flow Code capability looks like a good way for new MCU users to deal with some of the complexity using simple logical constructs. Having an example that takes them from idea to build to…
  • DAB
    DAB over 9 years ago

    I like it.

    The Flow Code capability looks like a good way for new MCU users to deal with some of the complexity using simple logical constructs.

    Having an example that takes them from idea to build to show off is a great way to get them started.


    Well done.

    DAB

    • Cancel
    • Vote Up +1 Vote Down
    • Sign in to reply
    • More
    • Cancel
element14 Community

element14 is the first online community specifically for engineers. Connect with your peers and get expert answers to your questions.

  • Members
  • Learn
  • Technologies
  • Challenges & Projects
  • Products
  • Store
  • About Us
  • Feedback & Support
  • FAQs
  • Terms of Use
  • Privacy Policy
  • Legal and Copyright Notices
  • Sitemap
  • Cookies

An Avnet Company © 2023 Premier Farnell Limited. All Rights Reserved.

Premier Farnell Ltd, registered in England and Wales (no 00876412), registered office: Farnell House, Forge Lane, Leeds LS12 2NE.

ICP 备案号 10220084.

Follow element14

  • Facebook
  • Twitter
  • linkedin
  • YouTube