


So I saw a video of Open LED Race in action and I liked it. Simple, enjoyable, cheap to make and something that would keep small kids entertained. I'm a Psychologist and some of my clients are less than 10 years old so in an effort to bond with them in the first meeting I needed something that would create the feeling of a mutual goal, engage them in conversation and allow me to study their determination and level of engagement in the game. Open LED Race is perfect for this.
How Open LED Race works is you use two (or four) analog controllers to "race" cars made out of LEDs. The LED strip is the track and you can arrange it in any shape you wish. You need some cables, an Arduino, a cheap speaker, three electronic components and a LED strip.
I bought these two big analog buttons since they looked like they could take repeated hits from the angry hands of small children. One red and one green as the two player version of the game has a red and a green player. I've soldered the positive and negative ends of a three meter long cable to their respective +/- places on the buttons and soldered the other end of the cables to an RCA plug.

I've got a cheap Arduino Nano from AliExpress (CH340) and an I/O expansion board to go with it.

You will also need a WS2812 or WS2813 LED strip that has 60 LEDs per meter and is 5 meters long. I've got this from AliExpress for $30.

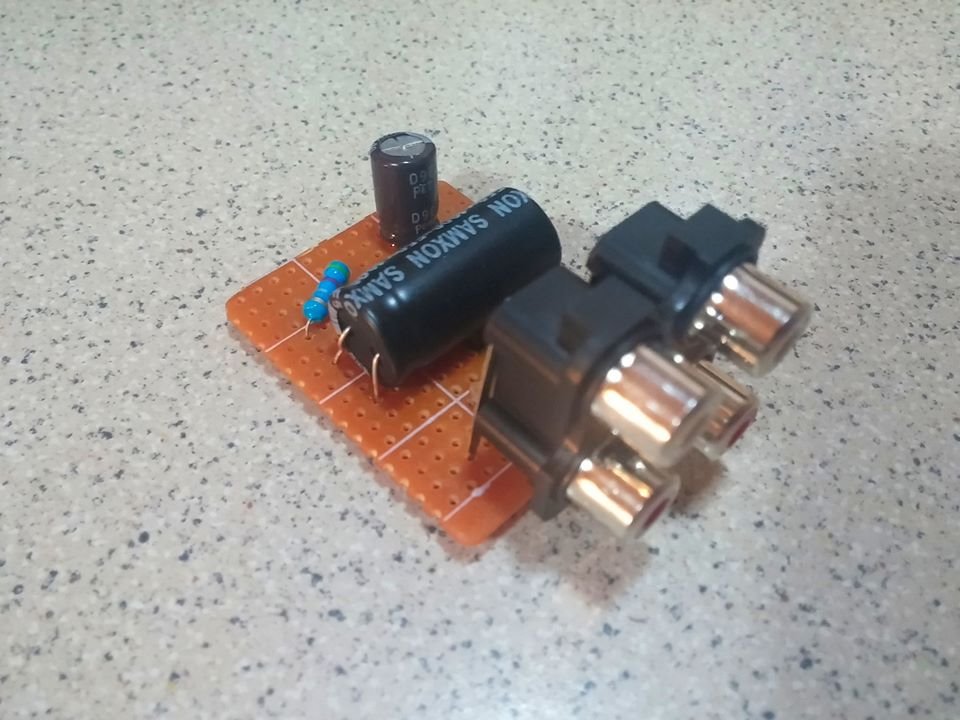
Along with the buttons and RCA male jacks you'll also need a four RCA female jack group like the one in the image below. Just in case you want to upgrade the game to four players later.

And an 0.25W or 0.50W 8 ohm speaker for the sound effects.

You will also need one resistor (between 330Ω and 500Ω). I used a 475Ω one.

...and one 5V 1000µF capacitor like the big one in the picture below and another anywhere in the 5V 1-10µF range (the second one in the picture is a 4.7µF one and the third a 10µF one; either will do).

You will also need a standard power source for the Arduino.

Now using the schematic below try it out first with a breadboard:

(image courtesy of https://www.hackster.io/gbarbarov/open-led-race-a0331a )
Connect a Dupont wire to one end of the resistor and the other end to A0 on the Arduino Nano. Another wire goes to the other end of the resistor and the DI cable of the WS2813 LED strip.
Take the 4.7µF or 10µF capacitor and connect it with wires to the D3 pin of the Nano and the + (red wire) of the speaker. The other speaker wire (black) goes to Ground.
Look at the bottom row of the RCA female group and connect their two positive ends to D6 and D7 respectively on the Nano. Their negative wires shoud go to Ground.
One end of the 1000µF capacitor should go to 5V and the other to Ground.
Connect the 5V and GND wires of the WS2813 to 5V and GND respectively. The remaining BI wire of the WS2813 also goes to Ground on the Nano. The WS2812 has no BI line.
In the end you should have something that looks like this:


The Arduino code to be uploaded to the Nano is here. You will also need a file called Adafruit_Neopixel.h. Open two tabs in the Arduino IDE, paste the contents of the files there and upload them to your Nano. The Chinese-made CH340 uses the old bootloader method for uploading files so be sure to check that in Tools > Processor > ATMega328p (Old Bootloader).

After the code is flashed into the microcontroller you can unplug the USB cable, fit the Nano into the I/O expansion board and plug in the power source. You can check out the game and if all connections are well-made.
Take a small proto board and solder the components and RCA female group onto it.
One thing you have to take into account is that the two capacitors are as far away as possible from one another. In a previous build the game kept freezin after a race if the red player won and I could not figure out why. It turns out the capacitors influenced one another and I had to better spread the components on the proto board.

It would be advisable to position them even farther away from one another than shown in the image above.
The reason the proto board was cut so small is because I also wanted a case to house this, the I/O board with the Arduino Nano and the Speaker. I took three 6mm thick wooden planks and drew a case:

You can make your own design. This I made out of my head without much planning; just some measurements and simple math, then cut the pieces with a table saw.

Use wood glue to glue the pieces together and apply pressure on the joint.

I've glued small wooden cubes in the inner corners of the box for better stability and glue adherence but also because I wanted the boards a bit elevated.

I've used Dupont cables to make the connections between the boards and the speaker and glued the speaker on the inner side of what would be the "cover" of the box. Drew small holes in that door and enlarged some of them with a polishing stone mounted on an electric drill. I applied pressure on the holes with the rounded head of the polishing stone until the wood started to smoke and the imprint it left was black and glossy and with an inner curvature. You will need these holes for the speaker. Use a glue gun to secure the wires, speaker and components.

Sand down the case. You can paint it if you want to. Now take some small wooden cubes that have the same height as the ones you glued inside the corners of the box and place three of them under three corners of each of the two boards. Secure them with screws or glue them to the boards. The important thing is the boards should be elevated and at the same level.
The elevation is needed because you will want to drill holes where you can fit the RCA cables, for the USB jack and for the power jack. These should be on the back of the case and it's better to have them one centimeter above ground level so you can easily pull the cables out when you want to move the game box. One hole on each side of the box at about halfway to its top. You can cut the female jack of the WS2813 LED strip leaving about five centimeters of wire coming out of it, insert these wires through one gole, secure the jack with glue so that it points outwards then connect these wires to their respective Dupont wires to make a connection. You can now use the other end of the LED strip (the male one) to connect the 5 meter long WS2813 to this female socket. The other end of the LED strip you can just cram in a bit in the other hole. The LED "cars" tend to appear at the beginning of the strip once they've reached the end of it so if you connect the two ends to the case it would look like they pass through the case as a checkpoint.
Sand down the case a bit then use something to give it a coating. I've used clear epoxy resing since that's what I've had around the house. Took a piece of cloth and rubbed the entire case well, left it to dry, repeated the procedure a couple more times, sanded it a bit again for leveling then applied a final clear coating.
Using wood I've built simple button holders or "joysticks" - cases for the large buttons really.

I wanted them to be big so the kids would have to use both hand to play the game - one for holding the joystick and the other for slapping the big button. The more physical action the more adrenalin your body pumps and the more adrenalin the more alert you become. I needed them alert after a game or two so I could do Psychological Counselling or therapy with them - so they'd pay attention to our discussion and the questions I would ask.
I've painted the button cases with acrylic paint, let them dry and applied some epoxy resin coating so they'd look nice and shiny:

Open LED Race is simple: the faster you hit the button the faser your LED car goes. After five laps the first one in line wins and then the entire LED strip lights up in the color of that player so you'll know for sure who won that race. Then it starts all over again. You even have "slopes" defined by blue LEDs and you can elevate these parts of the strip or make a loop out of it in that spot because the cars will need speed to pass over these and will "slide back" if they reach these points and you're not pushing the button fast enough, making the player lose ground.
You can stop the game by pulling out the plug, otherwise it goes on forever, but you can easily mount an On/Off switch somewhere along the power line or on the box itself.
Here's a sample gameplay video I've made:
- If the game freezes check the distance between the capacitors first then if all the connections are properly soldered.
- You only need to use one end of the LED strip to make the connections.
- Check out the code before uploading as you can modify the speed of the cars, how many rounds a race has and a bunch of other things.
- If you use two 5 meter LED strips you can have an even bigger track; you just need to modify the 300 in the code to 600.
- Make an extender for the barrel jack of the power cord. Mine is about four meters in lenght and I can place the case and track in the middle of my office without having to have a power plug nearby.
- You can use smaller analog buttons and play the game with your thumbs but you'll get tired pretty quickly this way.
- You don't absolutely need an I/O extender for the Arduino Nano (although it helps a lot to have many ground and voltage pins to chose from) as you can power the Arduino using its USB data cable and a proper 5V power adapter for it.
- If you have a 3D printer there are cases and button handles for Open LED Race ready to be printed.
Enjoy.
/Next day edit: It looks like the folks at Open LED Race awarded me a prize for this build. Cool. Will make another build out of it and donate it to and NGO dealing with autistic children.

/January 7th edit: gameplay with a friend in my office, on which occasion I've found out your chances of winning increase if you repeatedly hit the button with your forehead... 
Top Comments