element14 Community
element14 Community
    Register Log In
  • Site
  • Search
  • Log In Register
  • Members
    Members
    • Benefits of Membership
    • Achievement Levels
    • Members Area
    • Personal Blogs
    • Feedback and Support
    • What's New on element14
  • Learn
    Learn
    • Learning Center
    • eBooks
    • STEM Academy
    • Webinars, Training and Events
    • Learning Groups
  • Technologies
    Technologies
    • 3D Printing
    • FPGA
    • Industrial Automation
    • Internet of Things
    • Power & Energy
    • Sensors
    • Technology Groups
  • Challenges & Projects
    Challenges & Projects
    • Design Challenges
    • element14 presents
    • Project14
    • Arduino Projects
    • Raspberry Pi Projects
    • Project Groups
  • Products
    Products
    • Arduino
    • Dev Tools
    • Manufacturers
    • Raspberry Pi
    • RoadTests & Reviews
    • Avnet Boards Community
    • Product Groups
  • Store
    Store
    • Visit Your Store
    • Choose Another Store
      • Europe
      •  Austria (German)
      •  Belgium (Dutch, French)
      •  Bulgaria (Bulgarian)
      •  Czech Republic (Czech)
      •  Denmark (Danish)
      •  Estonia (Estonian)
      •  Finland (Finnish)
      •  France (French)
      •  Germany (German)
      •  Hungary (Hungarian)
      •  Ireland
      •  Israel
      •  Italy (Italian)
      •  Latvia (Latvian)
      •  
      •  Lithuania (Lithuanian)
      •  Netherlands (Dutch)
      •  Norway (Norwegian)
      •  Poland (Polish)
      •  Portugal (Portuguese)
      •  Romania (Romanian)
      •  Russia (Russian)
      •  Slovakia (Slovak)
      •  Slovenia (Slovenian)
      •  Spain (Spanish)
      •  Sweden (Swedish)
      •  Switzerland(German, French)
      •  Turkey (Turkish)
      •  United Kingdom
      • Asia Pacific
      •  Australia
      •  China
      •  Hong Kong
      •  India
      •  Korea (Korean)
      •  Malaysia
      •  New Zealand
      •  Philippines
      •  Singapore
      •  Taiwan
      •  Thailand (Thai)
      • Americas
      •  Brazil (Portuguese)
      •  Canada
      •  Mexico (Spanish)
      •  United States
      Can't find the country/region you're looking for? Visit our export site or find a local distributor.
  • Translate
  • Profile
Personal Blogs
  • Members
  • More
Personal Blogs
Legacy Personal Blogs Open Source Outdoor Robot platform JECCbot mini
  • Blog
  • Documents
  • Mentions
  • Sub-Groups
  • Tags
  • More
  • Cancel
  • New
Blog Post Actions
  • Subscribe by email
  • More
  • Cancel
  • Share
  • Subscribe by email
  • More
  • Cancel
Group Actions
  • Group RSS
  • More
  • Cancel
Engagement
  • Author Author: bernhardmayer
  • Date Created: 13 Jan 2020 2:16 PM Date Created
  • Views 1355 views
  • Likes 8 likes
  • Comments 8 comments
  • robotic
  • raspberrypi
  • mobile robot
  • robotics projects
  • arduino
Related
Recommended

Open Source Outdoor Robot platform JECCbot mini

bernhardmayer
bernhardmayer
13 Jan 2020

The JECCbot mini is an Open Source Outdoor Robotics platform which can be manufactured by a regular 3D printer.


image


The whole project and source files and production files and description is available on github: https://github.com/generationmake/JECCbot_mini


The chassis was constructed using FreeCAD and the FreeCAD project files are also available so one can modify them. There are also step and stl files to instantly start printing

image

The main goal is to make an easy entry into outdoor robotics. Outdoor robotics are a little bit different to the common known robot kits which drive on your table top or in your living room. Outdoors you are confronted with nature and your robot must be a little bit bigger so that it can drive over your lawn and isn’t stopped by every little stone. Additionally it needs more power to climb hills or overcome little obstacles like stones. Finally it has to cope with the weather because sometimes it starts raining when you are on a run. So it has to be somewhat water proof.


There also exist some contest for outdoor robots:

  • Robotem Rovne https://kufr.cz/view.php?nazevclanku=registrace-na-11-rocnik-robotem-rovne-je-zahajena&cisloclanku=2019030001
  • Roboorienteering http://robotika.vosrk.cz/roboorienteering/index.php
  • Field Robot Event https://www.fieldrobot.com/event/
  • Robotour https://robotika.cz/competitions/robotour/en


All these contests have in common that they are outdoors and that the robot has to drive over streets and lawns. Navigation is mostly done via GPS. Sometimes the robot has to carry a small payload. But all these contests require an emergency switch so that the robot can be stopped in case of an accident.


The JECCbot may not be the best fit for all these contests but it should be OK. More sophisticated robots are also more complicated and more expensive. But feel free to adopt the data and construction of the JECCbot mini to your needs.


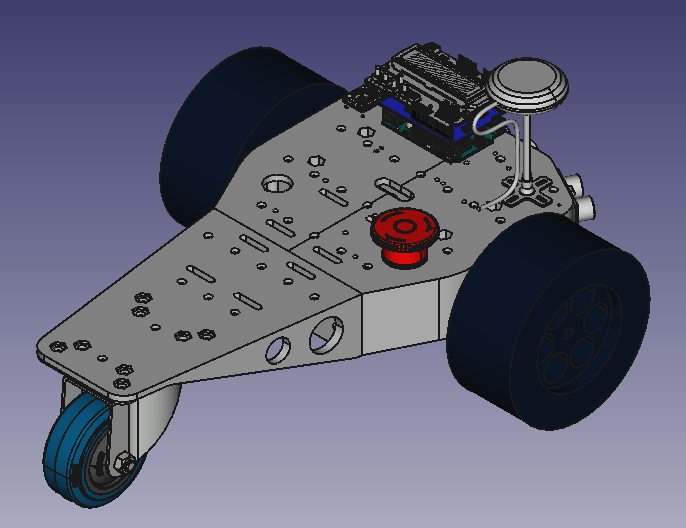
The JECCbot mini should be the easiest and cheapest way into that topic. The main chassis consists of two parts which can be 3D printed on any printer that has a volume of minimum 20 x 20 cm. It may take several hours until printing is finished. The whole chassis is 40 cm long and 20 cm wide. The whole robot with wheels and electronics is about 45 cm long and 35 cm wide and weights about 1.5 kg. The robot uses differential steering because it keeps the mechanics simple and is good enough for the tasks. Nevertheless there are definitely disadvantages with the roller wheel like blocked wheels.The robot needs a few additional parts like gear motors, wheels, switches and batteries. Sources of supply for these parts are on the github project.


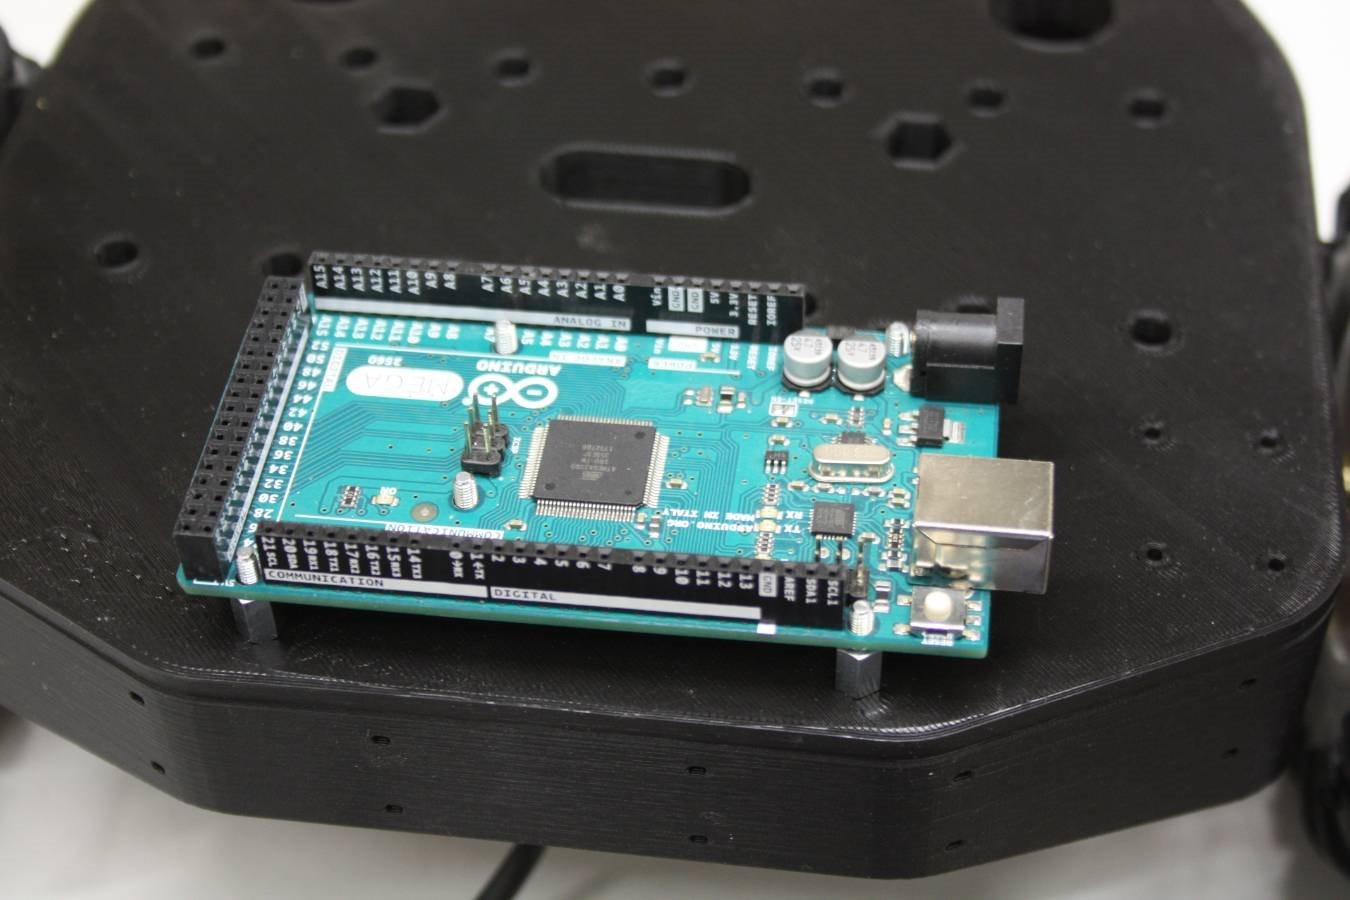
The JECCbot mini has mounting positions for various electronic boards:

  • Arduino Uno and Mega
  • Raspberry Pi
  • HighPowerMotorFeatherWing
  • and several sensors like IMU and GPS

The exact positions for mounting are described in the project wiki on github: https://github.com/generationmake/JECCbot_mini/wiki


image


We understand the JECCbot mini as a hardware platform for various tasks. So we don’t provide ONE electronics solutions but encourage you to equip the robot with the electronics suitable for your task. We just hope we have the right mounting positions on it.

We also made one sample project which controls the motor and uses a Bosch BNO055 IMU. This project uses an Arduino Mega, the Arduino Motor shield and an Adafruit BNO055 breakout board. The Arduino reads out the heading information of the BNO055 and uses this information to control the motors so that the robot drives straight.

Project is available here: https://github.com/generationmake/Arduino_on_JECCbot_mini


Videos

There are some videos of this project:

You don't have permission to edit metadata of this video.
Edit media
x
image
Upload Preview
image


You don't have permission to edit metadata of this video.
Edit media
x
image
Upload Preview
image


You don't have permission to edit metadata of this video.
Edit media
x
image
Upload Preview
image


In the coming weeks and months I will post several projects using the JECCbot mini platform.


I would like to hear your thoughts on the project

  • Sign in to reply

Top Comments

  • bernhardmayer
    bernhardmayer over 3 years ago in reply to dubbie +2
    Hi Dubbie, I just added a section with videos and hope this works now. I also made a new video that shows how the robot is driving on gravel: https://youtu.be/3hmIThvBiCg The robot has some problems with…
  • dubbie
    dubbie over 3 years ago in reply to bernhardmayer +1
    The robot is surprisingly good on the gravel. The wheels and tyres combination must be just right for the level of unevenness, plus, using three points of contact instead of four means it will always be…
  • bernhardmayer
    bernhardmayer over 3 years ago in reply to dubbie +1
    in the repository on github you can find all the construction data and the FreeCAD source file. So you can study our construction and modify it as you want. At the moment the robot uses wheels with a diameter…
  • bernhardmayer
    bernhardmayer over 3 years ago in reply to dubbie

    Dubbie,

    the contest is definitely a lot of fun.

    I already participated once in the contest in 2016.

    It looks like the conest is only for agricultural universities or similar institutions but this is not true. Anyone can compete in the contest like student groups or private teams. There is also no age limit. You just have to pay the registration fee and then you can compete.

    The contest usually takes three days. Task 1 and 2 on day 1, task 3 and 4 on day 2 and task 5 (Freestyle) and award ceremony on the last day. Task 1 and 2 have been unchanged for several years now. Task 3 and 4 will be changed this year. But this is explained in this blog post: https://www.fieldrobot.com/event/index.php/2019/12/20/field-robot-event-2020/

    You don't have to compete in all tasks, just take the ones you like.


    So, yes it is a nice contest.

    Bernhard

    • Cancel
    • Vote Up +1 Vote Down
    • Sign in to reply
    • More
    • Cancel
  • dubbie
    dubbie over 3 years ago in reply to bernhardmayer

    Bernhard,


    That looks a fun competition. Is it for anyone or just for farmers?


    Dubbie

    • Cancel
    • Vote Up 0 Vote Down
    • Sign in to reply
    • More
    • Cancel
  • bernhardmayer
    bernhardmayer over 3 years ago in reply to dubbie

    in the repository on github you can find all the construction data and the FreeCAD source file. So you can study our construction and modify it as you want.


    At the moment the robot uses wheels with a diameter of about 12 cm. We will try wheels with 17 cm in the coming days. But first we have to mill a new wheel adapter.


    There is a problem with the roller wheel on sticky grounds. It collects all the dirt and then the wheel is blocked. The front wheels still have enough power to move the robot but it is not very smooth anymore. With the bigger wheels we will also use a bigger roller wheel and see how it performs.

    This topic is important for us because we plan to participate at the Field Robot Event (https://www.fieldrobot.com/event/ ) and there the robot has to drive on a field on bare soil.


    Bernhard

    • Cancel
    • Vote Up +1 Vote Down
    • Sign in to reply
    • More
    • Cancel
  • dubbie
    dubbie over 3 years ago in reply to bernhardmayer

    The robot is surprisingly good on the gravel. The wheels and tyres combination must be just right for the level of unevenness, plus, using three points of contact instead of four means it will always be stable. It is an encouragement to me as I have some half ideas of making an outdoor mobile robot myself.


    Dubbie

    • Cancel
    • Vote Up +1 Vote Down
    • Sign in to reply
    • More
    • Cancel
  • bernhardmayer
    bernhardmayer over 3 years ago in reply to dubbie

    Hi Dubbie,


    I just added a section with videos and hope this works now.


    I also made a new video that shows how the robot is driving on gravel: https://youtu.be/3hmIThvBiCg

    The robot has some problems with gravel but I think slightly bigger wheels and a higher weight will fix this. We are working on bigger wheels.


    We used a Creality Ender 3 3D printer to produce the chassis. This is a low cost entry printer.


    Bernhard

    • Cancel
    • Vote Up +2 Vote Down
    • Sign in to reply
    • More
    • Cancel
>
element14 Community

element14 is the first online community specifically for engineers. Connect with your peers and get expert answers to your questions.

  • Members
  • Learn
  • Technologies
  • Challenges & Projects
  • Products
  • Store
  • About Us
  • Feedback & Support
  • FAQs
  • Terms of Use
  • Privacy Policy
  • Legal and Copyright Notices
  • Sitemap
  • Cookies

An Avnet Company © 2023 Premier Farnell Limited. All Rights Reserved.

Premier Farnell Ltd, registered in England and Wales (no 00876412), registered office: Farnell House, Forge Lane, Leeds LS12 2NE.

ICP 备案号 10220084.

Follow element14

  • Facebook
  • Twitter
  • linkedin
  • YouTube