element14 Community
element14 Community
    Register Log In
  • Site
  • Search
  • Log In Register
  • Members
    Members
    • Benefits of Membership
    • Achievement Levels
    • Members Area
    • Personal Blogs
    • Feedback and Support
    • What's New on element14
  • Learn
    Learn
    • Learning Center
    • eBooks
    • STEM Academy
    • Webinars, Training and Events
    • Learning Groups
  • Technologies
    Technologies
    • 3D Printing
    • Experts & Guidance
    • FPGA
    • Industrial Automation
    • Internet of Things
    • Power & Energy
    • Sensors
    • Technology Groups
  • Challenges & Projects
    Challenges & Projects
    • Design Challenges
    • element14 presents
    • Project14
    • Arduino Projects
    • Raspberry Pi Projects
    • Project Groups
  • Products
    Products
    • Arduino
    • Dev Tools
    • Manufacturers
    • Raspberry Pi
    • RoadTests & Reviews
    • Avnet Boards Community
    • Product Groups
  • Store
    Store
    • Visit Your Store
    • 'Choose another store...'
      • Europe
      •  Austria (German)
      •  Belgium (Dutch, French)
      •  Bulgaria (Bulgarian)
      •  Czech Republic (Czech)
      •  Denmark (Danish)
      •  Estonia (Estonian)
      •  Finland (Finnish)
      •  France (French)
      •  Germany (German)
      •  Hungary (Hungarian)
      •  Ireland
      •  Israel
      •  Italy (Italian)
      •  Latvia (Latvian)
      •  
      •  Lithuania (Lithuanian)
      •  Netherlands (Dutch)
      •  Norway (Norwegian)
      •  Poland (Polish)
      •  Portugal (Portuguese)
      •  Romania (Romanian)
      •  Russia (Russian)
      •  Slovakia (Slovak)
      •  Slovenia (Slovenian)
      •  Spain (Spanish)
      •  Sweden (Swedish)
      •  Switzerland(German, French)
      •  Turkey (Turkish)
      •  United Kingdom
      • Asia Pacific
      •  Australia
      •  China
      •  Hong Kong
      •  India
      •  Korea (Korean)
      •  Malaysia
      •  New Zealand
      •  Philippines
      •  Singapore
      •  Taiwan
      •  Thailand (Thai)
      • Americas
      •  Brazil (Portuguese)
      •  Canada
      •  Mexico (Spanish)
      •  United States
      Can't find the country/region you're looking for? Visit our export site or find a local distributor.
  • Translate
  • Profile
Personal Blogs
  • Members
  • More
Personal Blogs
Legacy Personal Blogs PYNQ-Z2 Workshop - session 2
  • Blog
  • Documents
  • Mentions
  • Sub-Groups
  • Tags
  • More
  • Cancel
  • New
Blog Post Actions
  • Subscribe by email
  • More
  • Cancel
  • Share
  • Subscribe by email
  • More
  • Cancel
Group Actions
  • Group RSS
  • More
  • Cancel
Engagement
  • Author Author: beacon_dave
  • Date Created: 21 May 2020 4:12 PM Date Created
  • Views 689 views
  • Likes 4 likes
  • Comments 6 comments
  • pynq framework
  • pynq-z2
  • pynq workshop
  • xilinx vivado design
  • pynqrunner
Related
Recommended

PYNQ-Z2 Workshop - session 2

beacon_dave
beacon_dave
21 May 2020

Continuing on from the first workshop in the series, this Element 14 workshop session

PYNQ-Z2 Workshop: Getting Up and Running with PYNQ

builds upon what was previously learnt about working with the PYNQ framework on the Tul Corporation PYNQ-Z2 development board.


The lab exercise this time was to create a custom PYNQ overlay using Xilinx Vivado and then to use it in a PYNQ project running in Jupyter Notebooks on the PYNQ-Z2 development board.


The design borrowed existing code from another PYNQ overlay and used high level synthesis to create new IP blocks which could then be combined with existing IP blocks distributed with Vivado in order to create an embedded vision project.


Some may suggest that the goal of the PYNQ framework is supposed to avoid the need to use the likes of Vivado FPGA design tools and to allow the design engineer to work from within the Python language, however that assumes the designer always has access to an appropriate PYNQ overlay which contains all the necessary FPGA design to match the project requirements. Sooner or later this will likely not be the case and as such having at least an overview of the overlay design process can still increase design productivity.


I found myself in this situation recently where I had been following along with a tutorial which was exploring the use of memory-mapped AXI GPIO on the PYNQ-Z2 development board. The PYNQ overlay being used included design elements for the push buttons, switches, and LEDs but not for the two RGB LEDs. The supplied block diagram confirmed this to be the case:


image

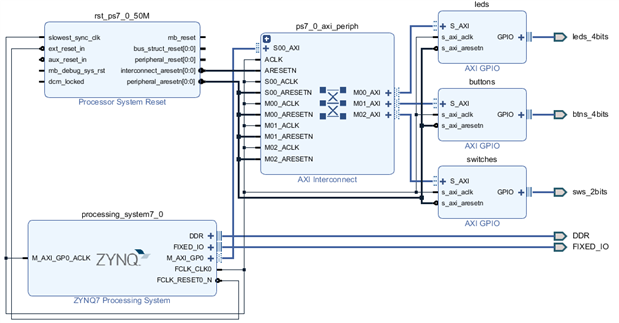
(original design from Xilinx PYNQ Workshop Session 4 https://github.com/Xilinx/PYNQ_Workshop/tree/master/Session_4  )


With my knowledge gained from the recent PYNQ-Z2 Embedded Vision Workshop, this turned out not to be a significant problem, as I decided to have a go at creating my own version of the overlay but with the additional AXI GPIO block for the RGB LEDs added and then to access it via memory-mapped registers using the PYNQ framework.


The resulting design in Vivado looked like this:


image

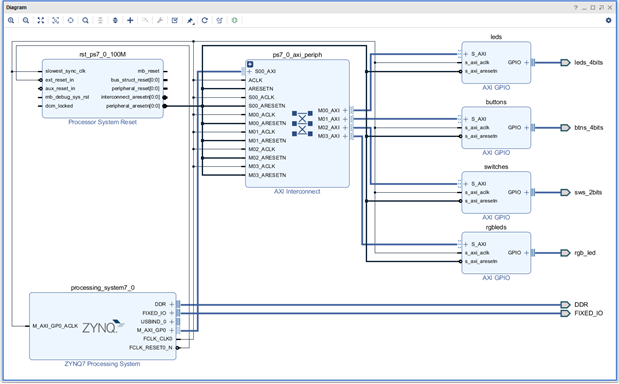
(enhanced design with additional AXI GPIO for the RGB LEDs added and routed to the on-board RGB LEDs)


Creating the design from scratch in Vivado turned out to be really easy, with most of the 'wiring' being done via automation. I required to adjust a few settings as I wanted to try and keep the routing and addresses the same as the previous design which I was trying to enhance. However validation of the block diagram passed without problem, the HDL wrapper was created, and the bitstream generated.


But one question still remained, would it actually work ?


Copying the overlay files over to the PYNQ-Z2 using the SMB network share allowed for work to continue in Jupyter Notebooks...


First we need to download the newly created overlay into the FPGA fabric:

image

Then we check that the address locations programmatically match what was assigned within the Vivado design:

image

image

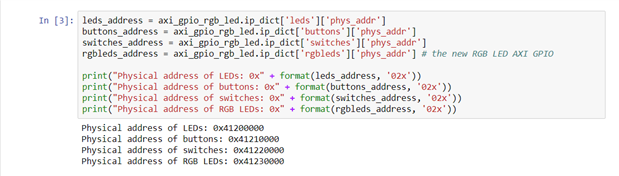
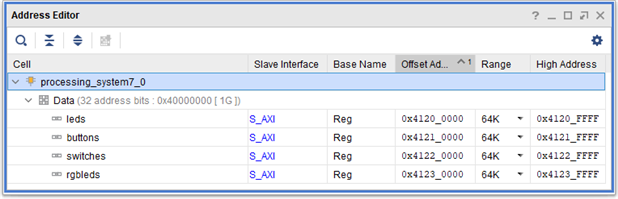
It is looking good so far. The 'rgbleds' at address 0x41230000 is the newly added feature.


Now to import the MMIO class and create instances for each of the GPIO devices:

image

Remember to configure the tri-state registers at offset 0x4 to set the direction to input or output:

image

Finally try turning the LEDs and RGB LEDs on and reading the buttons and switches:

image

Everything works. Success !

The new overlay both replicates the functionality of the original overlay, plus it now adds access to the RGB LEDs.

  • Sign in to reply

Top Comments

  • Fred27
    Fred27 over 3 years ago +1
    Great work. I hadn't noticed that the RGB LEDs weren't available, but it now seems a strange omission.
  • DAB
    DAB over 3 years ago +1
    Thanks for sharing. DAB
  • ralphjy
    ralphjy over 3 years ago +1
    Nice job! I hadn’t noticed that the RGB LEDs were missing either. I’ll have to add in your fix
  • beacon_dave
    beacon_dave over 3 years ago in reply to navadeepganeshu

    Follow the link previously mentioned above:

    PYNQ-Z2 Workshop: Getting Up and Running with PYNQ


    and click on the 'View Event Recording button:

    image

    • Cancel
    • Vote Up 0 Vote Down
    • Sign in to reply
    • More
    • Cancel
  • navadeepganeshu
    navadeepganeshu over 3 years ago

    Intresting!!!


    Is a link to this workshop recorded replay available? If yes, please share.

    • Cancel
    • Vote Up 0 Vote Down
    • Sign in to reply
    • More
    • Cancel
  • beacon_dave
    beacon_dave over 3 years ago in reply to Fred27

    "...seems a strange omission..."


    They probably got fed-up being blinded by the brightness of the RGB LEDs image


    I think I perhaps need to look at getting a PWM stage in there to tame them

    (perhaps controlled by an iPython Widget slider control in Jupyter…)

    • Cancel
    • Vote Up +1 Vote Down
    • Sign in to reply
    • More
    • Cancel
  • ralphjy
    ralphjy over 3 years ago

    Nice job!  I hadn’t noticed that the RGB LEDs were missing either.  I’ll have to add in your fix   

    • Cancel
    • Vote Up +1 Vote Down
    • Sign in to reply
    • More
    • Cancel
  • DAB
    DAB over 3 years ago

    Thanks for sharing.


    DAB

    • Cancel
    • Vote Up +1 Vote Down
    • Sign in to reply
    • More
    • Cancel
>
element14 Community

element14 is the first online community specifically for engineers. Connect with your peers and get expert answers to your questions.

  • Members
  • Learn
  • Technologies
  • Challenges & Projects
  • Products
  • Store
  • About Us
  • Feedback & Support
  • FAQs
  • Terms of Use
  • Privacy Policy
  • Legal and Copyright Notices
  • Sitemap
  • Cookies

An Avnet Company © 2023 Premier Farnell Limited. All Rights Reserved.

Premier Farnell Ltd, registered in England and Wales (no 00876412), registered office: Farnell House, Forge Lane, Leeds LS12 2NE.

ICP 备案号 10220084.

Follow element14

  • X
  • Facebook
  • linkedin
  • YouTube