Well, slightly longer time than I hoped for a second post, but here it is at last.
If you are a mainly windows user, you may not have come across telnet or ssh (more here) however in the Linux and Unix world they are very useful, and will make managing your Pi a lot easier.
In the original Debian build (the one I will be concentrating on) SSH was enabled by default but in the later build disabled. This was on security concerns, but unless you are directly exposing your pi to a public IP address this doesn't really matter - in simpler terms, if you connect to the Internet via a router then you don't really have a lot to worry about.
To enable SSH by default (so it works all the time) see the following link: http://elinux.org/R-Pi_Troubleshooting#Cannot_ssh_in_to_Pi
So from the command line on the Pi (after logging in, but before entering startx to go to the windows like environment) enter:
sudo mv /boot/boot_enable_ssh.rc /boot/boot.rc
Re-boot from the command line:
sudo shutdown -r now (Sudo - act as super user, shutdown as it sounds, -r = reboot and when=now)
You are now the proud owner of a Pi with SSH enabled, but Why I hear you ask ?
Well, when you are entering other instructions to do other exciting stuff on your Pi, to make life a little easier, you can SSH into your Pi using something called Putty, an SSH and telnet client for windows and type those instructions from the putty client rather than on the pi, which may not even have a keyboard attached.
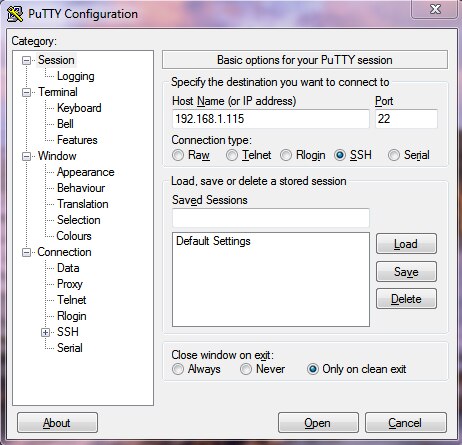
You will need the ip address of the pi, which you can find from the command line by typing ifconfig. Look for the block of text with Eth0 next to it (if on Ethernet) or wlan0 (if on wireless). look for the words 'inet addr' and next to this will be your pi's ip address, in my case it is 192.168.1.115 (this can change, so don't expect to be able to use the same IP every time you connect) and should start 192.168.x.x or 10.0.x.x (where x is a number from 0-255).
Next, fire up Putty,ensure connection type in putty is set to SSH, type in the Pi ip address (as below) and hit enter. You may get some messages about certificates, just answer yes or confirm. You will then get a black dos type window asking you to 'log in as'. Enter pi for the user and raspberry for the password (eg the default ones if you haven't changed them) and then you will be using your pi from the remote terminal. Now when you need to type long and complicated commands to set something up, you don't need to type them by hand, just copy and paste from the source you are looking at (copy a command on your windows PC, go to the putty window and right click, the command will paste). I find this a lot easier than doing the same thing directly on the pi.
If anyone is interested, you can now also use an FTP client to get files onto your pi (eg Quake Pak files) rather than having to download directly. I'll cover this in another post if anyone wants.