


Introduction
As a self-proclaimed Raspberry Pi and Texas hold’em nerd, I decided to build a Raspberry Pi Poker Player to bring with me to games to help make smart bets. Here is a video of it in action. The poker player performs 3 main steps: (1) identify cards, (2) identify hands, and (3) make bets. I will discuss how MATLAB helped me program these steps using deep learning, decision trees, and other techniques, and then deploy the final algorithm onto a Raspberry Pi.
Hardware used
- Raspberry Pi: brains of the project.
- USB webcam: to read images of the cards.
- Raspberry Pi Display: to assist in visualization.
- Push buttons: to call/fold bets.
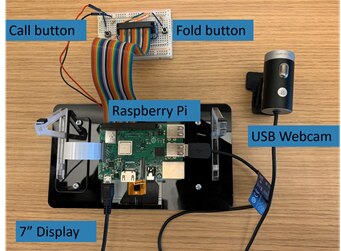
Fig 1: Hardware used in project
Identify cards

Fig 2: Webcam images are used as the input to the neural network that identifies cards
The first step is for the Raspberry Pi to identify cards. The webcam connected to the Pi captures images of the cards and a deep learning algorithm identifies them. MATLAB supports several popular deep learning networks that can be used for image classification, including SqueezeNet, AlexNet and GoogLeNet. AlexNet was chosen as it is sufficiently small to be deployed to a Raspberry Pi and it has relatively high prediction accuracy. We use transfer learning to tune it for our specific problem. Here is a detailed example that shows how to perform transfer learning using AlexNet.
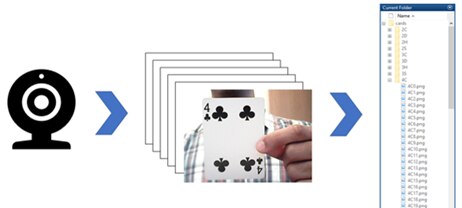
Fig 3: Collect data for transfer learning
The first step was to collect images of the cards we want to be able to identify. We took a series of snapshots using a webcam as we showed cards in different light settings and orientations. After manually selecting images that captured the features of each card with minimal blur / distortion, we rotated each image with MATLAB to avoid overfitting the network and to ensure it can recognize cards for different orientations. We ended up with over 10,000 images which were used in transfer learning. Instead of loading each image file into memory during training, we used the imageDatastore in MATLAB which let us work with the overall collection of images. The function augmentedImageDatastore was used to resize the images to 227x227 pixels which is the predefined input size of AlexNet. After applying transfer learning using these images, our network was able to effectively identify cards in all of our tests.
Identify hands and make bets
After identifying cards, the poker player is ready to identify hands. The flowchart in Figure 4 describes how this is implemented in MATLAB.

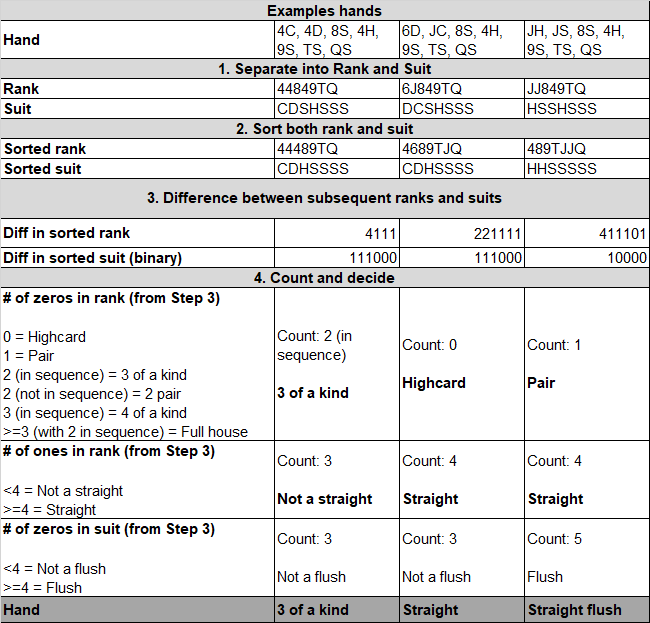
Fig 4: Flowchart to identify hands
Let’s use the example hands in the table below to better understand this flowchart. Note that the final 5 cards in each hand are community cards that are shared among all players.
After identifying cards and hands, the Poker Player is ready to place bets! The betting algorithm is very simple and based solely on what the identified hand is. It starts at 1 USD for a Highcard and increases by 1 USD for each subsequent ranked hand up to 10 USD for a Royal flush. The algorithm only makes bets on the complete hand, but it could certainly be updated and expanded.
Embed algorithm onto Raspberry Pi
We generate C++ code from our MATLAB algorithms and embed it onto the Raspberry Pi using MATLAB Coder. We wrote a function main_poker_player.cpp that serves as the main script of the executable, where we specify which functions to generate code for. The generated code and executable (including modified AlexNet and betting logic algorithm) are downloaded directly to the Pi for standalone execution – we just need to plug in a camera and run the .exe file.
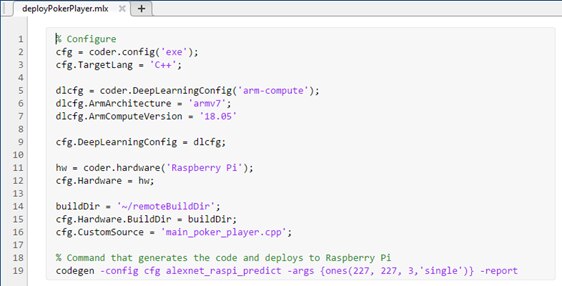
Fig 5: Generate code and deploy to the Raspberry Pi using MATLAB Coder
To understand this workflow in more detail and find additional resources, refer to the video here.
Conclusion
With that we have seen how to build a simple Raspberry Pi Poker Player using MATLAB. While this is a good start there are certainly areas for improvement, for example we could write a more sophisticated betting algorithm that is able to escalate bets and even bluff. Share your comments and ideas on how to improve the poker player! To request code, contact raspberrypi@mathworks.com.
