


Want to send telemetry data from a MikroE Click-Board to an Azure IoT Hub using a MaaXBoard? The MaaXBoard runs Debian Linux, so you can easily leverage Python to quickly implement interaction between attached hardware and Azure. This blog discusses reading a Temp & Humidity Mikroe Click-Board and sending the data to an Azure IoT Hub. Once the data has been delivered to an Azure IoT Hub, you can use the resources available on Azure to process data. This example is based on a Microsoft Quick Start Sample that has been modified to read a MikorE Click-Board for the telemetry data to send.
Equipment Setup
To set up the environment, install Azure CLI on your development machine. This process is described in https://docs.microsoft.com/en-us/cli/azure/?view=azure-cli-latest and provides instruction for Windows, Mac, and Linux. The Azure CLI can be used for many things, but in this blog, it is used to monitor IoT Hub events that occur as data is sent from the MaaXBoard to the IoT Hub.
Setting up the MaaXBoard involves several steps, all of which are detailed in an excellent article on Hackster.io, see Getting Started with MaaXBoard - Headless Setup. In addition to the steps described in the Hackster.io article, you need to add the following repositories:
- Microsoft Azure IoT Python Samples at https://github.com/Azure-Samples/azure-iot-samples-python. The Quickstart sample that is used is located within the 'azure-iot-samples-python/iot-hub/Quickstarts/simulated-device-2/' sub-directory.
- Review the documentation for the Send Telemetry Quickstart located at https://docs.microsoft.com/en-us/azure/iot-hub/quickstart-send-telemetry-python
Once you have cloned the Python Quickstart and read the Quickstart documentation, you can send “simulated” Temperature and Humidity to an IoT Hub to verify operation.
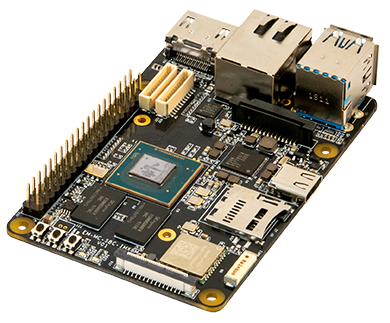
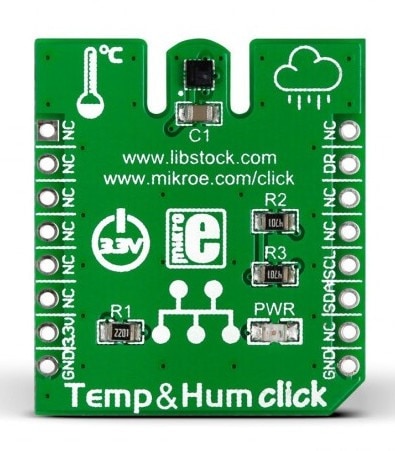
We will send Temperature & Humidity data read from an attached Click-Board, so we need to install a Click ShieldClick Shield on the MaaxBoard 40-pin header and a Temp&Hum Click BoardTemp&Hum Click Board for the sensor reading. The large heat-sink on the MX8M prevents the Click Shield from mounting properly, so you can either order a header extension (https://www.adafruit.com/product/4079?gclid=EAIaIQobChMI2PDPg8yz5gIVh_5kCh1J-AJPEAQYASABEgJx7_D_BwE) or remove the heat-sink (this isn’t a problem for this Python example but processor intensive tasks will require the heat-sink). To remove the heat-sink, simply remove the screws holding it on top of the MX8X and remove.
Click-Board Python Script
With the Click Shield and Click-Board installed, clone the github repository https://github.com/Avnet/clickboard_python. The hts221.py
script is setup to use I2C device 1 and you can verify this is the correct device by running i2cdetect -y 1 as shown below:

This command shows the device ID's connected to I2C device #1, in this case it shows the Barometer Click (5d) and the Temp&Hum Click (5f). If the devices were connected to a different I2C Device, you could change the 1 to a 2 and obtain similar output. The hts221.py script defines our I2C device at line 14 using the I2C device #1 and when hts221.py is ran, it produces the following:

After verifying the hts221.py script runs correctly, we can modify SimulatedDevice.py to utilize our hardware instead of the simulated data:
- Add "import hts221' at line 7
- Update the CONNECTION_STRING to reflect the IoT Hub connection string you have in your IoT device (if you haven't already done this)
- Modify the function iothub_client_telemetry_sampe_run() (in hts221.py) by adding/modifying lines 73-84 as shown below:

- The first function 'init()' simply reads the device ID and if the correct ID is read, reports the device as 'Initialized'.
- The activate() function configures control register 1, powers the hts221 up, then loads the calibration data.
- The functions, readTemperature() and readHumidity(), are self explanatory and their results are used to build the telemetry message to send the IoT Hub.
note: use the -O flag to avoid having the stand-alone output being printed
When you run SimulatedDevice.py, it now reports the HTS221 as initialized, displays the Temperature and Humidity, then sends the telemetry message to your IoT Hub:

Monitoring Azure IoT Hub Events
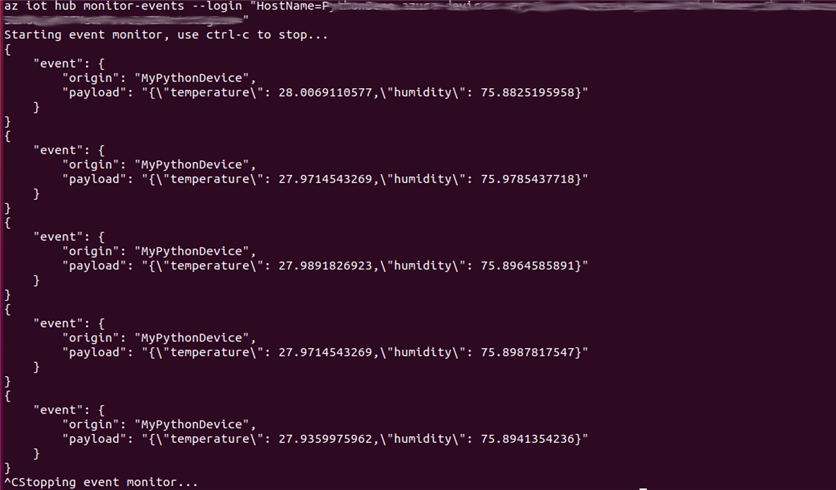
With the telemetry messages now sent to the IoT Hub, use the Azure CLI to monitory the reported events using the command
az iot hub monitor-events --login "<<Connection String>>”
for example:
Conclusion
Congratulations, you are now sending Telemetry data that is read from the Temp&Hum Click Board to the Azure IoT Hub! With the plethora of MikroE Click-Boards that are available, there are numerous opportunities for telemetry collection. In fact, the Barometer Click can be used if you want to modify SimulatedDevice.py to send Barometric Pressure instead of, or in addition to, Humidity.
As always, please let me know if you find this helpful and have any suggestions for other blogs.