Hadoop is a free, Java-based programming framework that supports the processing of large data sets in a distributed computing environment. It is part of the Apache project sponsored by the Apache Software Foundation.
Hadoop makes it possible to run applications on systems with thousands of nodes involving thousands of terabytes. Its distributed file system facilitates rapid data transfer rates among nodes and allows the system to continue operating uninterrupted in case of a node failure. This approach lowers the risk of catastrophic system failure, even if a significant number of nodes become inoperative.
In this post, we are going to discuss the steps to setup Hadoop on pcDuino.
1. Preparation
We only used two pcDuinos, one as Master, and the other one as Slave. We configure both nodes as static IP address and host name so that it’s easy to manage and make sure the communication between nodes is smooth.
1.1 Configure the static IP address of Master
Add information of static IP, and DNS, and make sure it can connect to network:
auto eth0 iface eth0 inet static address 192.168.3.150 netmask 255.255.255.0 gateway 192.168.3.1 dns-nameservers 192.168.3.1
1.2. Modify the host name:
$vim /etc/hostname
Change the host name to:
ubuntu-master
1.3. Modify the file host for Masters:
$vim /etc/hosts
Append the following information:
192.168.3.150 ubuntu-master 192.168.3.151 ubuntu-son1
1.4. Modify the information of Slave (refer to 1.1-1.3):
Name of Slave: ubuntu-son1
IP of slave: 192.168.3.151
Append the following information to file hosts:
192.168.3.150 ubuntu-master 192.168.3.151 ubuntu-son1
2. Create user and usergroup hadoop
2.1 Create user group hadoop:
2.2 Create user hadoop:
2.3 Add right to user hadoop, edit file ‘/etc/sudoers’ :
Press enter of the above line, it will open file /etc/sudoers. We can add the same rights of root to user hadoop. Add the following line below line “root ALL=(ALL:ALL) ALL”:
hadoop ALL=(ALL:ALL) ALL
Note: The file mode is 0440 for file /etc/sudoers. We need to change it to 0777 using chmod, and change it back to 0440 after we made the above change.
3. Install Java JDK on ubuntu-master and ubuntu-son1
We'd better install JDK8 linux arm, and we tried openjdk-6-jre, but it doesn't work well.
4. Install ssh for ubuntu-master and ubuntu-son1
We use the following command to install ssh service on both Master and Slave:
$sudo apt-get install ssh openssh-server
5. Setup the envirioment to ssh log in without password on Master and Slave
Before we do that, we need to change the user on all nodes to be hadoop.
The command is as below:
$su – hadoop
There are two ways to generate the keys: ras and dsa. By default, we will use rsa.
5.1 use rsa to generate ssh-key:
ssh-keygen -t rsa -P “”
Note: After press ENTER, there will be two files generated under !/.ssh, id_ras and id_ras.pub.
5.2 Add id_rsa.pub into file authorized_keys under ~/.ssh:
$cd ~/.ssh cat id_rsa.pub >> authorized_keys
6. Install hadoop on Master, and it's not needed for Slave
The version we are going to use for hadoop is hadoop-0.23.9.tar.gz as it's proved to be stable.
6.1 Download hadoop and unzip it to directory /usr/local:
$sudo wget http://mirror.bjtu.edu.cn/apache ... adoop-0.23.9.tar.gz $sudo cp hadoop-0.23.9.tar.gz /usr/local/
6.2 Unzip hadoop-0.23.9.tar.gz:
$cd /usr/local $sudo tar -zxf <i><i>hadoop-0.23.9.tar.gz</i></i>
6.3 Change the directory name to hadoop:
$sudo mv hadoop-0.23.9 hadoop
6.4 Change the directory owner to be hadoop:
$sudo chown -R hadoop:hadoop hadoop
6.5 Edit file hadoop/conf/hadoop-env.sh:
$sudo vim hadoop/conf/hadoop-env.sh
6.6 Locate line #export JAVA_HOME=:
Comment out #, and add the path of jdk to it:
$export JAVA_HOME=/usr/lib/jdk/jdk1.8.0
6.7 Edit file conf/core-site.xml
$sudo vim hadoop/conf/core-site.xml
Edit as following:
<!--?xml version=”1.0″?--> <!--?xml-stylesheet type=”text/xsl” href=”configuration.xsl”?--> <!– Put site-specific property overrides in this file. –> fs.default.name hdfs://ubuntu-master:9000
6.8 Edit conf/mapred-site.xml
$sudo vim hadoop/conf/mapred-site.xml
Edit as following:
<!--?xml version=”1.0″?--> <!--?xml-stylesheet type=”text/xsl” href=”configuration.xsl”?--> <!– Put site-specific property overrides in this file. –> mapred.job.tracker ubuntu-master:9001
6.9 Edit conf/hdfs-site.xml
$sudo vim hadoop/conf/hdfs-site.xml
Edit as following:
dfs.name.dir /usr/local/hadoop/datalog1,/usr/local/hadoop/datalog2 dfs.data.dir /usr/local/hadoop/data1,/usr/local/hadoop/data2 dfs.replication 2
6.10 Edit conf/masters, and add ubuntu-master as secondarynamenode
$sudo vim hadoop/conf/masters
6.11 Edit conf/slaves, and add name of slave to it, one line each.
$sudo vim hadoop/conf/slaves
Add the following line to it:
ubuntu-son1
7. Copy files on ubuntu-master to Slave node
7.1 Copy keys:
$scp ~/.ssh/id_rsa.pub hadoop@ubuntu-son1:~/.ssh/
7.2 Copy directory hadoop:
$scp -r /usr/local/hadoop hadoop@ubuntu-son1:/usr/local
As the current users of the two nodes are all hadoop, we cannot directly copy as above. The owner of the directory is root. We need to copy the directory to ~ of Slave as below:
$scp -r /usr/local/hadoop hadoop@ubuntu-son1:~
Then we change the user to be root, and mv to /usr/local, and then change the user to be hadoop.
$cd /usr/local $sudo chown -R hadoop:hadoop hadoop
After we finished the copy, we need to append the keys to the authorized list. We need to repeat this for every slave nodes:
$cat ~/.ssh/id_rsa.pub >> ~/.ssh/authorized_keys
Remember, we need to delete files data1, data2 and logs from the copied directory hadoop.
Now we are done with the environment setup, lets do some testing.
8. Testing
We enter into directory hadoop on Master node:
$cd /usr/local/hadoop
Start all the services:
$./bin/start-all.sh
We can check if the datanode is started or not by:
$jps
We can check the connection status by:
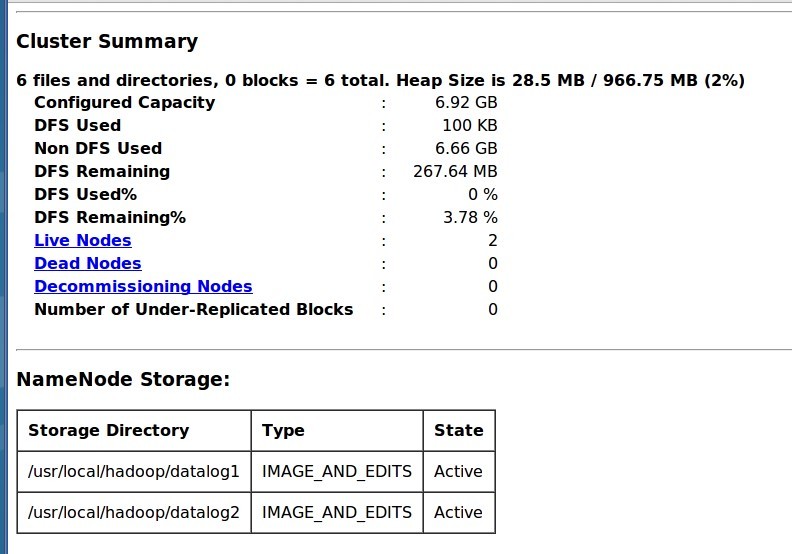
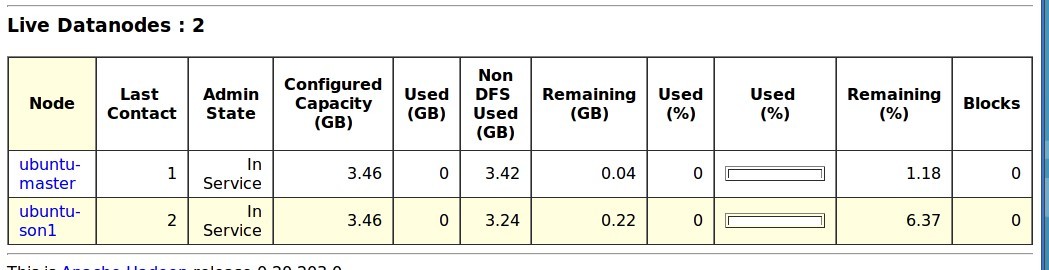
$./bin/hadoop dfsadmin -report
We can also directly visit the website:
http://ubuntu-master:50070