element14 Community
element14 Community
    Register Log In
  • Site
  • Search
  • Log In Register
  • Members
    Members
    • Benefits of Membership
    • Achievement Levels
    • Members Area
    • Personal Blogs
    • Feedback and Support
    • What's New on element14
  • Learn
    Learn
    • Learning Center
    • eBooks
    • STEM Academy
    • Webinars, Training and Events
    • Learning Groups
  • Technologies
    Technologies
    • 3D Printing
    • FPGA
    • Industrial Automation
    • Internet of Things
    • Power & Energy
    • Sensors
    • Technology Groups
  • Challenges & Projects
    Challenges & Projects
    • Design Challenges
    • element14 presents
    • Project14
    • Arduino Projects
    • Raspberry Pi Projects
    • Project Groups
  • Products
    Products
    • Arduino
    • Dev Tools
    • Manufacturers
    • Raspberry Pi
    • RoadTests & Reviews
    • Avnet Boards Community
    • Product Groups
  • Store
    Store
    • Visit Your Store
    • Choose Another Store
      • Europe
      •  Austria (German)
      •  Belgium (Dutch, French)
      •  Bulgaria (Bulgarian)
      •  Czech Republic (Czech)
      •  Denmark (Danish)
      •  Estonia (Estonian)
      •  Finland (Finnish)
      •  France (French)
      •  Germany (German)
      •  Hungary (Hungarian)
      •  Ireland
      •  Israel
      •  Italy (Italian)
      •  Latvia (Latvian)
      •  
      •  Lithuania (Lithuanian)
      •  Netherlands (Dutch)
      •  Norway (Norwegian)
      •  Poland (Polish)
      •  Portugal (Portuguese)
      •  Romania (Romanian)
      •  Russia (Russian)
      •  Slovakia (Slovak)
      •  Slovenia (Slovenian)
      •  Spain (Spanish)
      •  Sweden (Swedish)
      •  Switzerland(German, French)
      •  Turkey (Turkish)
      •  United Kingdom
      • Asia Pacific
      •  Australia
      •  China
      •  Hong Kong
      •  India
      •  Korea (Korean)
      •  Malaysia
      •  New Zealand
      •  Philippines
      •  Singapore
      •  Taiwan
      •  Thailand (Thai)
      • Americas
      •  Brazil (Portuguese)
      •  Canada
      •  Mexico (Spanish)
      •  United States
      Can't find the country/region you're looking for? Visit our export site or find a local distributor.
  • Translate
  • Profile
Personal Blogs
  • Members
  • More
Personal Blogs
Legacy Personal Blogs Seven segment and arduino
  • Blog
  • Documents
  • Mentions
  • Sub-Groups
  • Tags
  • More
  • Cancel
  • New
Blog Post Actions
  • Subscribe by email
  • More
  • Cancel
  • Share
  • Subscribe by email
  • More
  • Cancel
Group Actions
  • Group RSS
  • More
  • Cancel
Engagement
  • Author Author: idanre1
  • Date Created: 7 Mar 2017 12:15 PM Date Created
  • Views 513 views
  • Likes 2 likes
  • Comments 5 comments
Related
Recommended

Seven segment and arduino

idanre1
idanre1
7 Mar 2017

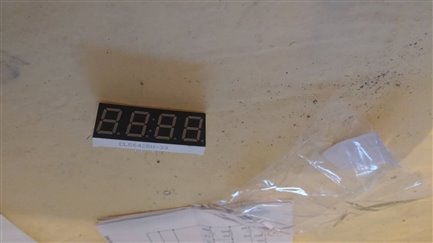
I have bought a 4 digit seven segment module on banggood.

1 Pcs 0.561 Pcs 7-Segment 4 Digit Super Red LED Display Common Anode Time - US$1.79

these things cost about 2$ and i wanted to test if they worth anything.

image


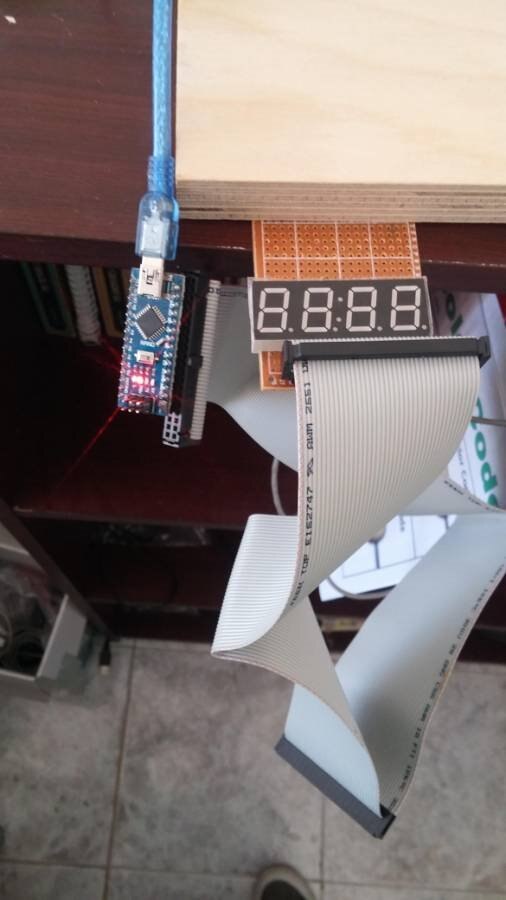
I have decided to connect them to arduino nano in a quick plug and play connection, so that it can be added for existing design using only 1 connector.


The thing about buying from china online is that you not always get what you order.

The module I received is CL5642BH and the module they published is HSX41056K.

So without any schematics i have decided to reverse engineering it using a breadboard.


Apparently the module turned out to be common anode as specified and with pin diagram as in arduino mega - How to wire up 4-digit 7-segment display? - Arduino Stack Exchange


When you google about these displays there is allot on confusion when to put the current limiting resistors, some say in the digits, some in the segments.

Actually I figured it out it can be both ways, only the code of the arduino is changed.


Then I found a nice library to deal with with that really simplifying it all

http://playground.arduino.cc/Main/SevenSegmentLibrary


You can config where you want to put the resistors and if its common anode/cathode or even more complex drivers and it works!

Just by reading the code you can see this lib is great.


Form factor:

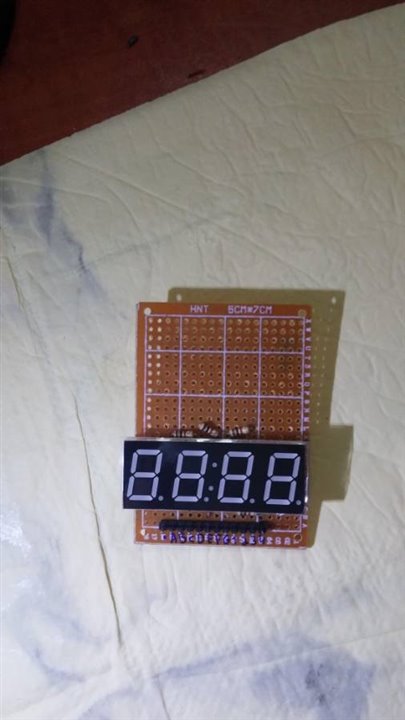
As I mentioned i have decided to make the circuit as compact as possible.

Because of that I put the resistors on the digits (4 instead of 8 resistors) and I used perforated board.


The front side is quite neat, only display and 4 resistors (and connectors)

image


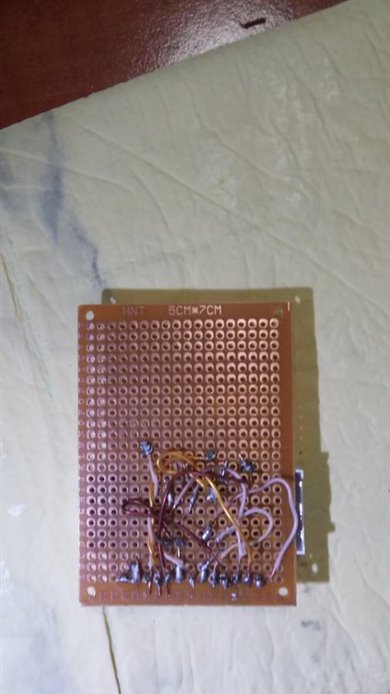
The rear side is quite messy


image


I was using an old IDE connector from an old computer to drive it all from the arduino


image


Open items:

  • The SevSeg library uses loop to always update the leds (kind of a tdma over the leds), I read around there is a was to use charlieplexing for keeping the leds on without the fluctuations.
    Still I didnt find any way to implement it on my display.
    Anyone have an idea?
  • Decreasing cable amount. Is there a module that uses i2c to only take 2 cables out of the arduino onstead of 12 cables?


Video of operation:

You don't have permission to edit metadata of this video.
Edit media
x
image
Upload Preview
image


Idan

  • Sign in to reply

Top Comments

  • c4m4ch0
    c4m4ch0 over 6 years ago +1
    MAX7219 or something like this ?
  • idanre1
    idanre1 over 6 years ago in reply to jc2048 +1
    Hi Im actually use it to display text on a remote vehicle. The sevseg lib can do text also... Actually the brightness can be adjusted. I will paste my code at the buttom. You can also adjust the brightness…
  • jc2048
    jc2048 over 6 years ago in reply to idanre1

    Interesting application. I thought you might be doing a test instrument, or something like that.


    I had imagined it was a traditional scan, where you'd scan the anodes in turn and present the segment drive (in a 1:4 multiplex). If the brightness remains constant, you must be scanning the segments in turn and deciding whether or not to drive the anode (an 1:8 multiplex).


    I don't see that a Charlieplex helps. With the anodes connected, there's no possibility of having diodes back-to-back nor of maximising the connection possibilities between the IO pins, which is where the savings come from.


    I don't have much experience with Arduino programming. Can't you set up a timer to generate an interrupt at regular intervals and use the interrupt routine to drive the display? That way it would be a backgound process and you could do what you like with the rest of your code without it having an impact on the scanning.

    • Cancel
    • Vote Up 0 Vote Down
    • Sign in to reply
    • More
    • Cancel
  • idanre1
    idanre1 over 6 years ago in reply to jc2048

    Hi

    Im actually use it to display text on a remote vehicle.

    The sevseg lib can do text also...


    Actually the brightness can be adjusted. I will paste my code at the buttom.

    You can also adjust the brightness using which resistors values you put in the circuit. Here i have 1k. When i tried 100ohm it was too bright.


    Thanks allot for the i2c extender that what exactly what i wanted.


    Also do you have a clue if i could use charlie plexing? This will decrese mips from the arduino and remove blinking from the display.


    This is my code for now.

    I just changed the pins which i used. And the brightness.

    /* SevSeg Counter Example
    
     Copyright 2017 Dean Reading
    
     Licensed under the Apache License, Version 2.0 (the "License");
     you may not use this file except in compliance with the License.
     You may obtain a copy of the License at 
     http://www.apache.org/licenses/LICENSE-2.0
    
     Unless required by applicable law or agreed to in writing, software
     distributed under the License is distributed on an "AS IS" BASIS,
     WITHOUT WARRANTIES OR CONDITIONS OF ANY KIND, either express or implied.
     See the License for the specific language governing permissions and
     limitations under the License.
    
    
     This example demonstrates a very simple use of the SevSeg library with a 4
     digit display. It displays a counter that counts up, showing deci-seconds.
     */
    
    
    #include "SevSeg.h"
    SevSeg sevseg; //Instantiate a seven segment controller object
    
    
    void setup() {
      byte numDigits = 4;
      byte digitPins[] = {5, 4, 3, 2};
      byte segmentPins[] = {12, 11, 10, 9, 8, 7, 6, 13};
      bool resistorsOnSegments = false; // 'false' means resistors are on digit pins
      byte hardwareConfig = COMMON_ANODE; // See README.md for options
      bool updateWithDelays = false; // Default. Recommended
      bool leadingZeros = false; // Use 'true' if you'd like to keep the leading zeros
      
      sevseg.begin(hardwareConfig, numDigits, digitPins, segmentPins, resistorsOnSegments, updateWithDelays, leadingZeros);
      sevseg.setBrightness(10);
    }
    
    
    void loop() {
      static unsigned long timer = millis();
      static int deciSeconds = 0;
      
      if (millis() >= timer) {
        deciSeconds++; // 100 milliSeconds is equal to 1 deciSecond
        timer += 100; 
        if (deciSeconds == 10000) { // Reset to 0 after counting for 1000 seconds.
          deciSeconds=0;
        }
        sevseg.setNumber(deciSeconds, 1);
      }
    
    
      sevseg.refreshDisplay(); // Must run repeatedly
    }
    
    
    /// END ///

    • Cancel
    • Vote Up +1 Vote Down
    • Sign in to reply
    • More
    • Cancel
  • idanre1
    idanre1 over 6 years ago in reply to c4m4ch0

    This is a whole solution for i2c but in a pretty high price.

    I am looking on a i2c adapter only.

    And that the arduino will actually can have extended io with it.

    • Cancel
    • Vote Up 0 Vote Down
    • Sign in to reply
    • More
    • Cancel
  • jc2048
    jc2048 over 6 years ago

    Good to see you experimenting and working things out for yourself. What are you going to show on the display?


    If you just use the four resistors, doesn't the brightness change depending on how many segments are on?


    You could try an I2C expander like this if you want an I2C connection:


    http://uk.farnell.com/microchip/mcp23017-e-sp/ic-io-expander-16bit-i2c-28dip/dp/1332088


    There's a whole range of them. I think you can get similar parts for SPI, too.


    Alternatively, you could use a microcontroller acting as an I2C slave. Advantage of that is the uC could do the scanning and the Arduino would only need to send data as and when it changed.

    • Cancel
    • Vote Up 0 Vote Down
    • Sign in to reply
    • More
    • Cancel
  • c4m4ch0
    c4m4ch0 over 6 years ago

    MAX7219 or something like this?

    • Cancel
    • Vote Up +1 Vote Down
    • Sign in to reply
    • More
    • Cancel
element14 Community

element14 is the first online community specifically for engineers. Connect with your peers and get expert answers to your questions.

  • Members
  • Learn
  • Technologies
  • Challenges & Projects
  • Products
  • Store
  • About Us
  • Feedback & Support
  • FAQs
  • Terms of Use
  • Privacy Policy
  • Legal and Copyright Notices
  • Sitemap
  • Cookies

An Avnet Company © 2023 Premier Farnell Limited. All Rights Reserved.

Premier Farnell Ltd, registered in England and Wales (no 00876412), registered office: Farnell House, Forge Lane, Leeds LS12 2NE.

ICP 备案号 10220084.

Follow element14

  • Facebook
  • Twitter
  • linkedin
  • YouTube