element14 Community
element14 Community
    Register Log In
  • Site
  • Search
  • Log In Register
  • Community Hub
    Community Hub
    • What's New on element14
    • Feedback and Support
    • Benefits of Membership
    • Personal Blogs
    • Members Area
    • Achievement Levels
  • Learn
    Learn
    • Ask an Expert
    • eBooks
    • element14 presents
    • Learning Center
    • Tech Spotlight
    • STEM Academy
    • Webinars, Training and Events
    • Learning Groups
  • Technologies
    Technologies
    • 3D Printing
    • FPGA
    • Industrial Automation
    • Internet of Things
    • Power & Energy
    • Sensors
    • Technology Groups
  • Challenges & Projects
    Challenges & Projects
    • Design Challenges
    • element14 presents Projects
    • Project14
    • Arduino Projects
    • Raspberry Pi Projects
    • Project Groups
  • Products
    Products
    • Arduino
    • Avnet & Tria Boards Community
    • Dev Tools
    • Manufacturers
    • Multicomp Pro
    • Product Groups
    • Raspberry Pi
    • RoadTests & Reviews
  • About Us
  • Store
    Store
    • Visit Your Store
    • Choose another store...
      • Europe
      •  Austria (German)
      •  Belgium (Dutch, French)
      •  Bulgaria (Bulgarian)
      •  Czech Republic (Czech)
      •  Denmark (Danish)
      •  Estonia (Estonian)
      •  Finland (Finnish)
      •  France (French)
      •  Germany (German)
      •  Hungary (Hungarian)
      •  Ireland
      •  Israel
      •  Italy (Italian)
      •  Latvia (Latvian)
      •  
      •  Lithuania (Lithuanian)
      •  Netherlands (Dutch)
      •  Norway (Norwegian)
      •  Poland (Polish)
      •  Portugal (Portuguese)
      •  Romania (Romanian)
      •  Russia (Russian)
      •  Slovakia (Slovak)
      •  Slovenia (Slovenian)
      •  Spain (Spanish)
      •  Sweden (Swedish)
      •  Switzerland(German, French)
      •  Turkey (Turkish)
      •  United Kingdom
      • Asia Pacific
      •  Australia
      •  China
      •  Hong Kong
      •  India
      • Japan
      •  Korea (Korean)
      •  Malaysia
      •  New Zealand
      •  Philippines
      •  Singapore
      •  Taiwan
      •  Thailand (Thai)
      • Vietnam
      • Americas
      •  Brazil (Portuguese)
      •  Canada
      •  Mexico (Spanish)
      •  United States
      Can't find the country/region you're looking for? Visit our export site or find a local distributor.
  • Translate
  • Profile
  • Settings
Personal Blogs
  • Community Hub
  • More
Personal Blogs
Legacy Personal Blogs Simple I/O control using PYNQ
  • Blog
  • Documents
  • Mentions
  • Sub-Groups
  • Tags
  • More
  • Cancel
  • New
  • Share
  • More
  • Cancel
Group Actions
  • Group RSS
  • More
  • Cancel
Engagement
  • Author Author: Fred27
  • Date Created: 12 May 2020 8:55 PM Date Created
  • Views 5224 views
  • Likes 7 likes
  • Comments 24 comments
  • pynq-z2
  • pynq
  • pynqstarter
Related
Recommended

Simple I/O control using PYNQ

Fred27
Fred27
12 May 2020

I really enjoyed the first PYNQ workshop and also an Embedded Hour session that was a few days later. I thought the best use of time would be to get my head around all the ways you can control the IO on the PYNQ-Z2 board.


We were given an example of using the pattern generator and trance analyzer to toggle a few pins and monitor what happens, but the example given just took some pin names and magically knew how to access them. This example for instance generated output on D0-D2 and monitored D17-D19:

image


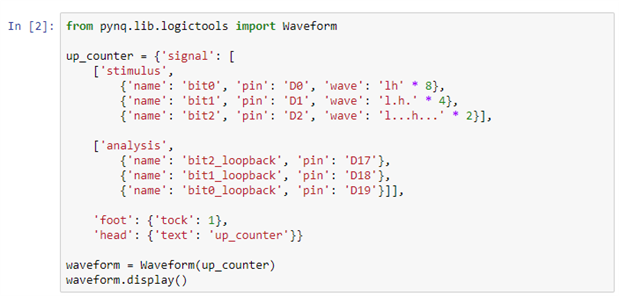
This great if you just want the pattern generator to do the work for you, but what if you want some finer control over these pins? What if you want to communicate with a device over I2C?


There are overlays for a fixed set of Pmod devices but I wanted to go a little off the beaten track and use another device. Well, for this you need to jump into another area of your Jupyter notebook and get familiar with the Microblaze side of things.


Microblaze

Microblaze is an interesting concept. Programming FPGAs is a world away from the probably more familiar world of microcontrollers. FPGAs are really powerful but there are times when a microcontroller is better suited to the job. Now, the Zynq device on the board already has an ARM microntroller inside it, but that's busy running Linux and doing all the stuff that makes PYNQ possible. What if you just need a little bit of precedural microcontroller goodness to help you along? That's where Microblaze comes in. It's a fairly small 16-bit microcontroller that's actually created withing the FPGA fabric.


I must admit it took me a while to find my way around the Microblaze abilities of the PYNQ board. There are a few examples but I couldn't actually find any comprehensive documentation. Under the microblaze_programming notebook I found some useful looking sections such as this:


image

IO on Arduino headers

However, I decided that I wanted to mess with some pins on the Arduino-style header. There were examples for Microblade targetting PMODA and I found another for the Pi pin headers (using %%microblaze base.RPI) and a bit of guesswork lead me to the following for targetting the pins I wanted and flashing an LED attached to pin A5 of the Arduino header:

image

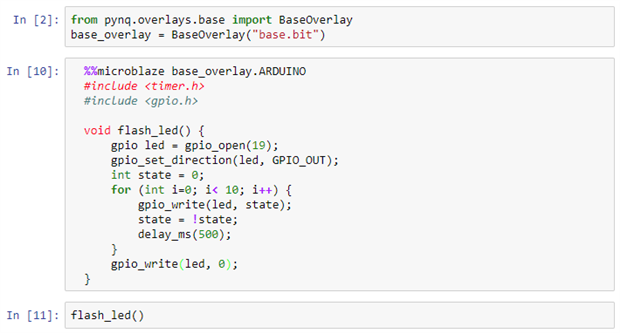
Now, none of this is complicated, but it required some guesswork. Not really complicated quesswork, but guesswork all the same. Considering how well PYNQ is set up to be self-documenting and easy to work with I found this odd. In particular, I found the the A5 pin is referred to as "19" buried in a comment on this page. Other than that though, it was easy enough to create a Microblaze processor and get it running some simple C code - via a Python-based notebook.


I2C on Arduino headers

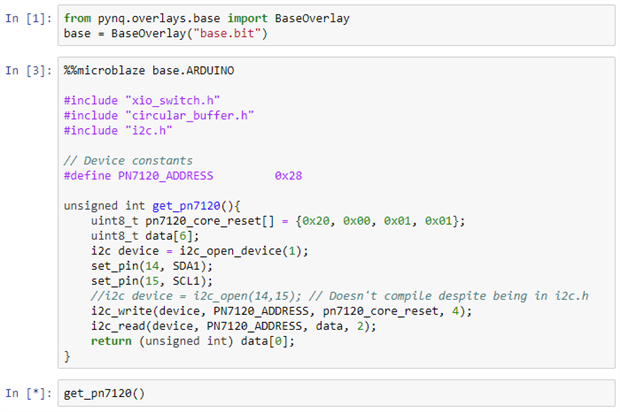
After finding an I2C example on the Raspberry Pi headers, I thought it should be reasonably simple adapting this to some different pins. Unfortunately this wasn't the case. This is the code I came up with, and despite trying lots of variations, whenever I executed the code, it hung. I couldn't see any way to find where it had hung without some clunky pin toggling either.

image


Take off and nuke it from orbit. It's the only way to be sure.

To make things more frustrating it seemed impossible to rest things without powering off the board. Killing the PYNQ Kernel had no effect. In fact, even if you have successful Microblaze code running (such as blinking and LED in an endless loop) there appears to be no way to stop it.


Sorry this blog is not a success story, but I believe in writing things up as they are - good or bad. I'm going to keep on plugging away at this when I get the chance between work and other projects.

  • Sign in to reply

Top Comments

  • Fred27
    Fred27 over 5 years ago in reply to jc2048 +2
    The 0x28 came from some working code from another device (Azure Sphere). That was a great suggestion to use 0x50 but in this case 0x28 was correct. I know some I2C libraries expect the address specified…
  • weiwei2
    weiwei2 over 5 years ago +1
    i am also trying to achieve similar, although i am still testing with other PYNQ board
  • Fred27
    Fred27 over 5 years ago in reply to weiwei2 +1
    I hope my partial success is some help to you. If you make any further progress, be sure to let us know.
Parents
  • Fred27
    Fred27 over 5 years ago

    After more digging I can send something out on the I2C pins without crashing anything. The magic seemed to be using i2c_device 0 and not bothering with set_pins. However what comes out is not valid I2C. It appears to be just one byte roughly resembling the I2C address for both write and for read.


    image

    • Cancel
    • Vote Up +1 Vote Down
    • Sign in to reply
    • More
    • Cancel
  • jc2048
    jc2048 over 5 years ago in reply to Fred27

    Do you have the I2C device actually connected to the pins? If not, it will stop when it doesn't get an ack back at the end of the address.

    • Cancel
    • Vote Up 0 Vote Down
    • Sign in to reply
    • More
    • Cancel
  • Fred27
    Fred27 over 5 years ago in reply to jc2048

    The device is connected and (I believe) properly configured. Not getting an ACK back would fit though.

    • Cancel
    • Vote Up +1 Vote Down
    • Sign in to reply
    • More
    • Cancel
  • jc2048
    jc2048 over 5 years ago in reply to Fred27

    Where did your 0x28 address come from? Was it an actual example intended for this IP block's implementation or did you find it from a software library for some other device?


    The device datasheet says either 0x50 or 0x52 for a write (depends on the select address pin). The 0x50 could be the same as 0x28 [sometimes software libraries treat the address as being an address part that you give them, shifted one left to make room for the r/w bit].


    Further thought. Are you sure this is a master interface? There's a [small] possibility it's a slave [so that you could plug in an Arduino board and have it talk to the FPGA as though the FPGA were its slave peripheral].

    • Cancel
    • Vote Up 0 Vote Down
    • Sign in to reply
    • More
    • Cancel
Comment
  • jc2048
    jc2048 over 5 years ago in reply to Fred27

    Where did your 0x28 address come from? Was it an actual example intended for this IP block's implementation or did you find it from a software library for some other device?


    The device datasheet says either 0x50 or 0x52 for a write (depends on the select address pin). The 0x50 could be the same as 0x28 [sometimes software libraries treat the address as being an address part that you give them, shifted one left to make room for the r/w bit].


    Further thought. Are you sure this is a master interface? There's a [small] possibility it's a slave [so that you could plug in an Arduino board and have it talk to the FPGA as though the FPGA were its slave peripheral].

    • Cancel
    • Vote Up 0 Vote Down
    • Sign in to reply
    • More
    • Cancel
Children
  • Fred27
    Fred27 over 5 years ago in reply to jc2048

    The 0x28 came from some working code from another device (Azure Sphere). That was a great suggestion to use 0x50 but in this case 0x28 was correct. I know some I2C libraries expect the address specified with the trailing bit and some without. i.e. some would append a 0 or 1 to 0x28 to get 0x50 (read) and 0x51 (write). Others would expect the address parameter passed as 0x50.


    It turned out I needed a slightly longer reset pulse and to wait a bit before I sent data and I'm now getting valid I2C data written to the PN7120! Reading is not quite there yet but I think I just need to wait for the device to signal that it's ready before trying to read. Anyway, work calls! I'll have to park it for now but it's always good to put something down knowing you're making progress.


    I can still get the board to lock up though. Maybe there's a limit on how many Microblaze instances can run and I'm creating one each time?

    • Cancel
    • Vote Up +2 Vote Down
    • Sign in to reply
    • More
    • Cancel
  • jc2048
    jc2048 over 5 years ago in reply to Fred27

    That's good. Once you can see things happening on the oscilloscope you've got a good basis for sorting out the rest. I'm always much happier when I get to that point. Good luck with the rest.


    I'm not sure what you're saying about calling instances of Microblaze. It's a processor built out of the logic, so if you called for too many of them to fit it would fail at the synthesis/layout/routing stage, wouldn't it?

    • Cancel
    • Vote Up 0 Vote Down
    • Sign in to reply
    • More
    • Cancel
  • Fred27
    Fred27 over 5 years ago in reply to jc2048

    What I mean is that if I run a section starting "%%microblaze" with an LED blinky, this LED continues to flash even if I change it to something else and run again. I've think I've also seen different behaviour if I run some code, reboot and run the same code again.


    It almost feels like each time you run a microblaze section it spins up another microblaze instance that is never disposed of. Sooner or later the kernel hangs. Of course this could just be my confusion as I'm stumbling around with this.

    • Cancel
    • Vote Up +1 Vote Down
    • Sign in to reply
    • More
    • Cancel
element14 Community

element14 is the first online community specifically for engineers. Connect with your peers and get expert answers to your questions.

  • Members
  • Learn
  • Technologies
  • Challenges & Projects
  • Products
  • Store
  • About Us
  • Feedback & Support
  • FAQs
  • Terms of Use
  • Privacy Policy
  • Legal and Copyright Notices
  • Sitemap
  • Cookies

An Avnet Company © 2025 Premier Farnell Limited. All Rights Reserved.

Premier Farnell Ltd, registered in England and Wales (no 00876412), registered office: Farnell House, Forge Lane, Leeds LS12 2NE.

ICP 备案号 10220084.

Follow element14

  • X
  • Facebook
  • linkedin
  • YouTube