element14 Community
element14 Community
    Register Log In
  • Site
  • Search
  • Log In Register
  • Members
    Members
    • Benefits of Membership
    • Achievement Levels
    • Members Area
    • Personal Blogs
    • Feedback and Support
    • What's New on element14
  • Learn
    Learn
    • Learning Center
    • eBooks
    • STEM Academy
    • Webinars, Training and Events
    • Learning Groups
  • Technologies
    Technologies
    • 3D Printing
    • FPGA
    • Industrial Automation
    • Internet of Things
    • Power & Energy
    • Sensors
    • Technology Groups
  • Challenges & Projects
    Challenges & Projects
    • Design Challenges
    • element14 presents
    • Project14
    • Arduino Projects
    • Raspberry Pi Projects
    • Project Groups
  • Products
    Products
    • Arduino
    • Dev Tools
    • Manufacturers
    • Raspberry Pi
    • RoadTests & Reviews
    • Avnet Boards Community
    • Product Groups
  • Store
    Store
    • Visit Your Store
    • Choose Another Store
      • Europe
      •  Austria (German)
      •  Belgium (Dutch, French)
      •  Bulgaria (Bulgarian)
      •  Czech Republic (Czech)
      •  Denmark (Danish)
      •  Estonia (Estonian)
      •  Finland (Finnish)
      •  France (French)
      •  Germany (German)
      •  Hungary (Hungarian)
      •  Ireland
      •  Israel
      •  Italy (Italian)
      •  Latvia (Latvian)
      •  
      •  Lithuania (Lithuanian)
      •  Netherlands (Dutch)
      •  Norway (Norwegian)
      •  Poland (Polish)
      •  Portugal (Portuguese)
      •  Romania (Romanian)
      •  Russia (Russian)
      •  Slovakia (Slovak)
      •  Slovenia (Slovenian)
      •  Spain (Spanish)
      •  Sweden (Swedish)
      •  Switzerland(German, French)
      •  Turkey (Turkish)
      •  United Kingdom
      • Asia Pacific
      •  Australia
      •  China
      •  Hong Kong
      •  India
      •  Korea (Korean)
      •  Malaysia
      •  New Zealand
      •  Philippines
      •  Singapore
      •  Taiwan
      •  Thailand (Thai)
      • Americas
      •  Brazil (Portuguese)
      •  Canada
      •  Mexico (Spanish)
      •  United States
      Can't find the country/region you're looking for? Visit our export site or find a local distributor.
  • Translate
  • Profile
Personal Blogs
  • Members
  • More
Personal Blogs
Legacy Personal Blogs Tevo Tarantula Prusa i3 Printer - Build - Part 1
  • Blog
  • Documents
  • Mentions
  • Sub-Groups
  • Tags
  • More
  • Cancel
  • New
Blog Post Actions
  • Subscribe by email
  • More
  • Cancel
  • Share
  • Subscribe by email
  • More
  • Cancel
Group Actions
  • Group RSS
  • More
  • Cancel
Engagement
  • Author Author: powderjockey
  • Date Created: 7 Apr 2018 10:47 PM Date Created
  • Views 409 views
  • Likes 6 likes
  • Comments 3 comments
  • 3D Printing
Related
Recommended

Tevo Tarantula Prusa i3 Printer - Build - Part 1

powderjockey
powderjockey
7 Apr 2018

I'm going to try and give the Tevo Tarantula Prusa i3 Printer a bit of a review.  I was kind of looking at getting a 3D printer, but the price of them seemed out of reach. Knowing nothing about 3D printers I would read some posts around the Internet, but nothing serious. I follow a blog at https://tech.scargill.net/. Mr. Scargill started a review on the printer in December of 2017, but had fallen ill and hasn't completed it. It is from his post that I decided to take the plunge and get one of these Tarantulas. I order it just be for Christmas and it arrived the first week of January. It was order from Banggood for $252.00 CAD at the time. I see it is a bit cheaper at the time of this writing.

The printer came well boxed with the inner printer box secured in an outer box. Well taped and marked for shipping. The inside box was also well secured for shipping.

IMG_20180112_144944_hdr

When you go into a store and make a purchase and on the side of the box you see "some assembly required", this is not your Tevo Tarantula. It should say on the box, "assembly required"! This printer is literally in a million pieces. But for the DIY individual this is a piece of cake. There are M3, M4 and M5 screws, "T" nuts, lock nuts and just some of the hardware. Fortunately, Tevo had a plan. There are 3 layers in the boxes. Each layer is very well packed and labelled.

Layer "A"

The top layer in the box is know a Layer "A" as all of the bags and components are marked with an "A".

IMG_20180112_145027_hdr

All of the cables, filament and the heat-bed (Tevo logo on it). The colour of the filament is just whatever they ship. There is no choice in it, you just have to take what you get. As you can see, it appears the top filament my have more than one colour in it.

Layer ”B”

IMG_20180112_145111_hdr

As you can see in the picture, the bags in this layer start with the letter "B". The power supply, 4-stepper motors, Titan Extruder (extra to the regular extruder)

Layer "C"

IMG_20180112_145140_hdr

Frame work and the acrylic pieces to assist in the assembly. The LCD screen and its acrylic framing noted in the bottom right corner. Each of the parts bags contain numerous screw, nuts, washers or wheels depending on the bag number and where you are in the instructions. (the "A" bags don't belong on this layer) Each part of the instructions tend to follow these letterings, right? But not so fast.

The instruction manual was opened and the instructions are not exactly numbered.  The building of dream piece of equipment was about to commence and they were going well until about page 4. Then YouTube became my best friend as I wondered my way through the instruction book. Google "Tevo A-7" and there it is, several YouTube videos on how to install the parts that relate to the bag A-7. This was because back on page 4 the image and the instructions made absolutely no sense at all.

IMG_20180112_145111_hdrIMG_20180112_145140_hdrIMG_20180112_145140_hdrIMG_20180112_145111_hdrIMG_20180112_145305_hdr

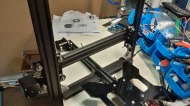
The "Y" axis is built and attached to the belt and motor. I did have the motor on the wrong in this picture and had to swap it to the other end, but this type of mistake happened more than once with the build of the printer. Hence the build took the better part of 4 days.


IMG_20180112_145314_hdrIMG_20180112_150905_hdr

The plastic "L" bracket in the left image broke due to trying to move the x/z axis on the frame, but was replaced with the metal "L" brackets in the right image.

The build seemed to progress quite well throughout the reset of the build. Each of the instructions/bag numbers was also watched with the YouTube video which opened  up a much better understanding on exactly how to build it properly. Watching the video saved me sometime in the end. I would highly recommend watching this video https://www.youtube.com/watch?v=_0F4T4aBN8c&t=3929s prior to and while building your Tevo Tarantula. This video does a few things in different order and makes the build make much more sense.


IMG_20180112_160957_hdrIMG_20180128_135238IMG_20180128_135210

Once the printer itself was built, there was the wiring to be done. In Part 2, I'll go thru the wiring to the main circuit board from the various components on the printer.

  • Sign in to reply

Top Comments

  • three-phase
    three-phase over 5 years ago +1
    Great start to your review, look forward to reading future blogs. Kind regards
  • neilk
    neilk over 5 years ago +1
    Very interesting, Scott, and a very economically priced unit. I look forward to seeing the next instalment Neil
  • neilk
    neilk over 5 years ago

    Very interesting, Scott, and a very economically priced unit.


    I look forward to seeing the next instalment


    Neil

    • Cancel
    • Vote Up +1 Vote Down
    • Sign in to reply
    • More
    • Cancel
  • three-phase
    three-phase over 5 years ago

    Great start to your review, look forward to reading future blogs.


    Kind regards

    • Cancel
    • Vote Up +1 Vote Down
    • Sign in to reply
    • More
    • Cancel
  • genebren
    genebren over 5 years ago

    Scott,

    Very interesting blog.  I too, have been interested in getting started in 3D printing.  This looks like it might be an excellent choice for me.  I look forward to your future updates and hopefully learning a lot from your blogs.

    Thanks for sharing!

    Gene

    • Cancel
    • Vote Up 0 Vote Down
    • Sign in to reply
    • More
    • Cancel
element14 Community

element14 is the first online community specifically for engineers. Connect with your peers and get expert answers to your questions.

  • Members
  • Learn
  • Technologies
  • Challenges & Projects
  • Products
  • Store
  • About Us
  • Feedback & Support
  • FAQs
  • Terms of Use
  • Privacy Policy
  • Legal and Copyright Notices
  • Sitemap
  • Cookies

An Avnet Company © 2023 Premier Farnell Limited. All Rights Reserved.

Premier Farnell Ltd, registered in England and Wales (no 00876412), registered office: Farnell House, Forge Lane, Leeds LS12 2NE.

ICP 备案号 10220084.

Follow element14

  • Facebook
  • Twitter
  • linkedin
  • YouTube