element14 Community
element14 Community
    Register Log In
  • Site
  • Search
  • Log In Register
  • Community Hub
    Community Hub
    • What's New on element14
    • Feedback and Support
    • Benefits of Membership
    • Personal Blogs
    • Members Area
    • Achievement Levels
  • Learn
    Learn
    • Ask an Expert
    • eBooks
    • element14 presents
    • Learning Center
    • Tech Spotlight
    • STEM Academy
    • Webinars, Training and Events
    • Learning Groups
  • Technologies
    Technologies
    • 3D Printing
    • FPGA
    • Industrial Automation
    • Internet of Things
    • Power & Energy
    • Sensors
    • Technology Groups
  • Challenges & Projects
    Challenges & Projects
    • Design Challenges
    • element14 presents Projects
    • Project14
    • Arduino Projects
    • Raspberry Pi Projects
    • Project Groups
  • Products
    Products
    • Arduino
    • Avnet Boards Community
    • Dev Tools
    • Manufacturers
    • Multicomp Pro
    • Product Groups
    • Raspberry Pi
    • RoadTests & Reviews
  • Store
    Store
    • Visit Your Store
    • Choose another store...
      • Europe
      •  Austria (German)
      •  Belgium (Dutch, French)
      •  Bulgaria (Bulgarian)
      •  Czech Republic (Czech)
      •  Denmark (Danish)
      •  Estonia (Estonian)
      •  Finland (Finnish)
      •  France (French)
      •  Germany (German)
      •  Hungary (Hungarian)
      •  Ireland
      •  Israel
      •  Italy (Italian)
      •  Latvia (Latvian)
      •  
      •  Lithuania (Lithuanian)
      •  Netherlands (Dutch)
      •  Norway (Norwegian)
      •  Poland (Polish)
      •  Portugal (Portuguese)
      •  Romania (Romanian)
      •  Russia (Russian)
      •  Slovakia (Slovak)
      •  Slovenia (Slovenian)
      •  Spain (Spanish)
      •  Sweden (Swedish)
      •  Switzerland(German, French)
      •  Turkey (Turkish)
      •  United Kingdom
      • Asia Pacific
      •  Australia
      •  China
      •  Hong Kong
      •  India
      •  Korea (Korean)
      •  Malaysia
      •  New Zealand
      •  Philippines
      •  Singapore
      •  Taiwan
      •  Thailand (Thai)
      • Americas
      •  Brazil (Portuguese)
      •  Canada
      •  Mexico (Spanish)
      •  United States
      Can't find the country/region you're looking for? Visit our export site or find a local distributor.
  • Translate
  • Profile
  • Settings
Personal Blogs
  • Community Hub
  • More
Personal Blogs
Legacy Personal Blogs Third Year Systems Project - 4: Sensor Readings
  • Blog
  • Documents
  • Mentions
  • Sub-Groups
  • Tags
  • More
  • Cancel
  • New
  • Share
  • More
  • Cancel
Group Actions
  • Group RSS
  • More
  • Cancel
Engagement
  • Author Author: djfraz
  • Date Created: 19 Oct 2017 12:14 PM Date Created
  • Views 461 views
  • Likes 2 likes
  • Comments 2 comments
Related
Recommended

Third Year Systems Project - 4: Sensor Readings

djfraz
djfraz
19 Oct 2017

As part of the project we need to have a visual c# program read a sensor connected to the MBed. The sensor we decided to use was the Adafruit TCS34725 Colour Sensor, as we already have the colour sensor working on the mbed all we needed to do was to set up the program to read the serial in line and respond to the command sent from the c# application when it wants to receive the data.


The basic c++ source for the MBed looks like this;

#include "mbed.h"


Serial pc(USBTX, USBRX);


int main() {
    
    while(1) {
        if (pc.readable()){
                char Data_in = pc.getc();
                
                switch(Data_in){
                    case 'R' : /*Do Something*/ break;
                    }
        }
            
    }
}


using the case statement to decode the input allows us to add more functionality to the source if we want to read other sensors, we will just create more functions to read the sensor and return the values in a way for us to decode them in the c# application. The Data returned from the MBed is in the form [Red<space>Green<space>Blue<space>Clear<newline>].


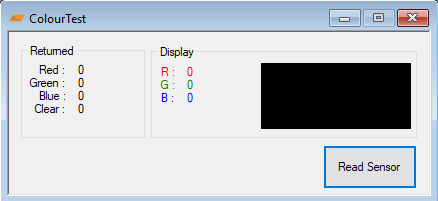
The application is simple;

image

and the source for reading the sensor, when "Read Senor" button is clicked;

private void BTN_Read_Click(object sender, EventArgs e)
        {
            string Data_In = null;
            
            try
            {
                serial.WriteLine("R");
                Data_In = serial.ReadLine();
            }
            catch (TimeoutException)
            {
                MessageBox.Show("ERROR: Timeout");
            }
            catch (InvalidOperationException)
            {
                MessageBox.Show("ERROR: Open Serial Port");
            }
            
            string[] in_Data = Data_In.Split(' ');


            int W_col = int.Parse(in_Data[3]);
            
            float R_col = (float.Parse(in_Data[0]) * 255) / W_col;
            float G_col = (float.Parse(in_Data[1]) * 255) / W_col;
            float B_col = (float.Parse(in_Data[2]) * 255) / W_col;


            LBL_Red.Text = in_Data[0];
            LBL_Green.Text = in_Data[1];
            LBL_Blue.Text = in_Data[2];
            LBL_Clear.Text = in_Data[3];


            int R = (int)R_col;
            int G = (int)G_col;
            int B = (int)B_col;


            LBL_Col_red.Text = R.ToString();
            LBL_Col_Green.Text = G.ToString();
            LBL_Col_Blue.Text = B.ToString();


            Color sample_Colour = new Color();
            sample_Colour = Color.FromArgb(R, G, B);
            TXT_Colour.BackColor = sample_Colour;
            
        }


in the try catch block we attempt to send the command to the MBed, two catch exceptions were added; the first is for the COM port read timeout, the second for if the COM Port is closed.

The line

string[] in_Data = Data_In.Split(" ");

is used to take the input and split it into an array, using the <space> in between the values. The data in the array can then be manipulated.


The labels in the Returned group box will be updated with the raw value from the serial data.

To make the application a little more interesting a textbox is updated with the colour from the sensor. As the  max value of the sensor is 2^16 (65,536) and the FromARGB method only takes a byte (255) as an input we need to multiply the data by 255 and divide by the clear value.


FromARGB then produces a new colour object which we set to the backcolor property of the text box.

and the result is

image


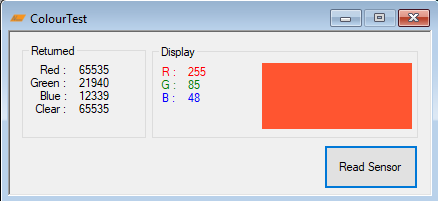
The colours seam to be a tad off, think it will probably be due to fluctuations in the sensor. Might be worth while averaging the sensor reading and returning the average, but for now i think it's close enough to complete this week's deliverable.

  • Sign in to reply

Top Comments

  • DAB
    DAB over 7 years ago +1
    When you use color sensors, you also have to have a good light source. If you check the data sheet, they usually will provide the readings for a certain type of illumination source. To calibrate your sensor…
  • djfraz
    djfraz over 7 years ago in reply to DAB

    The adafruit board we are using has a built-in LED. I think that the guys have done some calibration on the MBed, but for me to get the software finished I hook up one to my arduino, and just dumping the raw data function from the sensor library to serial port. It may be what is causing the slight error in the colour produced, or it may be using the clear value to convert to a byte, or it may even be that my monitors colour are a bit off. Might even be worth will chopping off the LSB of the data just to remove the lower values.


    I'm just happy that i can hold up a red object to the sensor and the textbox looks red.

    • Cancel
    • Vote Up 0 Vote Down
    • Sign in to reply
    • More
    • Cancel
  • DAB
    DAB over 7 years ago

    When you use color sensors, you also have to have a good light source.


    If you check the data sheet, they usually will provide the readings for a certain type of illumination source.


    To calibrate your sensor, either use a calibrated light source or known reflective surfaces so that you can see how your existing light source reacts to known colors.


    After that, you can then plug in adjustments over the color ranges you are interested in.


    DAB

    • Cancel
    • Vote Up +1 Vote Down
    • Sign in to reply
    • More
    • Cancel
element14 Community

element14 is the first online community specifically for engineers. Connect with your peers and get expert answers to your questions.

  • Members
  • Learn
  • Technologies
  • Challenges & Projects
  • Products
  • Store
  • About Us
  • Feedback & Support
  • FAQs
  • Terms of Use
  • Privacy Policy
  • Legal and Copyright Notices
  • Sitemap
  • Cookies

An Avnet Company © 2025 Premier Farnell Limited. All Rights Reserved.

Premier Farnell Ltd, registered in England and Wales (no 00876412), registered office: Farnell House, Forge Lane, Leeds LS12 2NE.

ICP 备案号 10220084.

Follow element14

  • X
  • Facebook
  • linkedin
  • YouTube