


Introduction
We’re all quite excited about our new Formula AllCode robot buggy, which is now in production. We should receive stock before the end of January and can’t wait to let it loose on the world!
Our robot can be programmed using a wide range of programming languages on a number of different platforms using a standard set of commands, collectively known as the Application Programming Interface (or API for short).
We’re starting to expand the tools we are supporting. We already have a Windows DLL which can be used with many Windows-based programming languages such as LabView, C# and Visual Basic. Android applications can easily be created using App Inventor, and we are developing solutions for iOS tablets/phones, Raspberry Pis, and more.
The API
The commands in the preliminary API can be seen below.
Connection
ComOpen
ComClose
ComQuery
ComFindFirst
LED/Speaker
LEDWrite
LEDOn
LEDOff
PlayNote
Motors
SetMotors
Forwards / FD / FW
Backwards / BD / BW
Left / LT
Right / RT
SetLogoSpeed
EncoderReset
EncoderRead
Sensors
ReadSwitch
ReadIR
ReadLine
ReadLight
ReadMic
ReadAxis
ReadBearing
LCD
LCDClear
LCDPrint
LCDNumber
LCDPixel
LCDLine
LCDRect
LCDBacklight
LCDVerbose
Servo
ServoEnable
ServoDisable
ServoSetPos
ServoAutoMove
ServoMoveSpeed
SD card
CardInit
CardCreate
CardOpen
CardDelete
CardWriteByte
CardReadByte
CardRecordMic
CardPlayback
CardBitmap
One of the languages we are keen to support is Python and I spent a few hours this week playing around with this language. I’ve done a few things in Python before, mainly on a Raspberry Pi (things like interfacing the RPi to our E-Blocks), but I’m certainly no expert. However, as a language it is simple to use and is easy to set up.
Set up
After installing Python 3.5 and the PySerial library on my Windows 10 PC, I then paired the robot with the PC. This was simple via the “Manage Bluetooth Devices” settings in Windows. Once paired, a “virtual” serial link (COM port) is made between the PC and the robot and I made a note of the COM port that had been created (in my case, it was 21). Pairing only needs to happen once.
Python Shell
Before creating programs, I wanted to experiment with communicating to Formula AllCode using commands directly typed into the Python Shell. My first task was to connect to the robot with the Python Shell using IDLE by importing the pySerial library and opening the virtual COM port with the correct baud rate (115200). Once connected, the blue LED on the buggy will stay constant and commands from the API can be sent. My first was to set the LEDs at the front of the robot.
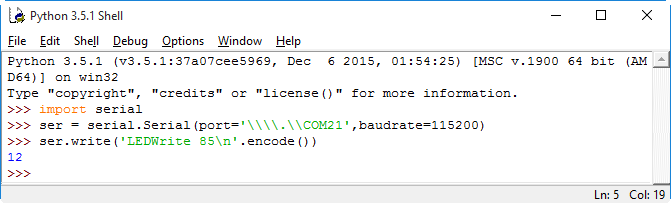
The three commands may need a little explaining:
import serial
This simply imports the pySerial library into Python so the commands can be used.
ser = serial.Serial(port='\\\\.\\COM21',baudrate=115200)
Use this command to open the virtual COM port at the appropriate baudrate. Note the format of the string for “port” – this gets around a quirk in the operating system and allows the full range of COM ports to be accessed. The returned object (“ser”) can now be used to communicate with the robot.
ser.write('LEDWrite 85\n'.encode())
This sends our first command to the robot. Note that each command needs to end with a ‘\n’ (newline) character. Another thing to be aware of is Python uses Unicode strings internally which are not suitable for the robot which expects a “byte string”. The “.encode()” function performs this conversion.
The “12” that appears after the ser.write command is the return from the command, which is the number of bytes written (including the newline).
Similar commands can be executed from the Python Shell:
ser.write('Forwards 100\n'.encode())
ser.write('PlayNote 50,100\n'.encode())
My first programs
To create and run a new program, select “File…New File” from the Python menu, type in your program in the new window and then press F5 (or select “Run…Run Module” in the menu). My first program was pretty tame, and hopefully it is self-explanatory:
#Example 1: simple LED flasher
import serial
import time
ser = serial.Serial(port='\\\\.\\COM21')
count = 4
while count > 0:
ser.write("LEDWrite 255\n".encode())
time.sleep(.5)
ser.write("LEDWrite 0\n".encode())
time.sleep(.5)
count = count - 1
Of course, a robot buggy that does not move is like a kettle made of chocolate – so my next program was to get some movement. This program makes the robot to move in a square:
#Example 2: drive in a square
import serial
import time
ser = serial.Serial(port='\\\\.\\COM21')
count = 4
while count > 0:
ser.write("Forwards 100\n".encode())
time.sleep(.5)
ser.write("Left 90\n".encode())
time.sleep(.5)
count = count - 1
My third program introduced sensors, making the robot wiggle when the light level drops (e.g. when someone goes near it).
#Example 3: React to drop in light level
import serial
import time
ser = serial.Serial(port='\\\\.\\COM21')
while 1:
ser.write("ReadLight\n".encode())
base_val = int(ser.readline().rstrip())
in_val = base_val
while in_val > base_val*.9:
ser.write("ReadLight\n".encode())
in_val = int(ser.readline().rstrip())
ser.write("SetMotors 100,-100\n".encode())
time.sleep(.2)
ser.write("SetMotors -100,100\n".encode())
time.sleep(.2)
ser.write("SetMotors 100,-100\n".encode())
time.sleep(.2)
ser.write("SetMotors -100,100\n".encode())
time.sleep(.2)
ser.write("SetMotors -0,0\n".encode())
The command to read the sensor value back may need some explaining: the “readline” reads the raw string back, “rstrip” is used to remove any trailing white space (e.g. line feeds and carriage returns) and “int” converts it to an integer.
Creating a library
Writing commands using pySerial is ok, but the commands look more complex than they need to – especially when reading sensor values. To overcome this, we have developed a Python library for the Formula AllCode robot which will be available in January to coincide with its launch.
To give an idea of the improvement, the following Python program does the same thing as Example 3 above using the library:
#Example 4: React to drop in light using library
import time
import FA
FA.ComOpen(21)
while 1:
base_val = FA.ReadLight()
in_val = base_val
while in_val > base_val*.9:
in_val = FA.ReadLight()
FA.SetMotors(100,-100)
time.sleep(.2)
FA.SetMotors(-100,100)
time.sleep(.2)
FA.SetMotors(100,-100)
time.sleep(.2)
FA.SetMotors(-100,100)
time.sleep(.2)
FA.SetMotors(-0,0)
Unfortunately, I have to get back to work now…
Playing with the Formula AllCode robot was great fun and I could have done it all day, but unfortunately there’s some “real” work to do. I’ve played with many different robot buggies over the years but our new one is genuinely different and exciting.
Python is becoming increasingly popular and justifiably so. It has some quirks (what programming language doesn’t?), but the combination of readable code and a powerful command line interface mean it’s very easy to pick up.
Having it work so simply with our robot provides a hugely motivating platform for novices to begin their first steps in programming. Even relatively experienced coders like me will find it difficult to get back to more mundane projects.
But it doesn’t stop with Python. Our robot is called “Formula AllCode” because you can use it on many different platforms in many different programming languages. Once you have mastered controlling it in Python, why not try C# or Java? Or graphical programming languages like App Inventor or Flowcode?
It really is a great way to learn robotics and programming your way.
