element14 Community
element14 Community
    Register Log In
  • Site
  • Search
  • Log In Register
  • Community Hub
    Community Hub
    • What's New on element14
    • Feedback and Support
    • Benefits of Membership
    • Personal Blogs
    • Members Area
    • Achievement Levels
  • Learn
    Learn
    • Ask an Expert
    • eBooks
    • element14 presents
    • Learning Center
    • Tech Spotlight
    • STEM Academy
    • Webinars, Training and Events
    • Learning Groups
  • Technologies
    Technologies
    • 3D Printing
    • FPGA
    • Industrial Automation
    • Internet of Things
    • Power & Energy
    • Sensors
    • Technology Groups
  • Challenges & Projects
    Challenges & Projects
    • Design Challenges
    • element14 presents Projects
    • Project14
    • Arduino Projects
    • Raspberry Pi Projects
    • Project Groups
  • Products
    Products
    • Arduino
    • Avnet Boards Community
    • Dev Tools
    • Manufacturers
    • Multicomp Pro
    • Product Groups
    • Raspberry Pi
    • RoadTests & Reviews
  • Store
    Store
    • Visit Your Store
    • Choose another store...
      • Europe
      •  Austria (German)
      •  Belgium (Dutch, French)
      •  Bulgaria (Bulgarian)
      •  Czech Republic (Czech)
      •  Denmark (Danish)
      •  Estonia (Estonian)
      •  Finland (Finnish)
      •  France (French)
      •  Germany (German)
      •  Hungary (Hungarian)
      •  Ireland
      •  Israel
      •  Italy (Italian)
      •  Latvia (Latvian)
      •  
      •  Lithuania (Lithuanian)
      •  Netherlands (Dutch)
      •  Norway (Norwegian)
      •  Poland (Polish)
      •  Portugal (Portuguese)
      •  Romania (Romanian)
      •  Russia (Russian)
      •  Slovakia (Slovak)
      •  Slovenia (Slovenian)
      •  Spain (Spanish)
      •  Sweden (Swedish)
      •  Switzerland(German, French)
      •  Turkey (Turkish)
      •  United Kingdom
      • Asia Pacific
      •  Australia
      •  China
      •  Hong Kong
      •  India
      •  Korea (Korean)
      •  Malaysia
      •  New Zealand
      •  Philippines
      •  Singapore
      •  Taiwan
      •  Thailand (Thai)
      • Americas
      •  Brazil (Portuguese)
      •  Canada
      •  Mexico (Spanish)
      •  United States
      Can't find the country/region you're looking for? Visit our export site or find a local distributor.
  • Translate
  • Profile
  • Settings
Personal Blogs
  • Community Hub
  • More
Personal Blogs
Legacy Personal Blogs Vintage Turntable repair: Can I fix a Perpetuum Ebner from 1958 - part 7 - Make Speed Sensor from Scrap Parts
  • Blog
  • Documents
  • Mentions
  • Sub-Groups
  • Tags
  • More
  • Cancel
  • New
  • Share
  • More
  • Cancel
Group Actions
  • Group RSS
  • More
  • Cancel
Engagement
  • Author Author: Jan Cumps
  • Date Created: 8 Mar 2015 10:00 AM Date Created
  • Views 1071 views
  • Likes 1 like
  • Comments 2 comments
  • hercules_launchpad
  • duty_cycle
  • audio
  • hack
  • vintage
  • turntable
  • internet_of_things
  • arm_cortex
  • motor_control_kit
  • texas_instruments
  • motor_control
  • ir
  • detect
  • shield
  • motor
  • arduino
  • speed
  • sensor
  • streaming
Related
Recommended

Vintage Turntable repair: Can I fix a Perpetuum Ebner from 1958 - part 7 - Make Speed Sensor from Scrap Parts

Jan Cumps
Jan Cumps
8 Mar 2015

What happened before:


For almost a year I have a vintage turntable from Perpetuum Ebner at home.

It's not mine. It belongs to someone that asked me to fix it. And it turned out that fixing the motor would cost too much.

I asked the owner to collect the tt. That hasn't happened yet and the machine is collecting dust at my home.


So I'll take the freedom to attempt a non-intrusive repair with modern components. I'm also thinking about making it an Enchanted Objects Design Challenge.


In post 1 I present the turntable, talk about my previous repair attempts and brainstorm on some modding ideas.
In post 2 I'm measuring up the different gears, pulleys and wheels, and I calculate the speed of the original motor.

Post 3 is the first post on motor control. I'm reviewing the operation of the Infineon DC Motor Control Shield.

In post number 4  I'm using the enhanced PWM module of my The specified item was not found. Hercules LaunchPad to test drive the motor.

The table is spinning for the first time in post 5.

In post 6, I put it all together. I now have a turntable that works, with PWM speed regulation.


In this article I'm creating a sensor to measure the motor speed. That's the first step to get constant speed control.


image


Where can I measure speed?

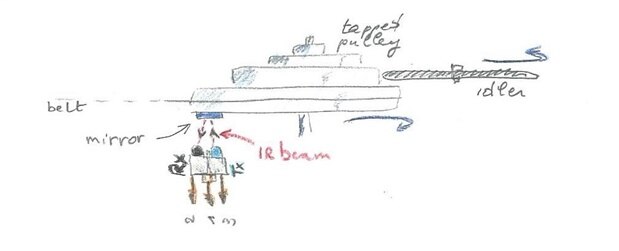
There are many ways to measure the speed of this turntable. There's at least 5 parts that I can use: the motor, the belt, the tapped pully, the idler wheel or the platter.

I try to keep things simple for myself. Three of the options should always move at a constant speed, regardless of the platter speed: the motor, the belt and the tapped pulley.

And that tapped pulley is the easiest of those three. It's got a flat surface at the back, there's room there to place a sensor, and there are good sensor mounting options at the right place.


Sensors

My sensor bin is empty at the moment. I used the last one in the coin detector of a drink dispenser.

I checked my pile of discarded gear, and picked up a defect video player. These have a significant amount of mechanics in them. They're good for sensor harvesting.

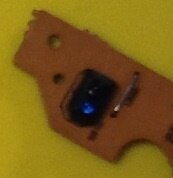
And I wasn't disappointed: IR transmitters and receivers (some mounted in a plastic holder), an opto-coupler with gap (could be handy if I decide to measure the belt speed), and a device I haven't found any info on.


image


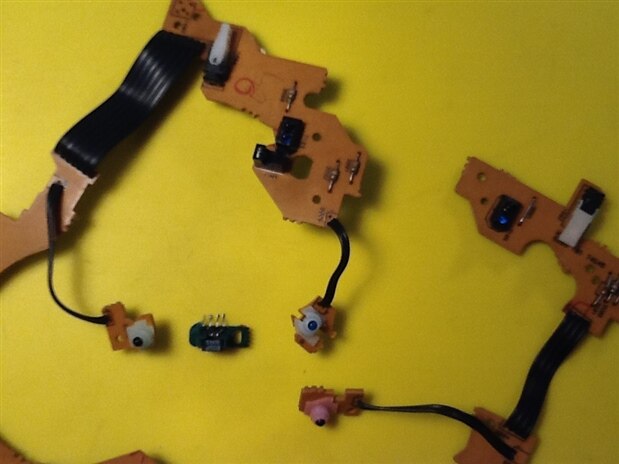
So that means that I can once again choose the simplest option. And that's one of those IR LED pairs mounted in plasic.


image


The combination of these two simplest options gives this possible solution:

make a small part of the backside of the pulley reflective with a tiny mirror, and mount the sensor pair close to it.

If I reuse the original PCB, I can use that as mounting point.


image


I tested this, and it works really well in practice.

I get a nice pulse without bounce using this simple schematic:


image

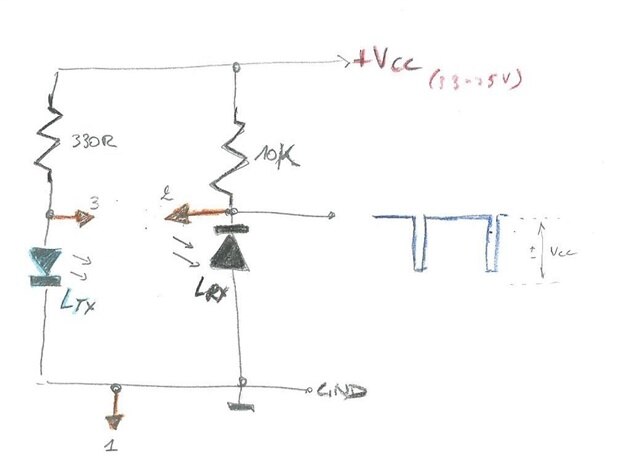
The resistors have rough values here. They are the 330 Ohm and 10K ones that come with the typical Arduino kits.

I tested with 5V. I'll recalculate them when I adapt the circuit to 3.3V.

Here's what the output looks like on an oscilloscope. The measurement was done with the circuit taped in place and the motor spinning:


image


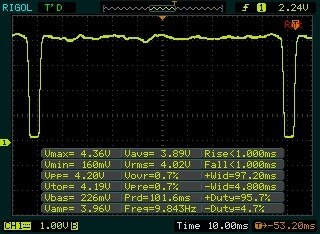
This signal is clean enough. I am going to use the eCAP (enhanced capture) module of the Hercules Launchpad to measure the speed and use it as the feedback data.

The firmware has to complete the controlled loop: a continuous check of measuring the speed and adjusting the motor driver signal.


This video is unavailable.
You don't have permission to edit metadata of this video.


Related posts
Vintage Turntable repair: Can I fix a Perpetuum Ebner from 1958 - part 1
Vintage Turntable repair: Can I fix a Perpetuum Ebner from 1958 - part 2 - Calculating the Motor Speed
Vintage Turntable repair: Can I fix a Perpetuum Ebner from 1958 - part 3 - Infineon Motor Driver shield
Vintage Turntable repair: Can I fix a Perpetuum Ebner from 1958 - part 4 - Hercules LaunchPad Enhanced PWM try-out
Vintage Turntable repair: Can I fix a Perpetuum Ebner from 1958 - part 5 - Yes I Can
Vintage Turntable repair: Can I fix a Perpetuum Ebner from 1958 - part 6 - Speed Adjustment with Variable Duty Cycle
Vintage Turntable repair: Can I fix a Perpetuum Ebner from 1958 - part 8 - Sample the Motor Speed with Microcontroller
  • Sign in to reply

Top Comments

  • DAB
    DAB over 10 years ago +1
    Nice solution, much better than a phased locked loop. Using recycled sensors is a very good choice. They are inexpensive and usually pretty good quality. DAB
  • Jan Cumps
    Jan Cumps over 10 years ago in reply to DAB

    Thanks!

    I managed to record the speed of the pulley with a microcontroller today.


    image

    There's a slight difference between the values of the scope and controller, but that is comfortably below the threshold for my application.

    In essence, all electronic work is now finished. The rest I'll need to do in the firmware.

    The scope signal is the inverse of the one in the blog post because I put a single transistor buffer between IR detector and microcontroller input.

    • Cancel
    • Vote Up 0 Vote Down
    • Sign in to reply
    • More
    • Cancel
  • DAB
    DAB over 10 years ago

    Nice solution, much better than a phased locked loop.


    Using recycled sensors is a very good choice.  They are inexpensive and usually pretty good quality.


    DAB

    • Cancel
    • Vote Up +1 Vote Down
    • Sign in to reply
    • More
    • Cancel
element14 Community

element14 is the first online community specifically for engineers. Connect with your peers and get expert answers to your questions.

  • Members
  • Learn
  • Technologies
  • Challenges & Projects
  • Products
  • Store
  • About Us
  • Feedback & Support
  • FAQs
  • Terms of Use
  • Privacy Policy
  • Legal and Copyright Notices
  • Sitemap
  • Cookies

An Avnet Company © 2025 Premier Farnell Limited. All Rights Reserved.

Premier Farnell Ltd, registered in England and Wales (no 00876412), registered office: Farnell House, Forge Lane, Leeds LS12 2NE.

ICP 备案号 10220084.

Follow element14

  • X
  • Facebook
  • linkedin
  • YouTube