


Good day folks!!!
I know......I know......It has been very late since the last blog.....but we're back in to action. Having received the kit very late, we are having a minor setback compared to other comrades. Never the less, I would like to thank Element 14, Rasp pi and Matlab for providing such an opportunity for all the students interested to learn something and something productive. Below is the picture showing the un-boxing of the kit..................................................

Coming to the part of getting started with the Rasp pi, it was made very easy and understandable by the Matlab and Simulink community and was hassle free. I recommend following these instructions to getting an intro about setting up Rasp pi in Matlab and Simulink. You will find that it is far more easier to set up and get started with Rasp pi using Matlab than to do it independently.
Please follow the links given above as they are self-sufficient in making you understand the how-to of Rasp pi.
I have divided the project in to 6 phases:
1. Setting up and checking the availability.
This phase includes Setting up Rasp pi and procuring the components needed.
We are now currently at Phase 1 and the procurement of components and sensors is done.
We are using Pi camera for tracking an object and getting the feed about the distance from a distance sensor ( Sharp IR- GP2Y0A710K0F)
The picture showing the setting up of Rasp pi is shown below:

Please find the link or the pdf attached for accessing the datasheet and the manual of the mentioned distance sensor.
Having observed the distance vs output analog voltage of the given sensor, we notice that initially when the obstacle is touching the sensor, as it moves farther away from the sensor till 92-100 cm, the output voltage increases till a specific value and from 100 cm to 500 cm its value decreases in equal steps i.e. uniformly.
In the manual is given an approximation formula to calculate the distance from the output analog voltage of the sensor, which is also shown below.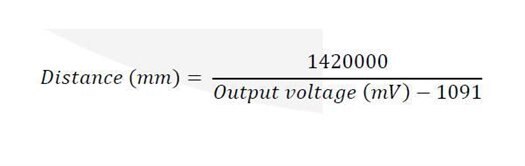
Coming to the Pi camera, again I am greatly thankful to Matlab community for having simplified the process of performing image and video manipulations with Pi camera and many examples can be found in Matlab and Rasp pi community.
2. Testing and Calibration.
This phase includes the testing of individual Sensors and other electronics to ensure that each sensor is working properly.
Calibration of the distance sensor is the crucial part of this phase. The distance-varying analog output of the distance sensor has to be manipulated to get the exact values of the distance.
3. Developing modules and coding them respectively.
This phase involves making the project modular to make it easier to operate and easier to code.
4. Integrate the modules.
This is the most important phase which involves connecting and interfacing all the modules to complete the project of Virtual eye system as a whole.
5. Rigorous testing and removing errors.
This phase involves the process of testing to remove bugs and make the process as efficient as possible.
6. Scope for project enhancement.
This phase involves making any upgrades to improve the functionality of the project and make it more usable and incorporate additional capabilities like using a Pi-Noir camera for night vision and mapping.
These phases are scheduled all along the month of August till the starting week of September which will be updated weekly. Stay tuned for witnessing the idea transforming into product in the upcoming phases of development.
| GP2Y0A710K0F.pdf | |


Top Comments