element14 Community
element14 Community
    Register Log In
  • Site
  • Search
  • Log In Register
  • Community Hub
    Community Hub
    • What's New on element14
    • Feedback and Support
    • Benefits of Membership
    • Personal Blogs
    • Members Area
    • Achievement Levels
  • Learn
    Learn
    • Ask an Expert
    • eBooks
    • element14 presents
    • Learning Center
    • Tech Spotlight
    • STEM Academy
    • Webinars, Training and Events
    • Learning Groups
  • Technologies
    Technologies
    • 3D Printing
    • FPGA
    • Industrial Automation
    • Internet of Things
    • Power & Energy
    • Sensors
    • Technology Groups
  • Challenges & Projects
    Challenges & Projects
    • Design Challenges
    • element14 presents Projects
    • Project14
    • Arduino Projects
    • Raspberry Pi Projects
    • Project Groups
  • Products
    Products
    • Arduino
    • Avnet & Tria Boards Community
    • Dev Tools
    • Manufacturers
    • Multicomp Pro
    • Product Groups
    • Raspberry Pi
    • RoadTests & Reviews
  • About Us
  • Store
    Store
    • Visit Your Store
    • Choose another store...
      • Europe
      •  Austria (German)
      •  Belgium (Dutch, French)
      •  Bulgaria (Bulgarian)
      •  Czech Republic (Czech)
      •  Denmark (Danish)
      •  Estonia (Estonian)
      •  Finland (Finnish)
      •  France (French)
      •  Germany (German)
      •  Hungary (Hungarian)
      •  Ireland
      •  Israel
      •  Italy (Italian)
      •  Latvia (Latvian)
      •  
      •  Lithuania (Lithuanian)
      •  Netherlands (Dutch)
      •  Norway (Norwegian)
      •  Poland (Polish)
      •  Portugal (Portuguese)
      •  Romania (Romanian)
      •  Russia (Russian)
      •  Slovakia (Slovak)
      •  Slovenia (Slovenian)
      •  Spain (Spanish)
      •  Sweden (Swedish)
      •  Switzerland(German, French)
      •  Turkey (Turkish)
      •  United Kingdom
      • Asia Pacific
      •  Australia
      •  China
      •  Hong Kong
      •  India
      • Japan
      •  Korea (Korean)
      •  Malaysia
      •  New Zealand
      •  Philippines
      •  Singapore
      •  Taiwan
      •  Thailand (Thai)
      • Vietnam
      • Americas
      •  Brazil (Portuguese)
      •  Canada
      •  Mexico (Spanish)
      •  United States
      Can't find the country/region you're looking for? Visit our export site or find a local distributor.
  • Translate
  • Profile
  • Settings
Personal Blogs
  • Community Hub
  • More
Personal Blogs
Legacy Personal Blogs WowWee Rovio: Battery Charger Fix
  • Blog
  • Documents
  • Mentions
  • Sub-Groups
  • Tags
  • More
  • Cancel
  • New
  • Share
  • More
  • Cancel
Group Actions
  • Group RSS
  • More
  • Cancel
Engagement
  • Author Author: SGarciaV
  • Date Created: 9 Jun 2013 12:33 AM Date Created
  • Views 1223 views
  • Likes 2 likes
  • Comments 0 comments
  • wowwee_rovio
  • rovio
  • diode
  • fix
  • wowwee
Related
Recommended

WowWee Rovio: Battery Charger Fix

SGarciaV
SGarciaV
9 Jun 2013

WowWee Rovio

Battery Charger Fix

By Salvador Garcia


Introduction


Some WowWee Rovio robots were incorrectly assembled. As a result one of the charger circuit diodes was inserted backwards. This caused the robot to not fully charge the battery. The following is the procedure to follow to correct this assembly error.


Note: Not all Rovios have this issue. The first course of action, if your Rovio is new, is to make use of the warranty. You need to be comfortable disassembling the robot and unsoldering and soldering the diode. Seek help if not.


Procedure


Images
Notes
image

Remove the battery pack from the Rovio. My model had two screw holding the battery compartment lid closed. Remove the screws if present.


Disconnect the battery by pulling the two connectors apart by using gentle but firm force.

imageLocate the six screws indicated in the image at left. Unscrew and remove.
image

Once the Rovio’s cover is removed its innards are exposed. The charger circuit is located to the left of the battery compartment when the Rovio’s two wheels are positioned closest to you.

image
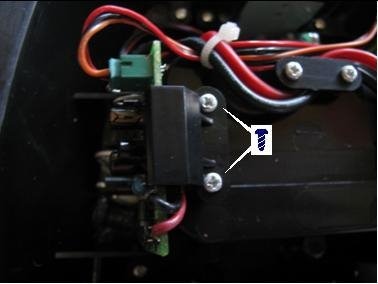
Remove the two screws that hold the circuit board in place and slide out the board towards you.
image

The circuit board’s silkscreen has the schematic symbol of the diode. The physical placement of the diode must coincide with the schematic symbol.


Although blurry, the image at left shows the diode correctly placed. The Rovio that I have did not need this fix done.


If needed, unsolder the diode, reverse its placement and resolder, making sure that the solder joint is firm and not cold.


Reassemble by sliding the charger circuit board, making sure that the board goes into the railings. Replace the two screws. Replace the cover making sure that no wires get pinched. Replace the six screws, making sure that they are not screwed in too tight. Finally reinstall the batteries. And this exercise is complete.


For those that would rather have a document I've provided a PDF version that can be downloaded. The link should be just below.


Attachments:
imageRovioDiodeFix.pdf
  • Sign in to reply
element14 Community

element14 is the first online community specifically for engineers. Connect with your peers and get expert answers to your questions.

  • Members
  • Learn
  • Technologies
  • Challenges & Projects
  • Products
  • Store
  • About Us
  • Feedback & Support
  • FAQs
  • Terms of Use
  • Privacy Policy
  • Legal and Copyright Notices
  • Sitemap
  • Cookies

An Avnet Company © 2025 Premier Farnell Limited. All Rights Reserved.

Premier Farnell Ltd, registered in England and Wales (no 00876412), registered office: Farnell House, Forge Lane, Leeds LS12 2NE.

ICP 备案号 10220084.

Follow element14

  • X
  • Facebook
  • linkedin
  • YouTube