


EDITS: 6/6/19 Updated navigation links.
11/6/19 Added link for part 8; fixed broken links.
14/6/19 Updated navigation links.
9/7/19 Updated navigation links.
17/7/19 Updated navigation links.
11/8/19 Updated navigation links.
22/11/19 Updated navigation links and added final design and build files
Attachment YAPS V1.2.zip contains final design/build files for this project. Others that remain in the parts are 'for the record' and out-of-date.
I’ve been working on a design for a bench power supply over the last few months; it seems like a popular thing to do hence its name - Yet Another Power Supply.
For the record, I first picked up a soldering iron about 7 months ago and at that time I hadn’t even heard of an Op Amp! Many of the questions I’ve asked on the site since March have been geared around this project - when I’ve been unable to work out an answer myself, or needed some clarification - as well as trying out techniques to make sure I could actually build it, e.g. my attempts at SMD soldering. Everyone has been really helpful, and I don’t think I could have made it this far without that help, so I thought you might like to see what it was all about.
I spent quite some time looking for a design to work on. I don’t have the knowledge, yet, to design a supply wholly from scratch so I need to build on the shoulders of others. What can I say? The vast majority of power supply projects seem to progress to abandonment half way through or degenerate into a 300 post forum entry with posters suggesting a resistor change here, a capacitor change there, a different op amp etc. Even the original poster ends up confused and I just completely lose the plot. Very frustrating, but I guess life intervenes and more important things crop up.
What I did find was an interesting solution in a paper from Analog Devices by Keith Szolusha. This describes a bench power supply using Linear Technology’s demonstration circuit. It was built, is sold as a technology demonstrator (so works), is low in part count and has a schematic that I could analyse. I also found a design and build, based on this, on Instructables by a chap called Andrei.
YAPS takes the latter as a major part of it so I have to give a lot of credit to Andrei; Keith’s uses parts that are just too hard for me to solder without a rework station, something I don’t want to invest in just yet - it also seemed too complete so would just be a straight copy and build! There are a number of issues with the original instructables design which I’ve had to identify and fix, primarily from reading data sheets and applying information from those, but also from a LTSpice simulation I created for it. In addition, I extended it with a transformer based power stage, rather than a bought switching supply, and added a different front end for it with more sensor points. This makes it more interesting for me personally - I get to add my own elements to the design - but it really feels like this can be V1: once I build it and start testing/analysing/using it I’m sure that I can move to V2 with improvements e.g. a wholly Arduino controlled interface, fixed regulated outputs such as 5V or 6V.
This is a 0-15v, 0-3A supply. It’s probably worth saying that I could definitely buy a supply for a lot less than this is being built for, but that’s not why I’m doing it. I’m not sure when I will actually get to use 3A either.
This is how I thought about breaking down the postings:
Part 1 - Introduction (this post)
Part 4 - Design - Calculations
Part 7 - Prototyping of Arduino
Part 8 - Prototyping the power stage
Part 9 - Creating the Arduino Interface
Part 10 - The Control Stage and Functional Testing
Part 12 - Design revisited: reworking the layout and PCB
Part 12 Reprise - Design revisited
Part 13 - Encasement and Wrap up
Parts 2 - 6 will appear quickly as I’m already that far forward. The rest will appear as I progress. Having said that, I daresay things will change as I go along and I’m hoping that irony doesn’t rear its head and this becomes another abandoned project! Feel free to chip in - I’m learning as I go so feedback will be well received. I really hope that I’m not going to hear “It’s never gonna work” though - I feel like I’m hanging myself out there with this!!
A slight diversion
This is a new hobby for me really, driven partly by my involvement with the Turing / Welchman Bombe at the National Museum of Computing. In essence, the Bombe is ‘The World’s Most Fascinating and Interesting Circuit Tester’ so is electrical rather than electronic, but there’s no harm in taking a wider view of things!
This isn’t my first power supply: for my very first project I designed and created a simple switching supply based around a LM7805 and LM7806 which will give a regulated 5V, 6V and 9V or 12V, depending upon the actual input supply. I was quite pleased with it to be honest as it was a wholly-from-scratch design and build of my own and it works!
Here's the circuit (I just realised that Vin should really read Vout to avoid confusion - it really means 'the same voltage as Vin: 9V or 12V'):
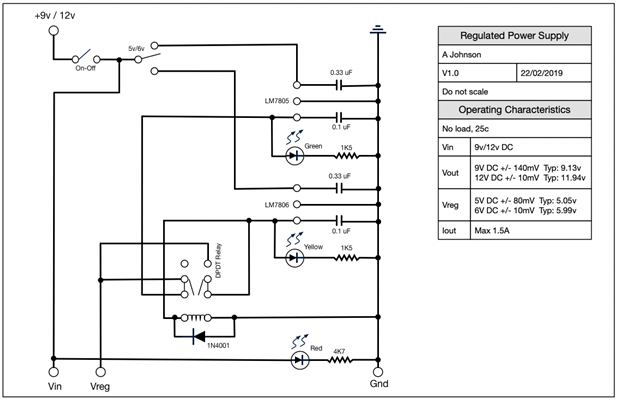
Stick a 9V or 12V wall wart into it and you can switch between a regulated 5V or regulated 6V output. You can also access the 9V or 12V as well. I was using all these voltages at different times when I was messing around with stuff early on.
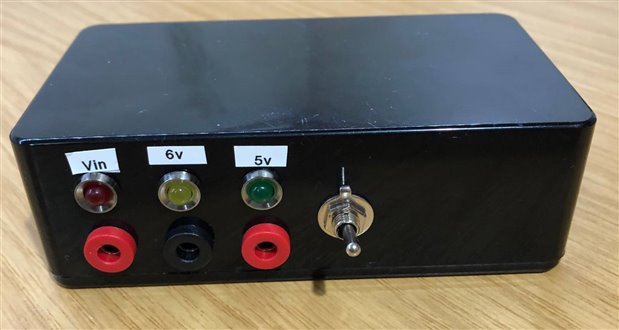
It fits in a small box! Around the back are banana plug inputs for the wall wart supply as well as an on/off switch. The switch at the front will flip between the 6V and 5V output. Looking at it now, it may be a bit confusing: the black connector is GND; the red connector on right is the regulated output; the red connector on the left is the voltage of whatever is plugged in at the back. I've attached a PDF of the whole design I produced - using Omnigraffle but that's what I had at the time.
Next: Part Two - Design - Schematic
| SimpleSupply.pdf | |

Top Comments
-

fmilburn
-
Cancel
-
Vote Up
+2
Vote Down
-
-
Sign in to reply
-
More
-
Cancel
-

Andrew J
in reply to fmilburn
-
Cancel
-
Vote Up
+1
Vote Down
-
-
Sign in to reply
-
More
-
Cancel
Comment-

Andrew J
in reply to fmilburn
-
Cancel
-
Vote Up
+1
Vote Down
-
-
Sign in to reply
-
More
-
Cancel
Children