


So Why Networking and new Pi 2?
Introduction
I have been seeing many discussions lately involving the Raspberry Pi 2 from new users. Many wish to use the new credit card sized computer with a lot of power, but cannot dedicate the resources like HDMI monitor, keyboard, mouse, etc. So what to do? If you learn a bit about networking, I can show you a way to use this small sized computer without the expense of these and keep the wife and kids happy because you do not steal the TV! So lets get into a little fun learning and see the results.
Networking
So you may have heard the word or something like TCP/IP and thought this was too complicated or feared a lot of math. Let me say I will not use anything more than arithmetic! Stay with me and I will show how to see this picture:
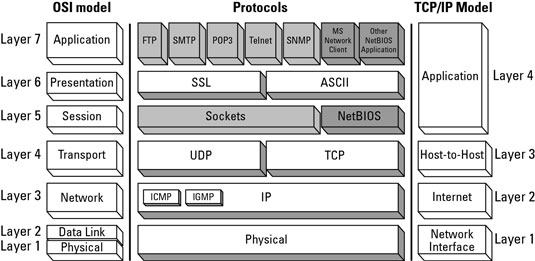
The picture on the right says a thousand words! But you really need to understand just a few. The bottom layer is the actual physical connections like RJ45 plug used with Cat5 cabling. We all have used this when we hook up the laptop to a physical device called a router. If we use the wireless, it is replaced with an adapter like USB or on the motherboard with an internal antenna. But whatever it is it is "PHYSICAL". The next layer up is Data Link using a MAC address normally burned into hardware. Think of this as a device address since you may have both wireless and wired connection on the same machine.
Ok, moving up to layer 4 we see the transport. This layer handles "HOWTO" communicate between devices. There are two choices: 1) UDP where I send a message and expect no reply. Think of email. We send an email and do not care when it arrives. But if we care, we use 2) TCP. TCP is like a phone call. I will only talk when I get someone on the other end. How do I know? They say "Hello"! Once I know who they are, we take turns back and forth talking waiting till the other pauses before talking. This is TCP and sometimes called Half Duplex! BTW, this is how we talk with the router. We use another address called IP at this level. But I need another part called the mask also. So communication is from computer to router. Then the router relays the message to other routers. The last part is a router to a computer known as the server. Google has many servers and so do other companies.
The next two layers only happen on the computers and not in the routers. They do various things like encrypt messages using SSL. If you see an url with HTTPS, that is using SSL. You would not want to send bank information if not HTTPS. Some browsers also add a symbol in the corner looking like a lock closed! Good to check your browser.Sockets is another part referring to the application handling of the commands to "send" or "receive" data. The server uses a special command called "listen" to see if anyone wants some help or service. On the very top are the protocols. These are FTP (file transfers), SMTP (sending email), POP3, (receiving email), Telnet (application terminal like SSH), and SNMP (signalling information for errors over the network).
For more details see OSI networking model, TCP/IP | What’s The Difference Between… content from Electronic Design
Raspberry Pi 2
So why do I care? When I know the networking above, I can connect my Raspberry Pi directly to my laptop without a router like magic. After following an install of Rasbian (there are many places to show how, see Downloads | Raspberry Pi for latest downloads), we are ready to setup the Raspberry Pi 2. First using nano on the Pi, we need to change this file (be careful not to delete):
 sudo nano /etc/network/interfaces
#iface eth0 inet dhcp
iface eth0 inet static
address 192.168.5.90
netmask 255.255.255.0
# The above sets a static IP address and mask to allow direct connection to Windows 7 laptop
 Note the address uses a 5 in the third position after the second dot. You can use anything from 2 to 255 as long as it it NOT used by your router! because 0 and 1 are often used...
sudo apt-get update
sudo apt-get upgrade
sudo apt-get install tightvncserver
Note you may need to reply "y" for the above to continue.
Next, with both machines off, cable the ethernet on the Raspberry Pi 2 with a cat5 cable to the ethernet on the laptop/desktop Windows 7 machine. Turn on the Raspberry Pi 2 and the laptop/desktop Windows machines. after a few minutes time, both should be up. If you can tell me below which came up first.  Open Network and Sharing Center on Windows 7. You should see on the second line (if you using wireless!) an unidentified network. To the right, click on Local Network Connection after the Connections:

At the bottom left, click on the Properties button. In new popup, looking down the list of protocols (remember those?) we want to select (not open) Internet Protocol Version 4 (not 6 since that is newer!). The Properties button becomes available on the right below list. Please click it now. In this box (love how Windows uses many boxes?), change from "Obtain an IP address automatically" to "Use the following IP address". See below what to enter:
192 . 168 . 5 . 89
255 . 255 . 255 . 0
  .    .    .
First is IP address, second is mask, and third is gateway which is left blank since we do not use a router.
Lastly we need software to talk to Raspberry Pi 2 from Windows 7. I would suggest PUTTY, but any would do. See Download PuTTY - a free SSH and telnet client for Windows.
Now we can configure PUTTY with these parms:
Host: pi@192.168.5.89 Port: 22 SSH Saved Sessions: My RaspPi 2
Click button "Save" these parm as your favorite name(My RaspPi 2). Click "Open" button near right bottom to open a terminal window. You will enter the default password of "raspberry" . Now you have a one line terminal interface. But wait, you want a full screen like on a monitor!
Window 7
We are almost there so stay with me. In order to run full screen, we need a VNC server and a VNC client. The server code was downloaded before when we installed tightvnc server code. It is the most widely used because it is small foot print in memory and fairly responsive. To start, we will need our SSH window into Raspberry Pi 2. Look above if you need to re open. Enter the following:
 tightvncserve :1
You will be prompted for a password. This is not the Raspberry Pi 2 password, but one you will use below for client connection. It is 8 characters in length.
Repeat exactly what you typed in previous set to verify.
Another password for view only. I hit enter to skip!
 You will get a few lines showing you are done. Save these by selecting and copy. Later paste into a safe place in case you need them.
This command will start a background program to "listen" for any attempt to run VNC service on port 5009. If this sounds strange please re-read the networking above. Next step we can download on Windows 7 a program called UltraVNC. You can find a download at UltraVNC | SourceForge.net. Read very carefully before downloading so you understand the process. When we open the UltraVNC Viewer on Windows 7, we get a small window:
VNC Server: 192.168.5.90:1
Click Connect button on right side
A window prompting you for password:
 This is the password you set for TIGHTVNC SERVER and not the Raspberry Pi 2 password!

See new window open looking like this:

Top Comments