element14 Community
element14 Community
    Register Log In
  • Site
  • Search
  • Log In Register
  • Community Hub
    Community Hub
    • What's New on element14
    • Feedback and Support
    • Benefits of Membership
    • Personal Blogs
    • Members Area
    • Achievement Levels
  • Learn
    Learn
    • Ask an Expert
    • eBooks
    • element14 presents
    • Learning Center
    • Tech Spotlight
    • STEM Academy
    • Webinars, Training and Events
    • Learning Groups
  • Technologies
    Technologies
    • 3D Printing
    • FPGA
    • Industrial Automation
    • Internet of Things
    • Power & Energy
    • Sensors
    • Technology Groups
  • Challenges & Projects
    Challenges & Projects
    • Design Challenges
    • element14 presents Projects
    • Project14
    • Arduino Projects
    • Raspberry Pi Projects
    • Project Groups
  • Products
    Products
    • Arduino
    • Avnet Boards Community
    • Dev Tools
    • Manufacturers
    • Multicomp Pro
    • Product Groups
    • Raspberry Pi
    • RoadTests & Reviews
  • Store
    Store
    • Visit Your Store
    • Choose another store...
      • Europe
      •  Austria (German)
      •  Belgium (Dutch, French)
      •  Bulgaria (Bulgarian)
      •  Czech Republic (Czech)
      •  Denmark (Danish)
      •  Estonia (Estonian)
      •  Finland (Finnish)
      •  France (French)
      •  Germany (German)
      •  Hungary (Hungarian)
      •  Ireland
      •  Israel
      •  Italy (Italian)
      •  Latvia (Latvian)
      •  
      •  Lithuania (Lithuanian)
      •  Netherlands (Dutch)
      •  Norway (Norwegian)
      •  Poland (Polish)
      •  Portugal (Portuguese)
      •  Romania (Romanian)
      •  Russia (Russian)
      •  Slovakia (Slovak)
      •  Slovenia (Slovenian)
      •  Spain (Spanish)
      •  Sweden (Swedish)
      •  Switzerland(German, French)
      •  Turkey (Turkish)
      •  United Kingdom
      • Asia Pacific
      •  Australia
      •  China
      •  Hong Kong
      •  India
      •  Korea (Korean)
      •  Malaysia
      •  New Zealand
      •  Philippines
      •  Singapore
      •  Taiwan
      •  Thailand (Thai)
      • Americas
      •  Brazil (Portuguese)
      •  Canada
      •  Mexico (Spanish)
      •  United States
      Can't find the country/region you're looking for? Visit our export site or find a local distributor.
  • Translate
  • Profile
  • Settings
Personal Blogs
  • Community Hub
  • More
Personal Blogs
Frank Milburn's Blog 3D Printed Right Angle LED Indicators
  • Blog
  • Documents
  • Mentions
  • Sub-Groups
  • Tags
  • More
  • Cancel
  • New
  • Share
  • More
  • Cancel
Group Actions
  • Group RSS
  • More
  • Cancel
Engagement
  • Author Author: fmilburn
  • Date Created: 8 Jun 2019 4:27 AM Date Created
  • Views 2444 views
  • Likes 9 likes
  • Comments 19 comments
  • 3d printer
  • right-angle-led-socket
  • led
  • right angle led
Related
Recommended

3D Printed Right Angle LED Indicators

fmilburn
fmilburn
8 Jun 2019

I have used right angle LED indicators on a number of projects in the past and have a small collection of them.

image

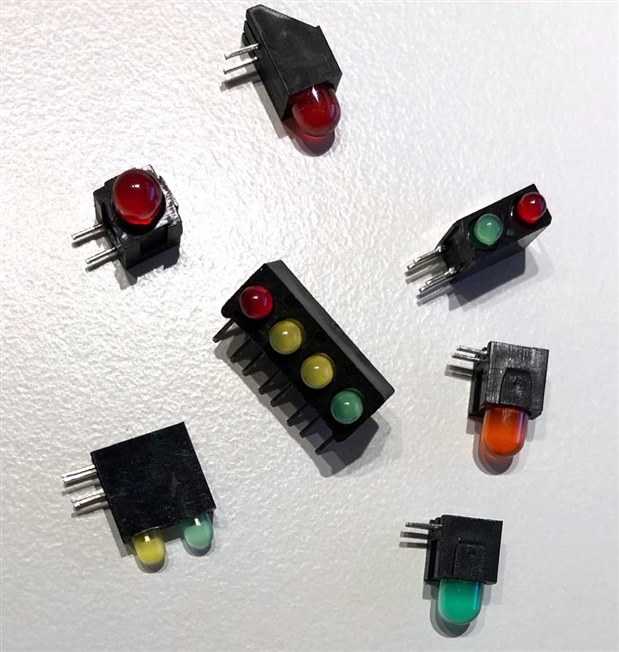
The problem with such things, even were I to have a larger collection, is I never seem to have the right one when I need it.  In the past I have had to make do with the wrong color, wait on an order, or even just bend LEDs over without a fixture. But now I have a 3D printer that needs warming up so I decided to see if I could print a fixture.  The specifications I set for the trial are:


  • 5mm LED
  • 2.54 mm (0.1") lead spacing
  • Sized to fit together in a row if desired on regular 0.1" perfboard or breadboard


This would seem easy enough but actually it is on the edge of what my little printer can do.  I had to tweak hole size and such for a while to finally get something that works.  Here is what the model looks like:

image

And here is what it looks like after slicing:

image

It is simple to assemble...  Insert the LED and bend the leads :-)

image

And here are several in a breadboard lined up and working:

image

It would be easy to print a 2, 3, or 4 gang horizontal fixture or even stack them.  If needed, the height, LED size, etc. can be modified.  They don't look as nice as the commercial ones of course and are a bit clunkier.  They are quick and easy however and only take about 3 minutes to print.  So next time I only need a couple and don't have a full order ready, no problem.

  • Sign in to reply

Top Comments

  • gam3t3ch
    gam3t3ch over 5 years ago +7
    What size nozzle are you using? one thing I noticed is the layer height there you might be able to lower it to get some better results as well. did you put the design file or stl on thingiverse or anything…
  • shabaz
    shabaz over 5 years ago +6
    They look great! It's an excellent use-case for a 3D printer.. making mounts for LEDs, switches, PCBs, etc.
  • shabaz
    shabaz over 5 years ago in reply to genebren +4
    Hi Gene, Is it possible to have transparent/translucent filament plastic? If so, light pipes could be possible. I feel it could be a great use-case if it works.
  • luislabmo
    luislabmo over 5 years ago in reply to fmilburn

    Rotate part - if anything it adheres too strongly and the part is a pain to remove.  The reason I oriented it that way is to avoid supports in the large opening that would need removal.  Hole size is acceptable quality printed this way.  Am I missing something though?

    If the first layers look wider and you are having issues removing the part, chances are the first layer is too tight (too close to the print bed) and/or also too much extra material on the first layers, Ideally those first layers should end up of same size as the rest of the body. I had the same issue on my Lulzbot Mini with factory settings and had to dial down those settings. Supports are usually a must on geometries that tend to have more than 45 degrees, I think holes of that size won't need supports when printed vertically image, I may suggest try one on a different orientation and see how it goes.


    Luis

    • Cancel
    • Vote Up +4 Vote Down
    • Sign in to reply
    • More
    • Cancel
  • fmilburn
    fmilburn over 5 years ago in reply to DAB

    Thanks!

    • Cancel
    • Vote Up +1 Vote Down
    • Sign in to reply
    • More
    • Cancel
  • DAB
    DAB over 5 years ago

    I like them, they may not be as pretty, but you can customize their look based upon your needs.


    DAB

    • Cancel
    • Vote Up +2 Vote Down
    • Sign in to reply
    • More
    • Cancel
  • fmilburn
    fmilburn over 5 years ago in reply to luislabmo

    Hi Luis,


    Your technique with the LED caps looks great!


    Thanks for the 3D print suggestions.  Much appreciated as I am early on the learning curve.  You are correct, I meant mm and not inches :-). 

    • First couple of layers - Good observation.  I will have a look at the slicer setting as I haven't explored that.
    • Rotate part - if anything it adheres too strongly and the part is a pain to remove.  The reason I oriented it that way is to avoid supports in the large opening that would need removal.  Hole size is acceptable quality printed this way.  Am I missing something though?
    • Cancel
    • Vote Up +2 Vote Down
    • Sign in to reply
    • More
    • Cancel
  • luislabmo
    luislabmo over 5 years ago in reply to fmilburn

    Hi Frank,


    In the past I used a 1/16" PVC sheet, drilled some holes and used some LED caps but I think yours is a nice work and idea!, it takes less space. I will try it myself.

    image


    I think you probably meant 0.2mm layer height. In my experience 0.2mm height provides good quality. I can't see the entire geometry of the part but given that it has very small legs it probably won't get better than that unless you take the painful process of calibrating your printing for very precise prints. From what I can see, I suggest few things to improve it a little bit:

    • 0.2mm or 0.1mm IMO is good and will provide good quality
    • I see the bottom layers (like the first 3 or 4) are wider compared to the rest of the part. That usually happens when your first layer is too close to the bed and also in the slicer there is a setting you can dial down (it adds some extra material to the first layers)
    • Rotate it 90 degrees: I think if you rotate before printing. There are some faces that can add better adhesion (more surface) and also may help improving the quality of the small details (see the red arrows)
      image
    • For the dimensions of the part, use "the magic number" multiples. In this case for a 0.4mm nozzle, calculate widths as a factor of this number.


    Luis

    • Cancel
    • Vote Up +4 Vote Down
    • Sign in to reply
    • More
    • Cancel
>
element14 Community

element14 is the first online community specifically for engineers. Connect with your peers and get expert answers to your questions.

  • Members
  • Learn
  • Technologies
  • Challenges & Projects
  • Products
  • Store
  • About Us
  • Feedback & Support
  • FAQs
  • Terms of Use
  • Privacy Policy
  • Legal and Copyright Notices
  • Sitemap
  • Cookies

An Avnet Company © 2025 Premier Farnell Limited. All Rights Reserved.

Premier Farnell Ltd, registered in England and Wales (no 00876412), registered office: Farnell House, Forge Lane, Leeds LS12 2NE.

ICP 备案号 10220084.

Follow element14

  • X
  • Facebook
  • linkedin
  • YouTube