element14 Community
element14 Community
    Register Log In
  • Site
  • Search
  • Log In Register
  • Community Hub
    Community Hub
    • What's New on element14
    • Feedback and Support
    • Benefits of Membership
    • Personal Blogs
    • Members Area
    • Achievement Levels
  • Learn
    Learn
    • Ask an Expert
    • eBooks
    • element14 presents
    • Learning Center
    • Tech Spotlight
    • STEM Academy
    • Webinars, Training and Events
    • Learning Groups
  • Technologies
    Technologies
    • 3D Printing
    • FPGA
    • Industrial Automation
    • Internet of Things
    • Power & Energy
    • Sensors
    • Technology Groups
  • Challenges & Projects
    Challenges & Projects
    • Design Challenges
    • element14 presents Projects
    • Project14
    • Arduino Projects
    • Raspberry Pi Projects
    • Project Groups
  • Products
    Products
    • Arduino
    • Avnet Boards Community
    • Dev Tools
    • Manufacturers
    • Multicomp Pro
    • Product Groups
    • Raspberry Pi
    • RoadTests & Reviews
  • Store
    Store
    • Visit Your Store
    • Choose another store...
      • Europe
      •  Austria (German)
      •  Belgium (Dutch, French)
      •  Bulgaria (Bulgarian)
      •  Czech Republic (Czech)
      •  Denmark (Danish)
      •  Estonia (Estonian)
      •  Finland (Finnish)
      •  France (French)
      •  Germany (German)
      •  Hungary (Hungarian)
      •  Ireland
      •  Israel
      •  Italy (Italian)
      •  Latvia (Latvian)
      •  
      •  Lithuania (Lithuanian)
      •  Netherlands (Dutch)
      •  Norway (Norwegian)
      •  Poland (Polish)
      •  Portugal (Portuguese)
      •  Romania (Romanian)
      •  Russia (Russian)
      •  Slovakia (Slovak)
      •  Slovenia (Slovenian)
      •  Spain (Spanish)
      •  Sweden (Swedish)
      •  Switzerland(German, French)
      •  Turkey (Turkish)
      •  United Kingdom
      • Asia Pacific
      •  Australia
      •  China
      •  Hong Kong
      •  India
      •  Korea (Korean)
      •  Malaysia
      •  New Zealand
      •  Philippines
      •  Singapore
      •  Taiwan
      •  Thailand (Thai)
      • Americas
      •  Brazil (Portuguese)
      •  Canada
      •  Mexico (Spanish)
      •  United States
      Can't find the country/region you're looking for? Visit our export site or find a local distributor.
  • Translate
  • Profile
  • Settings
Personal Blogs
  • Community Hub
  • More
Personal Blogs
Gene Breniman's Blog Outdoor Lighting - Light Up My Path
  • Blog
  • Documents
  • Mentions
  • Sub-Groups
  • Tags
  • More
  • Cancel
  • New
  • Share
  • More
  • Cancel
Group Actions
  • Group RSS
  • More
  • Cancel
Engagement
  • Author Author: genebren
  • Date Created: 21 May 2023 4:14 PM Date Created
  • Views 2430 views
  • Likes 9 likes
  • Comments 22 comments
  • 3D Printing
  • subtractive machining
  • led lighting
Related
Recommended

Outdoor Lighting - Light Up My Path

genebren
genebren
21 May 2023

In a prior blog ( Off the Shelf - Outdoor Lighting System Revamp  ), I added outdoor lighting to my deck.  Now I am extending the lighting from the deck, through the newly constructed path and garden (automatically controlled with the deck lighting). In late March, we started a project to remove another 200 sq. ft. of lawn in exchange for $200.00 worth of low-water native plants.  The goal of the project was to construct a pathway connecting the deck to the garden (and shop), add more native plants to our yard and to build a recirculating water feature.  The pathway was just screaming for some artsy LED lighting, so I jumped on that.

Here are some images of the path and garden under construction:

imageimage

imageimage

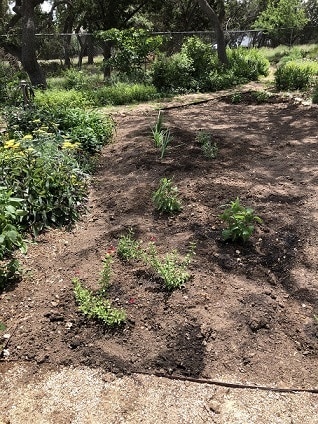
While there are still more plants that will need to be added to the garden, this marked the end of lawn removal project (for the rebate from the water company) and the start of the further improvement phase of the project.

My lighting plan is to add six path lights (three on each side of the path), staggered along the pathway.  My wife is pitching in by adding her artistic touch of the glass blocks that will be used as the path lights.  I am redesigning some of my prior LED lamps (like the ones that added to the deck in the above mentioned project).  For this design, I wanted the LED light engine to do two things, one apply bright illumination on the edges of the glass block to light up the pathway, while secondly, applying a warmer, lower intensity lighting to the inside area of the block to allow the design to be seen at night.  To achieve this effect, I used 6 LEDs, with 4 (cool white) LEDs mounted on one side of the PCB (to be pointed out) and 2 (warm white) LEDs mounted on the other side the PCB (to be pointed in).

Here are some of the details on the LED light engines:

imageimage

The LEDs are individually constant current controlled, set for ~20 mA.  With 12 LEDs per light fixture, the current draw is ~240 mA per fixture.

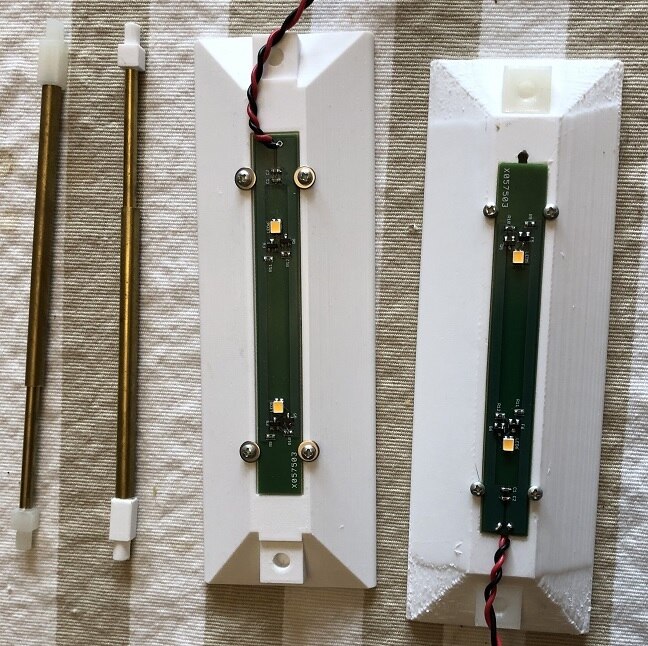
With a desire to control the light paths of the LEDs inside the blocks, I designed a reflector/board holder to mount the LEDs PCB.  Here are some images of this design:

image

Telescoping rod parts:

image

Actual pieces, telescoping holding rods and LED holder/reflectors (Some of my finishes were less than spectacular due to the humidity, i.e. not fully dried filaments) .

imageimage

With the pieces assembled, the next step was to load up a glass block with the pieces.  This proved to be quite difficult due to the limited opening of the glass block (~1.25" x 4.5").

image

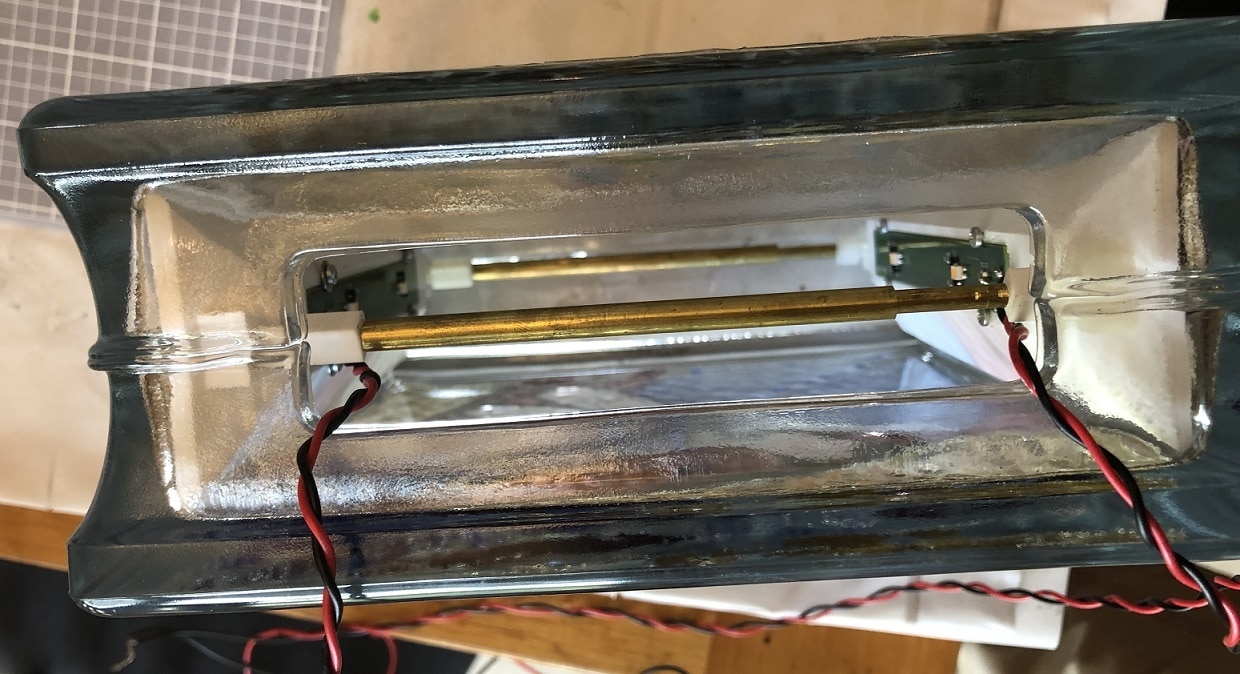
The two spring loaded, telescoping rods (brass tubing, with 3D printed ends and internal button inside the smaller diameter tube) are visible at the top and bottom of the glass block.  The rods hold the reflectors snug up against the inner walls of the glass block.

Now with everything assembled, it was time to see how the lighting effects were on the completed (mosaics applied to the front and back of the glass block).

imageimageimage

The lighting effects turned out really great.  The images are visible and the edges are well illuminated.  There is a bit of 'bright spotting' in the image, which might be improved with a diffuser, but I will wait until I get these installed to work on that.  Now we have the first path marker ready, only 5 more to build.

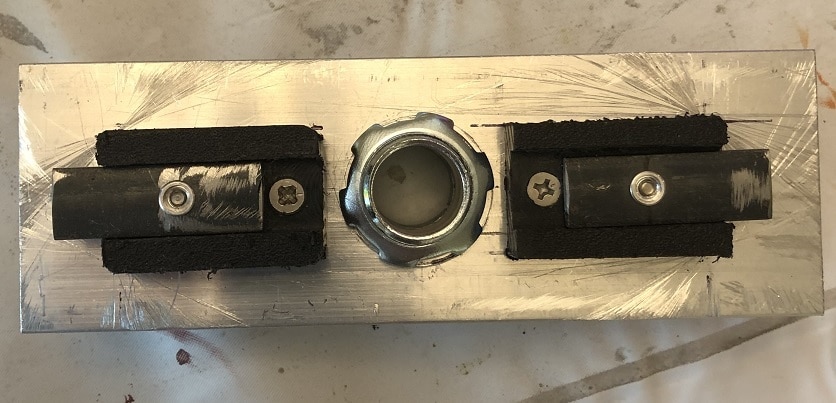
Mounting the glass blocks, was a tricky issue, but I think I have come up with an equally tricky solution.  I want to elevate these blocks about a foot above then pathway, so I plan to use 1/2" EMT conduit as a post.  I have designed a cover for the opening in the glass block (now at the bottom of the block), to cover the opening and provide a surface for a weather proofed closing and to mount the 1/2" EMT compression connector.  I cut a 2" x 6" x 1/4" aluminum cover for the bottom.  I then attached two blocks of HDPE (High Density Polyethylene) blocks to the cover that produced a snug fit to the opening.  The HDPE was machine with a slot for movable tabs made out of 1/2" x 1/4" steel bar.  The steel bar is retracted to insert the cover into the glass block and the extended to capture the edge of the glass block.  The screw on the tab (secured by a 6-32 rivnut) is then tighten to secure the glass block to the base.  Weather stripping will be applied to the cover and trapped between the cover and the block as the screws are tighten.

Here are some images of the cover assembly:

imageimageimageimage

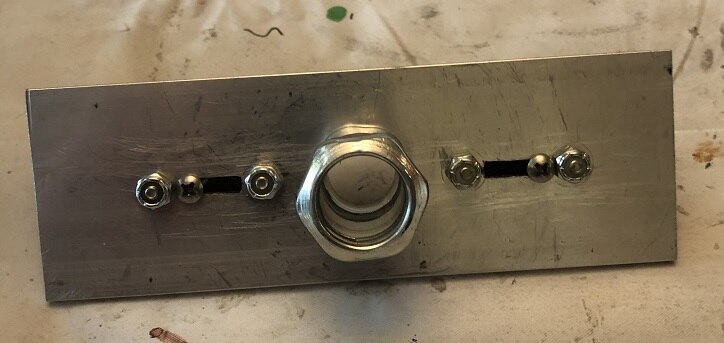
Again, all I need to do now is to repeat the process five more times and install everything.  The 1/2" EMT conduit was be cast into concrete blocks, which will buried along side the pathway, with the lights staggered side-to-side.

I will follow up with another post as I get the pathway completed.

Thanks for reading along on my journey to light up my yard.

  • Sign in to reply
  • genebren
    genebren over 2 years ago in reply to beacon_dave

    Thanks, this is an interesting idea.  In lighting for my yard, I have always used the "less is more" approach, where I try to use as little light as possible to add to the yard without distracting from the night sky. Currently I am using less than 5 Watts of LED lighting to accent the deck.  I see the path lighting to also be around the 5 Watt mark. Once I get a few sample points (try out these pathway lights) in place (temporary installation), I might need to add or subtract as necessary.

    If it comes to adding, I think that there have some good ideas that I might be able to throw into the mix.

    • Cancel
    • Vote Up 0 Vote Down
    • Sign in to reply
    • More
    • Cancel
  • beacon_dave
    beacon_dave over 2 years ago in reply to genebren

    Another possibility would be to consider the path edging. Is there any potential for a lighting project there ?

    If your are putting in containment in for the mosaics then it could be also be used for other creative stuff as well.

    I was looking at some consumer path lights in the store this afternoon but they all looked rather cheep and tacky. I however have seen some garden lights fitted into faux stones to allow them to blend in with rockeries, stone path edging etc. I guess you could 3D print a mould and then cast in decorative concrete to suit the path and create a more weather-resistant fixture. Could also cast in decorative concrete and then fill with a resin window.

    • Cancel
    • Vote Up 0 Vote Down
    • Sign in to reply
    • More
    • Cancel
  • beacon_dave
    beacon_dave over 2 years ago in reply to genebren

    If you want passive then a filter/gobo holder would be another way of doing it. It would allow more in the way of creative gobo mask effects but you would lose the ability to 'dial-in the mood' from the house.

    • Cancel
    • Vote Up 0 Vote Down
    • Sign in to reply
    • More
    • Cancel
  • genebren
    genebren over 2 years ago in reply to beacon_dave

    That is a very interesting idea.  I will have to think about that a bit.   Right now, the system is very passive.  The main controller, located in the house, determines when to turn on and off the lights.  To turn on, it uses a MOSFET to apply power to the lighting modules, which are just constant current regulated LEDs.  Adding special effects would require some kind of communications and/or memory to be able have configurable color schemes.  Okay, the wheels are turning......

    • Cancel
    • Vote Up 0 Vote Down
    • Sign in to reply
    • More
    • Cancel
  • beacon_dave
    beacon_dave over 2 years ago in reply to genebren

    I think you have pretty much 'nailed it' there with the warm lighting for the mosaics.

    What might be fun to try with RGB LEDs would be to add lighting at the base of the post that fans out and illuminates more of the  path itself. You could then have everything from 'the yellow brick road' to 'somewhere over the rainbow'.

    • Cancel
    • Vote Up 0 Vote Down
    • Sign in to reply
    • More
    • Cancel
>
element14 Community

element14 is the first online community specifically for engineers. Connect with your peers and get expert answers to your questions.

  • Members
  • Learn
  • Technologies
  • Challenges & Projects
  • Products
  • Store
  • About Us
  • Feedback & Support
  • FAQs
  • Terms of Use
  • Privacy Policy
  • Legal and Copyright Notices
  • Sitemap
  • Cookies

An Avnet Company © 2025 Premier Farnell Limited. All Rights Reserved.

Premier Farnell Ltd, registered in England and Wales (no 00876412), registered office: Farnell House, Forge Lane, Leeds LS12 2NE.

ICP 备案号 10220084.

Follow element14

  • X
  • Facebook
  • linkedin
  • YouTube